
Introduction
The internet has completely changed everything.
Today, it’s possible to build a business that gives you the flexibility to build a lifestyle you love — whether that means spending more time with your family, taking an extra vacation, or even just having a little extra “cushion” in the bank so you know that you’re safe.
If you’re reading this, you know you’re destined for more than just going to work from 9 to 5 for the rest of your life and feeling like you’re not being paid what you’re worth.
It used to be the case that the only way to more money and freedom was through expensive college degrees, getting some Wall Street job, or taking a huge loan to start a high-risk business.
But now, it’s possible to build a life you love by sitting at home on your couch.
Setting up an ecommerce store is one of the simplest, most “tried and true” routes to financial freedom. It’s not easy, but with the right approach, you could build a side revenue stream that gives you the freedom to design the life you want.
In this eBook, we’ll show you how to set up a profitable ecommerce store within one week. We’ll cover topics like how to come up with good product ideas, all the logistics of setting up an ecommerce store, the technical side, and even how to launch your first ad campaign.
Let’s dig in.
Generating Product Ideas
Picking the best products to sell is the next big challenge after deciding to start your eCommerce venture.
There are millions of products to choose from, and all of them have had success.
This is why picking products can be extremely difficult which can lead to products being picked on a whim, with little consideration which ends in poor performance.
In this chapter, our goal is to provide a roadmap for brainstorming product ideas, so we can later filter out the ones that aren’t worth testing.
1. Brainstorm
You never start with a blank page. Your head is already full of good ideas: your hobbies, products you like, trends, exciting products that you have heard of.
Write everything down that comes to mind. It doesn’t matter if you think the product will be a bestseller or not. Trust me — write it down.
2. Browse Other Shops
When you browse other stores, look at their offerings, best-selling lists, and promoted products. Many stores have a tremendous amount of data and employ entire departments to organize their sales and pick their products. Use that information to your benefit.
Browse a lot.
Browse frequently.
Here is a link list that is worth spending time researching:
▸ AliExpress Most Popular Products (Weekly)
▸ LightInTheBox Top Sellers List
3. Browse Social Shopping Sites
There are over 100 million products on Polyvore and 30 million on Wanelo. Add in Fancy and Pinterest, and you now have an infinite number of products from around the world that can be sorted by popularity, trends, categories, and more. People often overlook these sites in their research, but they are very valuable for deciding what things to sell.
Setup an account at each one, and subscribe to different categories and lists.
Follow what people like the most and add it to your list.
4. Ask Friends
The next time you have coffee with friends, ask their thoughts on trends.
Don’t limit yourself — talk with friends of all ages and backgrounds to get a wide variety of ideas.
5 Look Around
Look around your house, your work, your life. Are there any products you can’t live without? What products would make your life easier? Is there anything that is hard to find in the supermarket or department store? Howard Schultz came up with his coffee shop idea on a trip to Italy and later called it Starbucks. The founder of Inkkas brought his idea from Peru, where he saw great shoes he thought that people in the US would like. Stay
Howard Schultz came up with his coffee shop idea on a trip to Italy and later called it Starbucks. The founder of Inkkas brought his idea from Peru, where he saw great shoes he thought that people in the US would like.
Stay alerted and spot opportunities. You see hundreds of products and ideas each day.
Be observant, carry a notebook, and remember to write everything down.
Chapter’s Action Item
Write Down a List of 50 Product Ideas
Use the tricks mentioned above and spend some time browsing the web and writing down your ideas. Add them to an Excel spreadsheet so it’s easier to evaluate them later.
Remember – don’t get hung up on the details. All ideas will require a test. Your goal is just to come up with as many ideas as possible. In the second chapter, you will narrow down your idea list so it contains only the very best ideas.
Evaluating Product Ideas

As you may have noticed, generating the product ideas is the easy part. What truly matters is knowing which products will sell well, or at least have potential.
In this chapter, we will narrow down our ideas list and decide which products we are going to sell in our eCommerce store.
There are eight different filters. Go through each one and cross out the ideas that fail to meet the criteria.
Filtering Product Ideas
1. Niche Filter
With the rise of dropshipping and the relative ease that an eCommerce store can be created, niche shops have become the trend. It quickly turned from an eCommerce novelty to a proven, successful strategy.
Don’t fight the big stores. Avoid too broad and general categories. The masses are already exposed to thousands of offers daily.
Look to supply niche products that are underserved by larger players. For example, there is no specific interest group for a normal belt, but you can easily tell that cycling gear will resonate well with cycling enthusiasts. Find your niche.
2. Stay Away Categories Filter
It may overlap with the Niche Filter, but it’s essential to narrow down your product selections by excluding the ‘stay away’ categories.
Some product categories have grown significantly over the last decade, so there are already many strong players and smaller shops out there supplying these products.
Just look at the eCommerce growth rates: book sales are flat and the jewelry market is shrinking. 80% of Americans say they’ve bought electronics or apparel online in the past three months, which means they already have their choice of trusted store.
Cross off the following general categories from your idea list: books, jewelry, electronics, and clothing — you will need to be more specific and find a niche.
Please note: I don’t suggest crossing out these categories entirely. You could sell unique women’s fashion clothes, custom hiking/cycling electronics gear, or jewelry hidden in ca/videos/womens-fashion-ecommerce-storendles. I suggest you focus on finding an interesting subcategory that will make your store unique. Don’t fall into the trap of selling in general categories.
3. Price Sweet Spot Filter
We found that the perfect eCommerce product price is $40 to $60 (at a 200% markup).
With a $40 to $60 price range, the profits are relatively good and you can still cover the marketing costs of up to $20 per sale. The conversion rate is usually higher because the purchase requires less consideration on the part of the buyer. There is also less support. You increase the odds of the success of your store in the developing markets. With Chinese dropshipping, you can sell everywhere in the world. Although $30 may not be much to people living in the US, but it could be a lot for someone in South America or Eastern/Central Europe. Look over your list and cross out product ideas that are more than $60.
4. Marketing Channels Filter
You have to think about your marketing strategy before you even launch your store. You may change it, but you must have a plan to begin with.
To put it simply, different marketing channels are great for different products. Once you pick the product, you have to figure out which marketing channel will be best for it.
Advertising an $800 hoverboard on Facebook might not be the best idea, but you might succeed in advertising it on Google Adwords. A hoverboard is not a spontaneous purchase, in most cases, people will Google it to learn more about it and find which stores sell it.
Take a look at the product evaluation/marketing table:

Think about your resources (time, money, knowledge), select one or two marketing channels, and cross out all ideas that don’t suit those channels.
5. Google Trends & Keyword Tools
This is a must if you’re going to use Google Adwords or if you’re trying to grow your organic traffic. I recommend using these even if you’re going to use another marketing channel. It helps to see what products are trending and also to check the demand of your product ideas.
Keyword Tool
Go through your product ideas and enter each product name and their variations into the Google Keywords Analysis tool. Select Keywords Ideas method and look at how many searches each Low Competition Keyword receives.

Let’s say you could get all of that traffic and 2% of them would buy at your store. Would this demand be enough?
Google Trends
Go to trends.google.com and do the same. Enter each of your product ideas into the search and look what the trend is. Is the trend increasing or decreasing? Are there any patterns? Do you see any spikes?

What Does It All Mean?
In general, you should avoid product categories that have little or no search traffic (less than 500 monthly searches). If you are planning to do a lot of search campaigns or grow organically through SEO, you should further dismiss all product ideas that have high competition according to the Google Keyword Analysis Tool.
6. Seasonality Filter
Avoid seasonal products like Christmas decorations, Easter baskets, and even children’s toys. You can check product seasonality trends at Google Trends.

By focusing on seasonal items, you are reducing your sales cycle. Most Christmas decoration sales do not take place in the spring or summer, and Easter basket sales are not high in the fall or winter. You want to put products in your store that will be attractive for buyers for the entire year.
7. Copyrights Filter
Dismiss all branded products — it is not easy to find suppliers. If you dropship them from little-known suppliers, chances are you’ll be selling fake products. Build your own shop brand, and avoid western brands.
8. Competition Filter
Evaluating your competition may be an endless task, but you need to check whether the product you’re about to start advertising is already widespread among other websites.
Here’s a simple trick:
If you’re dropshipping, most store owners will likely have the same images. Google a product and try doing a product image search. Look at how many shops have similar products.
Find your competitors, check their pricing strategy, research their popularity/traffic (on sites like Alexa.org or SpyFu.com), and what marketing channels they are using. Cross out all products ideas that already have huge competition.
Chapter’s Action Item
Decide Your Store Product Category. Filter the product ideas you wrote in the previous chapter using the above filters. Decide on the product ideas that you want to proceed with when creating a store, and then think of related products to fill in the store.
Next, we’ll be launching our eCommerce store: picking a brand name, designing a logo, and setting up the Shopify store.
Launching the Ecommerce Store

People often think that if you are launching an eCommerce business, that you should do it the hard way. They think that you should never launch a poorly developed store, or that you should try to build the second Amazon long before making any actual sales.
But what we have found is that it’s much more productive to learn and create along the way. Your first step is to simply create you store. Once your store is up and running, you can explore advanced settings and solutions at a later time.
Below is the essential Store Launch Checklist. You can easily complete it in a couple of hours.
1. Pick Your Store Name
Picking a name shouldn’t be a huge concern right now. Think of something random and simple. For my test women’s clothing shop I came up with: Forest Store, Hill Hill Store, MarsIn1999.
I recommending adding ‘store’ or ‘shop’ because you will need to find an available internet address (domain), and it’s easier to find an available one when there are several words in the name.
Or, try out the online business name generator here.
2. Register for a Free Shopify Account
In the olden days, you had to get a server, upload an eCommerce system to it, hire someone to change it according to your needs, and pay to maintain it. It was expensive, time-consuming, and the final result was still a slow and ineffective website.
Thankfully, Shopify and other alternative software have simplified the process. You can create your store in just a few clicks and all of the server setup and maintenance is taken care of for you.
Go to Shopify.com, click ‘start your free trial’, enter your store name, and create your shop.

3. Choose Your Store Theme
Go to Shopify Theme Store and choose a theme. There are numerous free Shopify themes if your budget is tight. Try choosing the one that requires the least changes to make it look like you want. Editing your theme is a
Editing your theme is a time-consuming task and often ends in a website with lots of mistakes. A few popular selections are New Standard, Supply, Simple.
Once you have found your preferred store look, click the green button Preview In Your Store, and install it to your store.

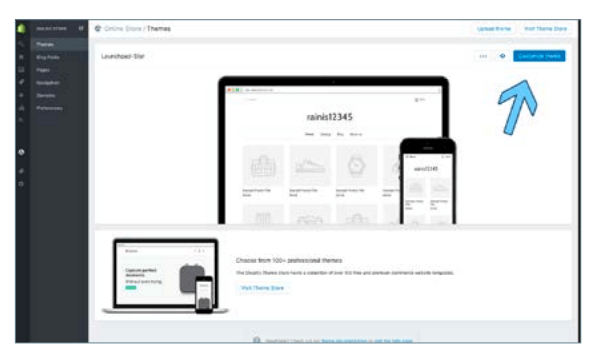
How to Tweak Your Theme:
Shopify is non-programmer friendly. To edit your store look, just go to Online Store, Themes, Customize Theme. On the right-hand sidebar, you’ll see each section of your theme: Header, Body, Footer, etc. Open each section and play around to get the feeling of what can be done with the theme. There’s nothing specific you need to change, but it’s good
There’s nothing specific you need to change, but it’s good know what you can do if you ever want any customization.
4. Add Your Logo
Your store logo is likely to be the first element seen by your store visitors, but a logo made by a professional graphic designer can cost you a lot of time and money. That’s why Shopify has created a easy to use and absolutely free Logo Maker.
Just go to Shopify Logo Maker, enter your brand name and test out some variations until you get a decent looking logo.
Here’s an example:

Alternatively, you could buy a custom logo on Fiverr for $5.
5. Have Your Standard Pages Ready
Content is extremely important. This is an area that you should focus on and spend more time on in the future.
However, the following sections should be enough to start with: About Us, Terms & Conditions, Privacy & Returns Policy, Shipping & Delivery Information, and Contact Us.
To create a page, go to Shopify Online Store, Pages, and click Add Page.

About Us Page:
This page eventually needs to be unique, but this will take quite a bit of time. In the meantime, copy and paste one of the pre-generated ‘About Us’ pages from the list below and edit it to suit your store later.
Welcome to [SHOP NAME]!
We aim to offer our customers a variety of the latest [PRODUCTS CATEGORY NAME]. We’ve come a long way, so we know exactly which direction to take when supplying you with high quality yet budget friendly products. We offer all of this while providing excellent customer service and friendly support.
We always keep an eye on the latest trends in [PRODUCTS CATEGORY NAME] and put our customers’ wishes first. That is why we have satisfied customers all over the world, and are thrilled to be a part of the [PRODUCTS CATEGORY NAME] industry.
The interests of our customers are always the top priority for us, so we hope you will enjoy our products as much as we enjoy making them available to you.
Or
We are [SHOP NAME], a small but motivated company specializing in[PRODUCTS CATEGORY NAME].
We believe passionately in great bargains and excellent service, which is why we commit ourselves to giving you the best of both.
If you’re looking for something new, you’re in the right place. We strive to be industrious and innovative, offering our customers something they want, putting their desires at the top of our priority list.
Shipping & Delivery Information:
Most of the sellers on Oberlo have very similar delivery prices and time frames, so it is best to copy and paste this standardized shipping & delivery page.
Our goal is to offer you the best shipping options, no matter where you live. Every day, we deliver to hundreds of customers across the world, ensuring that we provide the very highest levels of responsiveness to you at all times.
The time frame for order delivery is divided into two parts:
• Processing time: Order verification, tailoring, quality check and packaging. All orders are sent to the manufacturer for dispatch within 24 hours after the order is placed. The manufacturer and China Post process the orders, which takes an additional 2–4 days.
• Shipping time: This refers to the time it takes for items to be shipped from our warehouse to the destination.International delivery usually takes about 15–30 business days. US orders are shipped by ePacket, which is a US Postal Service product. After processing and leaving the warehouse, items usually take between 7 and 14 days to arrive at their destination but can take longer from time to time.
Contact Us:
Keeping in close contact with your customers is very important. Make sure you place a clearly visible ‘Contact Us’ link on your store.
To create a contact page, click the Add New Page button and change the page template to contact.

Required Policies:
Shopify offers a handy tool for generating terms and conditions, standard privacy, and return policies. Just go to Shopify Settings, Checkout, and scroll down to the Refund, Privacy, and TOS statements section to generate each policy sample.

6. Add a Payment Gateway
Add your PayPal email address under the Shopify Settings, Payments Section. Later, you can change, remove, or add additional payment options.
If you don’t have a PayPal account, registration at PayPal.com will take about 5 minutes.
Why PayPal?:
PayPal allows you to accept both PayPal and credit card payments. Plus, it’s the easiest solution for small merchants. Other payment providers like Stripe or BrainTree usually takes weeks to set up.
7. Adjust Shipping Settings
The sourcing tool we will recommend to you will offer most of the products with a free delivery option. So I suggest adding a free shipping rate for all of your orders, as well.
Go to Shopify Settings, Shipping, and delete all shipping zones that are noninternational, and edit the international zone rate to Free.
You can later adjust your shipping rates to include more delivery options. But Free Shipping is enough for now. In case you need help, here’s a short demo video (without sound):
In case you need help, here’s a short demo video (without sound):
8. Set-Up Your Billing Information
Before launching your store you should enter your Shopify billing information. You won’t be charged until your Trial Ends (14 days). Just go to your Shopify Settings, Account and enter your Billing information.
9. Add Custom Domain (Optional)
Buying a domain is optional. Currently, your URL looks like this [storename]. myshopify.com. But you might want to change it will look more normal: [storename].com.
You don’t have to do this right away, and there will be a cost (about $13 per year). You can set this up later once you decide if you want to invest further money into your business.
It is important to note, however, that a custom internet address provides social accountability when you start advertising your site, which can increase your sales significantly.
To buy a domain, go to Shopify Online Store, Domains Section, click Buy New Domain, and follow the instructions.

P.S. You’ll need to confirm the domain before it starts working. The confirmation letter is in your email inbox.
Chapter’s Action Item
Prepare Your Store for Product Import. Launch your store by following the checklist above. Don’t play too much with the details. What you really need is a simple medium to sell your products. A basic store serves this goal perfectly well. Next, we’ll be learning what is AliExpress dropshipping and how to find trustworthy product suppliers and populate your store with products.
Find Suppliers and Add Products to Your Store

Why AliExpress Dropshipping and How Does it Work? (FAQs)
With dropshipping, store owners can sell and ship products to their customers without actually seeing the products. After you sell a product, you simply buy it from a supplier and have it shipped directly to the customer.
Entrepreneurs love it because there is no inventory to hold, and a lower upfront investment lets you concentrate, in most cases, on the most important thing – bringing in customers.
Dropshipping isn’t something new. Zappos started off with dropshipping back in 1999. Amazon and Sears use dropshipping too. In fact, up to 33% of the entire eCommerce industry has adopted dropshipping as their primary inventory management model. And, if big names don’t catch your attention, look at the regular guys making their way and sharing their stories on Reddit.
So what does this have to do with AliExpress? Dropshipping is fueled by Chinese suppliers, and the number of Chinese dropshipping companies is on the rise. The growth of Chinese exports during the last decade can be linked to their integration with western businesses, and now thousands of Chinese suppliers understand the opportunity they have with dropshipping. That’s why to most people, dropshipping reminds them of Chinese products and nothing else.
AliExpress dropshipping is the new trend. It’s a way to easily start your first businesses or boost your current store’s efficiency. No doubt it comes with drawbacks, but let me start from the beginning.
What is AliExpress?
Charming Jack Ma shouldn’t be a stranger to you. A guy who built a $179B Alibaba empire is a superstar now. Often compared to Jeff Bezos from Amazon, Jack started his business in 1999 after failing to find Chinese products online and built a platform to offer Chinese suppliers’ products to the western part of the world.
At his primary business, Alibaba, you can buy products for your store and stock them in your own warehouse. On AliExpress, you can buy products in single pieces for yourself or you can dropship.
Both options are platforms, meaning that individual sellers can register there and sell their products to the world. Neither Alibaba nor AliExpress holds inventory. They are marketplaces, comparable to eBay.
How does AliExpress dropshipping work?
AliExpress dropshipping works similarly to the traditional dropshipping method. You copy the product from AliExpress to your store, set your own prices/ markups, and after you sell a product, you purchase it from AliExpress and have it shipped directly to your customer.
AliExpress dropshipping comes with many advantages, but dropshipping is much more nuanced than just stocking the inventory. AliExpress dropshipping can be total chaos if you do not take control in the beginning.
How does it differ from the standard dropshipping?
One of the biggest wholesale directories, WholeSale2b, offers over 1,500,000 products. AliExpress sells more than 1,500,000 t-shirts alone. Not to mention other categories like Consumer Electronics and Jewelry.
In addition to numerous dropshipping advantages, AliExpress dropshipping is extremely flexible:
▸ You control your own margins. You are not bound to a suggested retail price (MSRP) and can decide your retail price on your own.
▸ You can start immediately, for free. AliExpress dropshipping is possible even without contacting the supplier.
▸ You don’t need an established business entity before starting your online store. Though you will need one when you grow.
▸ You have access to millions of products. Instantly.
▸ AliExpress products are trendy. Chinese suppliers do their research watching the trends. Presidential campaign heating up? Sell Trump and Clinton t-shirts.
This all looks pretty good, right? So what is so messy about it? Below I answer the most frequently asked questions I hear about AliExpress dropshipping. Being fond of AliExpress, I find some questions uncomfortable, but I did my best to provide an honest, accurate picture.
Can you dropship AliExpress products easily?
Definitely yes. It’s even easier with tools like Oberlo.
Dropshipping from AliExpress makes all parties equally happy. AliExpress as a platform gets its share of revenue, suppliers sell their product, and you make profits.
I’ve personally sold over $3M worth of AliExpress products and know guys who have sold even more. It works
Will my customers know if the products are dropshipped from AliExpress?
Only if they found the same products on AliExpress themselves.
There are rarely any promotions in the packages your customer receives. And you can prevent that by contacting the suppliers through AliExpress messaging system before your orders are shipped.
If you’re doing quite a bit of sales, you can even arrange custom packages or flyers for free.
Why should someone buy from me if you can buy the same product from AliExpress cheaper?
Because you’re better.
Call it better marketing execution which reached the potential customer first, call it a brand which makes people buy from you, call it trusting your store brand or even your location, call it the value you offer by providing extra services or content, or call it technology that allows your customers to shop more easily.
Don’t be obsessed with price competition or even worse, uniqueness. In eCommerce, you will never be the cheapest and you will most likely never be unique.
Especially with lower priced products (<$100), the price is not the determining factor.
Look at the same product on different websites:
All these stores are multi-million businesses. Are these companies price competitive? No. Are they out of business? No. Why? Because in some ways they are better.
That being said, the possibility to set your own prices and not worrying about being price competitive should further ease the start of your business. If you have calculated that it costs $15 to get one customer with Facebook marketing, add $22 to the original AliExpress price and try to make the sale. You can increase your price, as long as it makes sense for people to buy the product at that price.
You can reorganize your pricing strategy later, but for the eCommerce first timers, this a tremendous no-sales relief.
AliExpress shipping takes too long, my customers won’t wait.
Alibaba made over $14 billions in sales in one day. Customers of other businesses listed above don’t seem to be concerned with long delivery terms either. Your task is to set clear expectations, define your shipping policy, and display it in the relevant places on your store.
AliExpress packages aren’t delivered by sea anymore, and it doesn’t always take 60 business days. Actually, with the now popular ePacket delivery option, it takes only 7-14 days to reach the US.
There are rumors that ePacket is coming to other major markets like Australia, the United Kingdom, and Canada too.
In addition, some suppliers keep their most popular products in US warehouses, which offers even quicker delivery.
Pick only the best suppliers and do your research. If you pick a random supplier, chances are you picked the one with the 2 months delivery option.
Note: the differences between shipping options are huge. Some suppliers claim to ship out their orders the same day with ePacket delivery (delivery time: approximately two weeks), others ship out their orders within 10 days and offer standard China Post 45 days delivery (delivery time: approximately two months).
What about quality risk and copyright infringements?
You probably have heard stories about the ridiculously bad quality of Chinese products. Sadly, these stories are true. But there are two sides to every story.
You can just as easily run into a bad supplier in Europe or the US. In the end, it’s you who needs do the careful due diligence, and it’s you who should sort the bad suppliers from the good ones. The unfortunate stories are well documented. Read them and don’t repeat the mistakes.
AliExpress is a marketplace, and just like I can put any item on eBay, a Chinese supplier can put any item on AliExpress. Just like eBay has had thousand of scammers and quality issues, AliExpress has had theirs too. Being a public company and hoping for business in foreign markets, AliExpress is forced to do a great job changing. Supplier accounts on AliExpress are no longer free. You have to pay ~$1,500 to have your full store running, which makes it difficult for scammers. Moreover, AliExpress offers a generous buyers safety program and hires thousand of employees to check their listings. In fact, Alibaba’s group hires over 2,000 employees to check that their listings don’t contain copyright infringements. A lot of Chinese suppliers can’t afford to sell cheap products anymore.
Do AliExpress suppliers speak English?
Chinese suppliers’ English can be a bit clumsy.
But, you can contact the suppliers in advance to get a sense of their English before doing business with them.
Bigger suppliers are quite responsive. They have sales teams managing your orders and answering your questions in live chat or email.
AliExpress Dropshipping is far from perfect. It’s tough and complex. It requires time, careful research, and planning. But it’s advantages make it the easiest way to kick-off your online business and it’s totally awesome for testing new product ideas.
Recall what has been said in the previous chapter:
AliExpress dropshipping works similarly to the traditional dropshipping method. You copy the product from AliExpress to your store, set your own prices/markups, and after you sell a product, you purchase it from AliExpress and have it shipped directly to your customer.
It’s extremely flexible and makes it the easiest way to kick-off your online store is with AliExpress Dropshipping.
There are three steps to getting a product to your store: finding the product, evaluating the supplier, importing the product to your store.
Finding Products on AliExpress
1. Add Products to Your Wishlist
AliExpress is just like an Amazon supplier database. Just go to AliExpress.com and look for the products you decided to sell in day two.

Once you find a product that fits your search criterias, add it to your AliExpress account wish list.
Make sure your products can be delivered with the ePacket delivery option. ePacket delivery takes only 14 days to arrive to the US, while other delivery options usually takes over a month.
Handy Tip: Install our free Chrome Extension and sort ePacket products in the category page.

Tip: Don’t Always Go For the Lowest Price
Typically, the price on AliExpress.com goes down with the quality. So don’t get overly excited when you find the same product at a fraction of the price.
There are a lot of sellers offering similar products on AliExpress.com. Be sure to compare prices different suppliers set. If a number of sellers have similar prices for the same product, but if one supplier has a significantly different price, this usually indicates that they have compromised on the quality of the product.
Although a lower price does not necessarily mean lower quality and vice versa, we highly recommend you avoid those types of situations. Here is an example:

Keep in mind that Chinese sellers on AliExpress.com have very tight margins and understand them well, this is why a higher price normally means a better quality product.
Tip: Look for Suppliers That Have 95% and Higher Positive Feedback
Two most important things while evaluating AliExpress.com sellers are their Feedback Score and Positive Feedback Rate. The Feedback Score indicates the seller’s sales volume, while the Positive Feedback Rate represents the feedback rate that the supplier has received. Always aim for 95% or higher positive feedback rate and at least a 2,000 feedback score.

Obviously, this doesn’t automatically mean that a supplier with a 500 feedback score is not to be trusted, but it is a good general measure to go by.
You should also consider individual product feedback and the order count. It’s much safer to buy a product that has been ordered a few thousand times with a 90% positive feedback score, than a product that has only been sold twice but has a 100% positive feedback score. Look for any unhappy customers. Usually, the unhappy customers help identify possible products defects and issues.

If a particular product does not yet have any feedback, look up the other products in the same category of that supplier and check the feedback. Some sellers start selling other vertical products, and you don’t want your customers to become the testers of those new products.
Tip: Pay Attention to the Responsiveness of the Supplier
Let’s say you have an emergency situation — a customer files a dispute on your PayPal account and insists on a reshipment. You want your supplier to respond to you immediately, don’t you?
To protect yourself against such situations, always check how responsive the AliExpress.com supplier is before importing their product. Write them a message via AliExpress.com and see how quickly you receive an appropriate response. You can even create a fictional scenario where you say you haven’t received your order. Note how long it takes for your seller to reply and how they handle the situation.

Importing Products to Your Store
1. Install free Oberlo Trial
Click here and install a free Oberlo trial to your Shopify store.

With Oberlo you can import products from AliExpress to your store. When you receive an order, Oberlo will ship those products to your customers automatically.
2. Set Up Oberlo
Before importing products to your store, you should set up the application. Go to the Oberlo settings page, set your Price Rules, and explore other settings.

3. Import Products
In case you haven’t done it yet, install our free Chrome Extension in order to use this importing method. Here’s the installation link: INSTALL
If you have installed our application, go to your AliExpress Wishlist and import all products that you’ve bookmarked before.

Alternatively, you can browse AliExpress, and after you find the product you want to import, click an orange arrow down button on the bottom right corner of the browser window.

The product is then added to your Oberlo Import List page where you can edit it and publish it to your shop.
4. Editing Products
AliExpress products often have very weird titles and descriptions. You’ll probably want to change them before publishing the products to your store.
Product customization is managed in the Oberlo Import List page. There you can set product category, update product title, description, tags, variants titles, adjust the prices, select which images you want to import, etc.
Just go to Oberlo Import List, edit your imported products and publish them to your store.

Chapter’s Action Item
Fill in Your Store with Products. Continue importing products from AliExpress until you have at least 50 products. Congrats, your store is now ready! In the next chapter, we’ll be learning how to launch your first Facebook Advertising campaigns and start making sales.
Launch Your First Ads Campaign

Facebook advertising is possibly the most effective way to promote your products to more than 1.5 billion people around the world.
If you’re just a beginner, it can seem a bit complicated – from all the pixels and conversion tracking, to numerous campaign objectives and the mysterious Power Editor tool. But don’t worry – we’ve got you covered. In this
But don’t worry – we’ve got you covered. In this
In this chapter, our guest Adomas Baltgalvis will share the fundamentals of Facebook advertising, so that you can launch your first successful ad campaign without wasting your time or money.
How Does It Work?
Facebook’s goal is to find the most effective way to allocate the limited advertising space they have.
They achieve it by running thousands of mini auctions every second, with advertisers competing against each other for that ad space. If you happen to win such an auction, you will be charged and your ad will be displayed to the audience you chose.
And how much does Facebook advertising cost?
Well, it depends.
Because of these auctions, your advertising costs will depend on many factors: the country, the audience, the ad placement, and even how good your ads are.
For example, there’s much more competition in the US, so you’ll have to pay more to reach the same amount of people compared to a cheaper country, like Thailand. Even within the US, some audiences can be twice or even three times more expensive to reach – you’ll have to test it for your own business and evaluate the results.
Now that you know how Facebook advertising works, let’s have a look at how to create an actual campaign.
To make the process easier, let’s break it down into three parts:
▸ BEFORE
▸ DURING
▸ AFTER
1. BEFORE
If you haven’t created any ad campaigns yet, you’ll have to set up your ad account in Facebook Ads Manager first.
Account Settings:
Go to the Ads Manager and select your ad account. Then, click on “Account Settings” on the top menu bar.

There, fill in your business name and address.

If you want someone else to help you manage your campaigns, scroll down to the Ad Account Roles section and click “Add a Person”.
Choose which level of admin rights you want to give them, enter their full name or email address, and click confirm:

By doing this, you won’t need to share any of your personal login details with them – they’ll be able to manage your ad campaigns from their own personal profiles.
Billing:
Next, add a new payment method under the “Billing” tab in the Ads Manager:

There, click “Add Payment Method”, choose how you’d like to pay (by card or Paypal) and enter your payment details:

Once you’re happy with the account settings and billing, let’s move to researching your audience.
Audience Research:
Finding the right audience is the most critical part of Facebook advertising.
If you choose an audience that’s not relevant enough to your ad, you’ll waste a lot of advertising budget on reaching the wrong people.
So when it comes to targeting, I like to get super specific, like aiming for an audience in the US that’s from 50,000 to 100,000 people. If it’s a smaller country, the potential audience could also be even smaller.
You should avoid using generic interests, like nature, sports, or food and choose very specific ones instead: relevant brands, authors, books, magazines, websites or even other Facebook pages.
To identify them, use the Audience Insights tool.

Go to Audience Insights and enter the “seed audience” you want to analyze in the sidebar:

Then, click “Page Likes” on the top menu bar and scroll down to see a list of other pages, relevant to the audience you selected.
2. DURING:
How to Create a Facebook Advertising Campaign: There are three main ways to launch a Facebook ad campaign:
1. using boost post on Facebook Pages,
2. using the self-serve Ads Create tool,
3. using the Power Editor tool.
Boost Post is the quickest and easiest way to promote your content, but it’s also the least effective one – I suggest you to stay away from it.
Power Editor, on the other hand, is a bit too complicated, especially for beginner advertisers. Although it gives you all the campaign features that you’d ever want, it’s not as intuitive to use.
So in this article, we will create ads in the Ads Manager with the Ads Create tool – it gives you most of the campaign settings but is easier to use.
Choosing Your Campaign Objective:
First, go to the Ads Create page by clicking on this link or clicking on the small arrow in the top right corner of your Facebook profile and choosing “Create an Ad”.
You will immediately see a list of the main campaign objectives that you can choose from:

There are 15 campaign objectives (although some are only accessible through Power Editor), and you should always go with the one that’s the most relevant to your end goal.
The reason why – Facebook does a lot of optimization automatically. Depending on which campaign objective you choose, Facebook will try to generate the least expensive results for you.
If you’re promoting an online store, you’ll want to choose either the Send People To Your Website or Increase Conversions objective, because that’s what Facebook will optimize for – website clicks or website conversions. To use the later you need to set up some additional tracking on your Shopify store, which we’ll cover next time. This time, choose Send People to Your Website, enter the URL of the product you want to promote, and click “Set Audience & Budget”.
This time, choose Send People to Your Website, enter the URL of the product you want to promote, and click “Set Audience & Budget”.

Select Your Audience:
Again, finding the right audience is absolutely critical for a successful campaign. So you need to choose the location, age, gender, and language of your audience:

Then, plug one or a few interests you’ve already discovered into the Detailed Targeting section:

You can even use a combination of interests by using the Narrow Audience feature – e.g. targeting people who are interested in all of the above AND the Runkeeper app:

By doing that, you’ll make sure you’re reaching the most relevant audience, so the response to your ads will be higher too.
The better response will lead to cheaper clicks and more chances to get a sale.
Set Your Budget & Schedule:
Once you found an optimal audience, choose from a daily or lifetime budget, and enter how much you’d like to spend.

Then, choose whether to run it continuously or between a specific start and end date.
In the Advanced Budget Settings, you can also choose your bidding and optimization preferences.
It deserves a separate article just for this one topic, but I’d generally suggest to begin with the default options: optimizing for link clicks to your website or website conversions and using automatic bids.
Once you’re happy with the Settings, click “Choose Ad Creative” to create the actual ads.
Design Your Ads:
For the ad creative, select to create a new ad or choose an existing post that you’ve already published on your page. Also, decide whether you want to use a single image or video in your ads, or go with multiple images (also known as carrousel or multi-product ads):
Also, decide whether you want to use a single image or video in your ads, or go with multiple images (also known as carousel or multi-product ads):

If you wanted to promote a few products from the same category in one ad, go with the multiple images format. If you have just one specific offer, choose single image format.
Next, choose what will be the media for your ads: images, slideshow, or a video. I would suggest to begin with using images for your ads:

You can select up to 6 images when creating a new campaign, which will create up to 6 ad variations in your campaign.
By creating a few ads, you can quickly see which image is working the best. You can choose this one and pause the other ads to save your ad budget.
The recommended image size is 1200 x 628 pixels and I suggest to save them in .png format.

After images, move on to the text part.
Here, choose the Facebook page you will be running the ads from – you can also choose to remove it, but that will stop you from running the ads in the mobile news feed or desktop news feed, which you don’t want.
You can connect your Instagram account too, if you wanted to show your ads on Instagram.

Then, enter the headline and text that will be used for your ad and choose an optional call-to-action button. Text will appear above the image and the headline immediately below it.
For the headline, you have a character limit of 25 symbols, and for a post text, you have 90 characters.

Below Call To Action, click “Show Advanced Options” and enter a News Feed Link Description that will appear below your headline.

Check the ad preview to make sure it looks exactly how you want:

Finally, remove any ad placements that you don’t want to use.
My advice would be use just one placement whenever possible: if you choose multiple ad placements, Facebook will again try to optimize your campaign and will usually push most of your budget to mobile devices.
If that’s what you want, great. But if you don’t have a mobile-friendly website, this could lead to getting a ton of mobile traffic but very few checkouts.
I also recommend to not use the Audience Network placement – they include third party apps and websites that are outside of Facebook and usually don’t generate the results you want. What’s worse, you can’t control the context of those websites, so your ad might be showing up to the right audience but on a very strange piece of content.

And once you’re happy with all of the above, click “Review Order”, double check your campaign settings, and click “Place Order”.
Congratulations – you’ve just created your first Facebook advertising campaign!
3. AFTER
It’s a fact that you’ll have some countries, age groups, gender, interests, placements, and ads performing better than the others.
What’s truly amazing is that you can find all that information in the Facebook Ad Reports, so make it a habit to come back every few days and evaluate your campaigns.

For example, you can check the Performance & Clicks report to see how the ad is doing overall.

My own and many other advertisers’ rule of thumb is to achieve at least 1% clickthrough rate on Desktop News Feed or Mobile News Feed.
If you’re getting a very high click-through rate on your ads, then your offer, audience and ad design, work well. If you see that you’re not getting at least a 1% click-through rate, you will want to test other products or audiences.
Also, see how many clicks you are receiving and what is the cost per click for different ads and audiences – that will help you plan your future advertising campaigns.
Finally, check your ad campaigns by different breakdowns:

With Breakdown, you can very quickly analyze your results by different countries, age, gender and placement, and identify any hidden gems that are working much better than the rest.

Campaign breakdown by age.
Find those hidden opportunities, edit your ad campaign, and focus on those components that are bringing the best results.
Chapter’s Action Item
Now that you know how to set up your advertising campaign, research the audiences, choose your campaign settings, and design your ads – Create your first Facebook advertising campaign. Don’t begin with a large budget, start small with a daily budget of $5 and keep learning.
Conclusion
Most people sit back in their cubicle, scroll through their Facebook feed looking at all the cool lives that their friends are living, and wish that they could the same.
In this day and age, it’s possible for virtually anyone to build a lifestyle they love using the tools available on the internet.
Want to travel the world? You can do that.
Want a little extra money each month to take your friends out to dinner? You can have it. Want another stream of income to feel “safer”? You can have that too. All you need to do is take action.
By going through this eBook, you’ve already separated yourself from everyone who keeps waiting for the perfect business idea to hit them out of the blue. You’ve shown that you’re committed to building a life you love.
And because of that, we want to help you even more.
We built the Oberlo forum to help early stage ecommerce entrepreneurs get their stores off the ground even faster — you can ask questions and meet other Oberlo users, and never feel like you’re “alone” on your journey.