
When it comes to ecommerce, your photos can make or break a store’s success. Jewelry photography is no exception.
If you’ve attempted jewelry photography before, or just admired how other brands do it, you probably know how difficult it can be. Many say that photographing jewelry is tougher than photographing other items, like clothes or furniture.
It’s true that photographing jewelry can be tricky. But with the right tools and tips, you’ll find it possible to take beautiful photos without hiring a professional.
In this article, we’ll give you a crash course on how to take jewelry pictures like a pro.
Jewelry photography equipment
Taking great photos of jewelry doesn’t have to involve purchasing high-end gear. With just a few essentials, you can create your own photography kit and take beautiful product images.
Let’s explore each of the items you’ll need for your jewelry photography shoot:
Camera
Contrary to popular belief, you don’t need a high-end camera lens to create good jewelry images. New jewelry sellers can also execute a shoot with an Android or iPhone. Use whatever camera you have handy, be it a digital camera or a smartphone.
Tripod
The best way to avoid camera shake is by using a tripod. Tripods hold the camera steady so you can use optimal aperture and ISO settings. You can get a basic one from Amazon for $30 or less.
Table
You don’t need anything fancy to set your products on. A standard folding table—ideally with a width between 24 and 27 inches—should work just fine.
Foam boards
When photographing a product, there’s always a side that doesn’t get enough light. This shadowed side can ruin the image. To create soft lighting, place a white foam board opposite the light source to reflect light into the shadowed area.
Tape or clamps
You’ll want clamps or tape to keep your foam boards in place when shooting on a table.
How to photograph jewelry
Once you’ve got your tools, you can start making photo magic. Here are the steps you should be paying attention to when photographing your jewelry.
Set up your table
Where do you want your “studio” to be set up? If you have a window with good natural light, set your table up to the left or right of it at a 90-degree angle.
Behind it should be your sweep, or white paper background, which makes a smooth surface behind your jewelry. You can use tape to adhere your sweep to a wall, brick, or wooden block to hold it up.
Your camera and tripod should go in front, facing the jewelry and sweep.

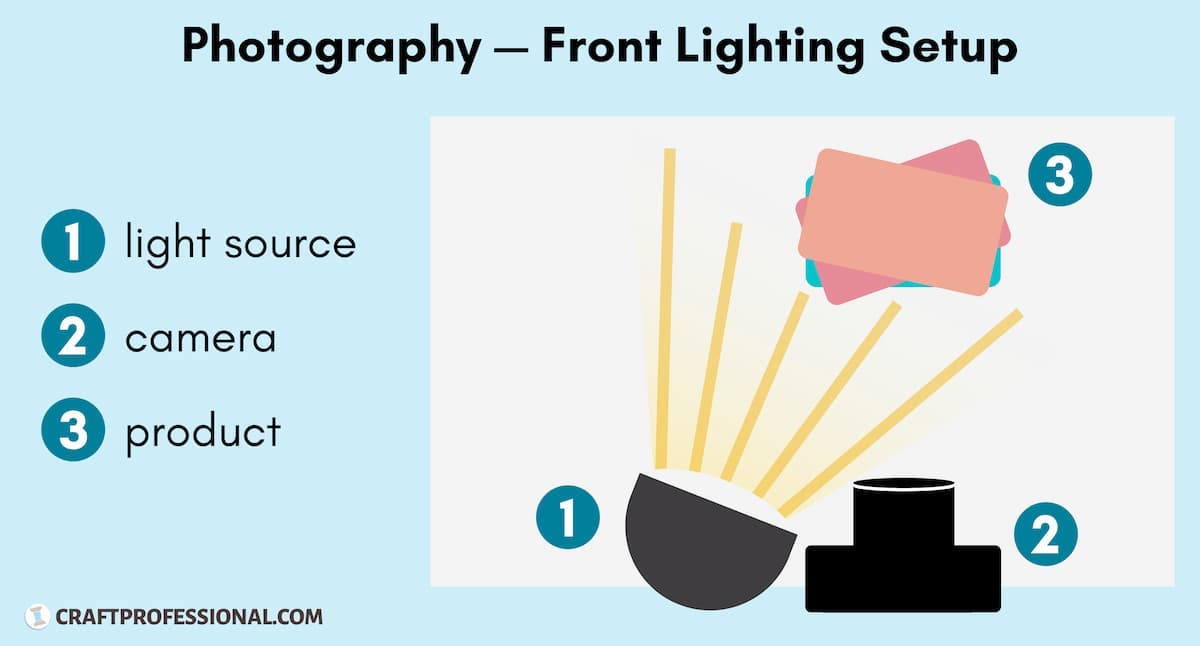
Position your lighting
If your room has plenty of natural light, you might not need extra lighting. But if it’s dim, place your lights at a 45-degree angle to your jewelry. Position a softbox or light tent behind the lights to spread the light evenly across your pieces. This helps avoid harsh shadows.
Another option is to use a light cone, which focuses light directly on your jewelry while minimizing reflections and shadows. If shadows still appear, move your jewelry closer to the camera and further from the background.
Style your jewelry
If this is your first foray into jewelry product photography, it’s OK to stick with just a white background. But know that you’ve got complete freedom to experiment (you’re shooting for your own jewelry store, after all).
To create compelling images, you can place your jewelry pieces on props, such as:
- Stands or ring holders
- Simple textured backgrounds
- A marble slab background
- Group photos with other accessories
The styling will depend on how you want to present your items. Although there are several ways to do it, it’s best to start simple and then create and test different styles over time.
Prepare your jewelry
Before starting the shoot, make sure to clean and polish your jewelry. The level of detail captured with a proper lighting setup and DSLR camera makes doing this a necessity.
Wipe down your jewelry every time you hold it. And after you polish it, place it in the center of the sweep’s flat area. You can also leave some room to sneak your white reflector in later. (Note: Wearing cotton gloves is a good way to save reshoots and time.)
Set your camera
Your camera’s settings will make a huge difference in how your final photos turn out. You want to have at least one photo with full focus on the entire piece, instead of focusing on only one part. If you’re using a camera you can adjust manually, make sure your aperture is set to f/10 or higher, and your ISO is set as low as possible, like ISO 100.
A high aperture and low ISO will help make sure your photos are sharp and detailed so customers can see exactly what they’re getting (this is also important for earning their trust).

Pay attention to your white balance. Is your jewelry showing in the intended color? If not, adjust the settings manually until it looks right.
You can also experiment to see if you can achieve better results. Consider tweaking the aperture, ISO, and shutter speed until you achieve the perfect exposure for your jewelry photos. These settings will vary based on your lighting and environment. Experiment to find the best combination for your needs.
Take the photo
When you’re setting up to take the photo, keep in mind the position of your camera. Keep it at an angle, pointing down toward your jewelry. When positioning your light(s), make sure they’re slightly higher than your product and angled down toward it.
Be sure that all light sources are set to the same power level and that the frame is fully filled with light, or you may end up with uneven bright spots.
Retouch and finalize
Retouch is an important step for giving your final image that extra oomph. If you’re not familiar with photo editing, you might want to hire a professional. You can use a website like Fiverr or Upwork to find someone in a pinch.
If you’re planning to teach yourself, there are plenty of free resources to help. Just keep in mind that it can get pretty complicated, so you’ll need to be dedicated to learning the tricks of the trade. (Or, of course, you can just edit the basics and be on your way.)

Jewelry photography tips
There’s no single right way to capture beautiful jewelry photos, but there are some guidelines to help make sure your final product is the best it can be. Here are some tips:
Keep backgrounds simple
You may be tempted to use a glitzy, vibrant background for your photos. But at the end of the day, this only distracts from your product and makes it tougher for your visitors to visualize.
It’s best to go with a plain white or black background. Just keep in mind that some online marketplaces don’t accept black backgrounds, so white is the safest choice.
Not only is this best visually, but it’s also easier for you along the way. As we’ve discussed, creating white background images is simple. They also make it easier to edit out any small issues in the retouching process.
Take consistent photos
Create some core guidelines for all of your photos—then stick to them. Keep track of things like your lighting, backgrounds, position of equipment, and camera settings.
There are several reasons for this. If your photos have too many varying styles or elements, it might distract your visitors. But even more important: it might dilute your brand identity. The more consistent your photos, the easier it will be for customers to understand what your brand is all about.
On top of that, your site will look much cleaner and more professional.

Use less props
This ties into the theme of simplicity that we touched on earlier. If you use too many props in your jewelry photography, your visitors will likely get distracted or even confused. It’ll take away from the glory of your pieces, especially when you have props that “upstage” your jewelry.
Keep it simple. Let your products shine and speak for themselves.
Capture multiple angles
Customers want to see your jewelry from various perspectives. Move the camera or the jewelry to photograph it from different angles. This helps shoppers get a complete view of your product. Showcasing different angles and settings on your online store can give a more comprehensive view of your pieces.
Optimize camera aperture and shutter speed
Aperture and shutter speed are key for capturing the fine details in jewelry photos. Start with an aperture around f/14 for depth. Shutter speed? Try about 1/2 second to get enough light. You can adjust these settings depending on your results.
Another tip is to always review your shots and tweak the aperture and shutter speed if needed. Optimizing both ensures your jewelry images are clear and vibrant.
Capturing jewelry photos with your phone
You don’t need a high-end DSLR for jewelry pics. A smartphone with a decent camera can work too. Here are some tips to make the most of it:
Secure your camera settings
Once you’ve set the camera preferences, keep them fixed. It stops any automatic changes and ensures your jewelry shots remain uniform.
Adjust color and light levels
Check if your phone allows manual color and light adjustments before taking the picture. If not, tweak them while editing for the best look.
Use a phone tripod
Using a tripod meant for phones helps keep your images sharp and steady, much like using a DSLR.
Try focus mode
If your phone has focus mode, use it to zoom in on the jewelry while softly blurring the surroundings.
Choose the main camera
The main camera on your phone (typically the back one) captures better detail than the selfie camera. Use it to get sharper, more detailed shots of your jewelry.
Take gorgeous jewelry photos today
Creating a beautiful jewelry ecommerce store isn’t as tough as it might seem. You don’t need to spend an arm and a leg on professional gear or a proper studio. All you really need to get the job done well are a good camera, sufficient lighting, a white background, and a photo editing tool.
You can easily create your own starter studio for less than $100. And as you get more experienced and your store continues to grow, you can gradually upgrade your studio with higher quality tools and resources.
Photographing jewelry FAQ
What is the best way to photograph jewelry?
The best way to photograph jewelry is by ensuring your pieces are lit evenly and consistently. Create your lighting setup at a 45-degree angle to the jewelry. Then set your camera to the correct aperture and take the photo. A mirrorless DSLR camera often gives the best results.
Which camera lens is best for jewelry photography?
Most jewelry photographers go for a macro lens to capture fine details. Try the Canon EF 100mm f/2.8L IS for rings or the Sigma 70mm f/2.8 EX DG for necklaces and bracelets. Both have stabilization and allow close focus.
How do you photograph jewelry in natural light?
Find a space that’s near a window. Position your setup 90 degrees to the left or right of the window. If harsh shadows appear, use a diffuser to soften them. Those without a diffuser can use a common household item such as a thin sheet, parchment paper, or a frosted shower curtain to create a softening effect.
How do you photograph jewelry at home?
- Prepare your jewelry.
- Position your lighting.
- Set up your table and sweep.
- Style your jewelry.
- Set your camera.
- Capture the photo.
- Edit and finalize.
How do I photograph different jewelry pieces?
Different jewelry pieces need different setups. For ring photography, use a small stand and zoom in to show details. For capturing items like earrings, hang them to highlight their drop. You can also drape necklaces over a bust for a natural look, and lay bracelets flat to showcase texture and clasp.