
Product photography is an important part of marketing any product, whether you are selling clothing, pet supplies online, or anything else. But how do you set yourself apart from your competition? Well one thing you can excel in is experimenting with your product on different backgrounds. And this doesn’t mean you have to travel, invest in lots of props, or even hire a photographer. All you need to know is how to remove the background from your images.
In this article, that is exactly what we will be talking about. You’ll learn everything you need to know about how to remove background images, and how to change backgrounds of images also. Even if you are only looking to remove a boring white background this is the article for you.
Whether you’re a technophobe looking for a quick fix or a budding Photoshop user looking for an in-depth tutorial, we’ve got you covered.
Plus, you’ll also learn about five background remover tools that give you more control over your edits and allow you to remove backgrounds from images in bulk.
To get even more tips on how to take better product images, check out our product photography course.
Sound good?
Let’s dive in and start creating great product images today.
Post Contents
- The Best Free Background Remover Tool: Remove.bg
- How to Remove a Background from an Image Online for Free
- How to Change a Photo Background Online with Canva
- Background Remover Tools
- Background Remover Apps
-
How to Remove a Background from an Image in Photoshop
- 1. Set Up Your Photoshop Edit
- 2. Use “Select and Mask”
- 3. Select the “Onion Skin” View
- 4. Use the Quick Selection Tool
- 5. Use the Refine Edge Brush Tool
- 6. Change the View to “On Black” to Continue
- 7. Use the Brush Tool to Select Any Areas You’ve Missed
- 8. Remove Selected Parts of Your Image
- 9. Save Your Edits as a Layer Mask
- 10. Change Background of Photo in Photoshop
- Remove Background from Image: Summary
- Want to Learn More?
The Best Free Background Remover Tool: Remove.bg
You’ve probably realized by now how tedious and frustrating it can be to remove a background from an image, even if it is just a white background – especially with complex photo editing software.
Perhaps you’ve already tried one of the many free background remover tools online only to be disappointed with the results.
Enter Remove.bg.
This website does one thing, and one thing only: remove backgrounds from images. Plus, it uses artificial intelligence (AI) to do all of the hard work for you.
As a result, this is our favorite way to remove a background from an image online on the fly. It’s simple, it’s fast, and the results are pretty darn good.
Here’s an example of what Remove.bg can do:

Not bad, hey?
Still, Remove.bg isn’t flawless.
Like all AI selection tools, it struggles when an image doesn’t have a distinct separation between the foreground and background of an image.
Here’s an example:

It’s also worth noting that Remove.bg only works with photos featuring at least one person. This means it doesn’t work with photos of animals or objects.
As a result, if you try to use the service to remove the background from an image not featuring a person, you’ll receive this error:

In this next example, I was hoping to remove the background of the image and to be left with just the skater. However, as you can see, Remove.bg has also left the other people featured in the image:

Still, in many cases like this, it wouldn’t be difficult to remove unwanted parts of the image with another photo editing tool.
Aside from these small hiccups, Remove.bg is pretty fantastic and well worth bookmarking.
Now, let’s run through exactly how to use it.
How to Remove a Background from an Image Online for Free
1. Go to Remove.bg in your web browser.
2. Select your image or enter an image URL.

3. Complete the verification process.

4. Review your results and download your new image.

It’s that simple! Okay, now it’s time to get creative.
How to Change a Photo Background Online with Canva
You might like to use your new image as it is with an invisible background. This is particularly useful when using your photo as part of a larger design, such as a website or poster.
However, removing a background from an image opens up a range of creative opportunities. Plus, it’s easy to change a photo background online with a free tool like Canva.

Here’s how to do it:
1: Go to Canva and Log In
If you don’t already have a Canva account, don’t worry – it only takes a minute to set one up.

2. Create a New Design in Canva
Once you’re logged into Canva, click the big green button in the upper left corner of the screen to create a new design.
Canva provides tons of awesome templates.
Scroll through the templates on show or use the search bar to find the type of template you need. Alternatively, click “Custom dimensions” in the upper left corner of the screen.

3. Upload Your Image to Canva
To upload an image to Canva, click “Uploads” in the left-hand sidebar menu and then click “Upload an image.”
Then, locate the image you downloaded from Remove.bg with the background already removed.

To add your image to your design, simply click on it and drag it across to the edit window:

4. Change Photo Background
The easiest way to change a photo background in Canva is to click “Background” in the left-hand sidebar and select one of the premade backgrounds.

There are tons of premade backgrounds available.
Plus, it’s easy to edit them to your liking using the settings at the top of the edit window:

5. Add an Image as a Background
It’s also simple to add an image as a background.
If you don’t have a great image to use as a background, again, there are tons of great images available for free.
Start by searching for background images within Canva.
To do this, click the “Elements” tab, then scroll through the images or use the search bar to find something in particular.

Alternatively, you could also use one of the many free stock photo websites, like Shopify’s Burst or Unsplash.
If you do this, you’ll need to download the image to your computer and upload it to your Canva edit, like in the example below.
Once you’ve found an image, drag it across to your edit window, resize it, and make sure it’s in the right position.

6. Make Your New Image the Background
You’ve probably noticed that the new image is now covering up your previous image.
To send this image to the background, click the image to select it, then click “Position” and “Backward.”

This will reveal your previous image with the background removed:
You can also use Canva to customize your image with text and graphics.
Congrats, you’re a design pro!
Background Remover Tools
Although Remove.bg is great for quick edits and Canva is great for changing a background, there are plenty of other background remover tools out there with more features and functionality.
Here are five more awesome background remover tools:
1. Photo Scissors
Available on Windows and Mac.
Best for: When you need more control than Remove.bg allows.

Photo Scissors is a free online background remover tool that’s very similar to Remove.bg.
The key difference is that Photo Scissors provides more control on which parts of your image you keep and which you erase.
It also keeps things extremely simple: Just highlight areas to keep in green and areas to remove in red.
Then, the tool’s AI will kick in and guess what you’re trying to achieve. Here’s an example:

Pricing: Photo Scissors is free!
2. Clipping Magic
Available on Windows and Mac.
Best for: Those who need more tools and editing options to refine their images.

Clipping Magic provides even more features and tools than Remove.bg and Photo Scissors.
With this background remover, you can select the areas to keep and delete just like with Photo Scissors.
However, you can also use dedicated tools to refine the edges of your image. Plus, Clipping Magic lets you adjust the colors or your image, and add shadows and reflections.
Pricing: Clipping Magic’s Light Plan costs $3.99 for 15 image downloads per month. Their Standard Plan costs $7.99 for 100 credits per month.
3. PicMonkey
Available on Windows and Mac.
Best for: Those who also need a basic, entry-level photo editor.

PicMonkey is a simple online photo editor that allows you to remove backgrounds from images.
It also provides all of the photo editing features and tools you might need for basic edits, such as a text tool and color adjustments.
Plus, the program provides plenty of design templates and graphics to add to your edits.
Pricing: PicMonkey plans start at $9 per month for the Basic plan, $14 per month for the Pro plan, and $37.50 for Teams.
4. Auto Clipping
Available on Windows and Mac.
Best for: Those who need a bulk image background remover tool.

Auto Clipping is an online background remover tool that allows you to remove backgrounds from images in bulk.
This could be especially useful for those editing product photos for an ecommerce store.
Pricing: Auto Clipping provides a ton of different pricing options depending on your needs – including pay-as-you-go pricing and monthly plans. The service charges $14.99 for 200 downloads pay-as-you-go and monthly payment plans start at $2.99 per month for 15 downloads.
5. Fotor
Available on Windows and Mac.
Best for: Those who would like a basic photo editing tool with an emphasis on creating collages.

Fotor is an all-in-one online photo editing and design tool that also allows you to remove backgrounds from images.
Just like PicMonkey, Fotor provides all of the basic photo editing and design tools you’ll need for simple edits.
Plus, the service also has a range of collage templates.
Pricing: Fotor costs $8.99 per month or $39.99 per year.
Background Remover Apps
Whether you are on the go or enjoying working from your smartphone, there are many background remover apps to choose from. Below are just five of the best free background remover apps available on the market.
1. Background Eraser
Best for: Those who are only beginning to experiment with these tools as the app is super easy to use.

Background Eraser is a free app on Android and iOS that makes it easy to cut from images and make an image’s background transparent.
With a rating of 4.7 out of 5 this app is one of the best to remove backgrounds from images.
2. Ultimate Background Eraser
Available on Android.
Best for: Those who want to remove backgrounds and add new ones in the same sitting.

Although just for Android, Ultimate Background Eraser is fun and easy to use. It’s features include an auto and manual way to remove backgrounds from images, the ability to extract parts of images, and a zoom feature to help with mobile editing.
Over 1 million users have installed this photo editing app. It provides all the basic editing features along with addons like new backgrounds to add and share buttons for social media. If you are editing photos for your online store this is a great app to use.
3. Change Background Of Photos
Available on Android.
Best for: Those who want to remove backgrounds quickly.

Boasting 10 million downloads this app can remove white and more complex backgrounds from most images using neutral networks to identify the background.
You can add your own new background or choose from a pre-existing one, create a collage, and share your professional looking photos on social media in minutes.
4. Fotor – Photo & Poster Editor
Best for: Amateur photographers who are looking for the perfect solution for photo editing.

This app does more than remove backgrounds from images for free. It is packed full to photo editing features that you can use to spruce up your product photographs. There are filters, photo adjustments, stickers, frames, and so much more.
How to Remove a Background from an Image in Photoshop
If you’re looking to take your photo editing skills to the next level, it’s essential to learn how to remove a white or busy background from an image using the professional graphics editor Photoshop.
Photoshop requires us to break the process down into manual steps.
This provides you with a lot more options and control over your final edit. However, it also means that the process is far more labor-intensive than using a background remover like Remove.bg.
If you haven’t already, you’ll need to create an Adobe Creative Cloud account and download Photoshop. If you’re just getting started, Adobe provides a free seven-day trial of Photoshop.
Okay, let’s jump in.
1. Set Up Your Photoshop Edit
To begin, click “Create New” to create a new session and import your image. Alternatively, simply click “Open” and select your image to begin a new session.

If you’ve never used Photoshop before, your edit window should look something like this:

2. Use “Select and Mask”
Once you’ve created a new session with your image, you need to select the right tools. To do this, click “Select” and then “Select and Mask…”

This replaces Photoshop’s tools with just the ones you actually need, including the:
- Quick selection tool
- Refine-edge brush tool
- Brush tool
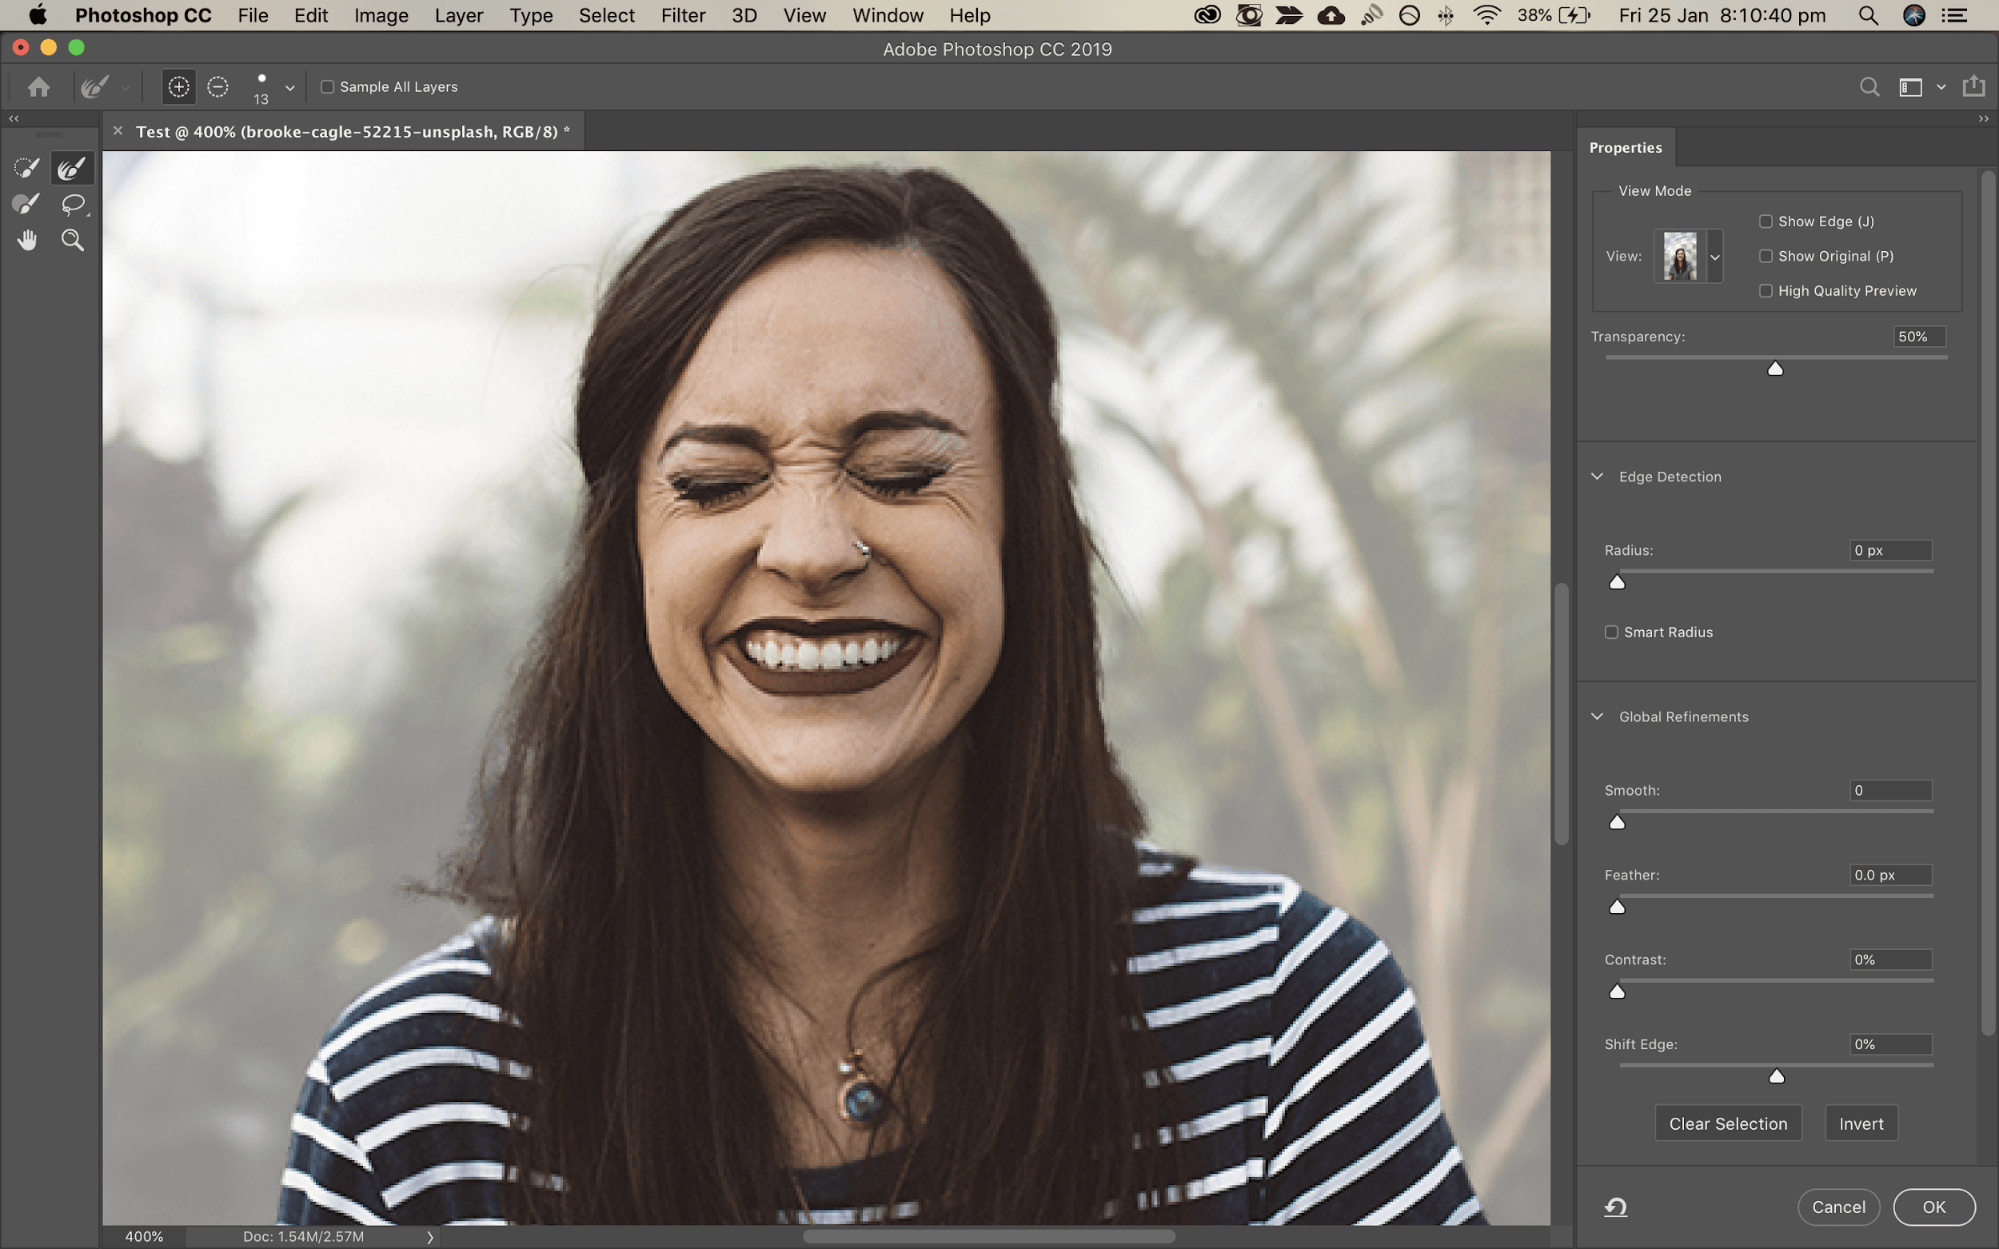
3. Select the “Onion Skin” View
Next, you need to select the right session view. Under “Properties” in the right-hand sidebar, click the drop-down menu next to “View.”
Then select the “Onion Skin” view – this makes the image partially transparent.

Before continuing, make sure the Transparency slider bar underneath is set to 50%.
4. Use the Quick Selection Tool
Now, use the Quick Selection tool to paint the areas of the image that you want to keep. This tool is very intuitive, which makes this process fairly simple.

Thanks to the Onion Skin view, it should be easy to tell which parts you’ve selected and which you haven’t.
Make sure to zoom in to select any areas you’ve missed.
5. Use the Refine Edge Brush Tool
Once you’ve done your best to select the areas of the image you want to keep, it’s time to use the Refine-Edge Brush tool. You can find this in the top left-hand toolbar.
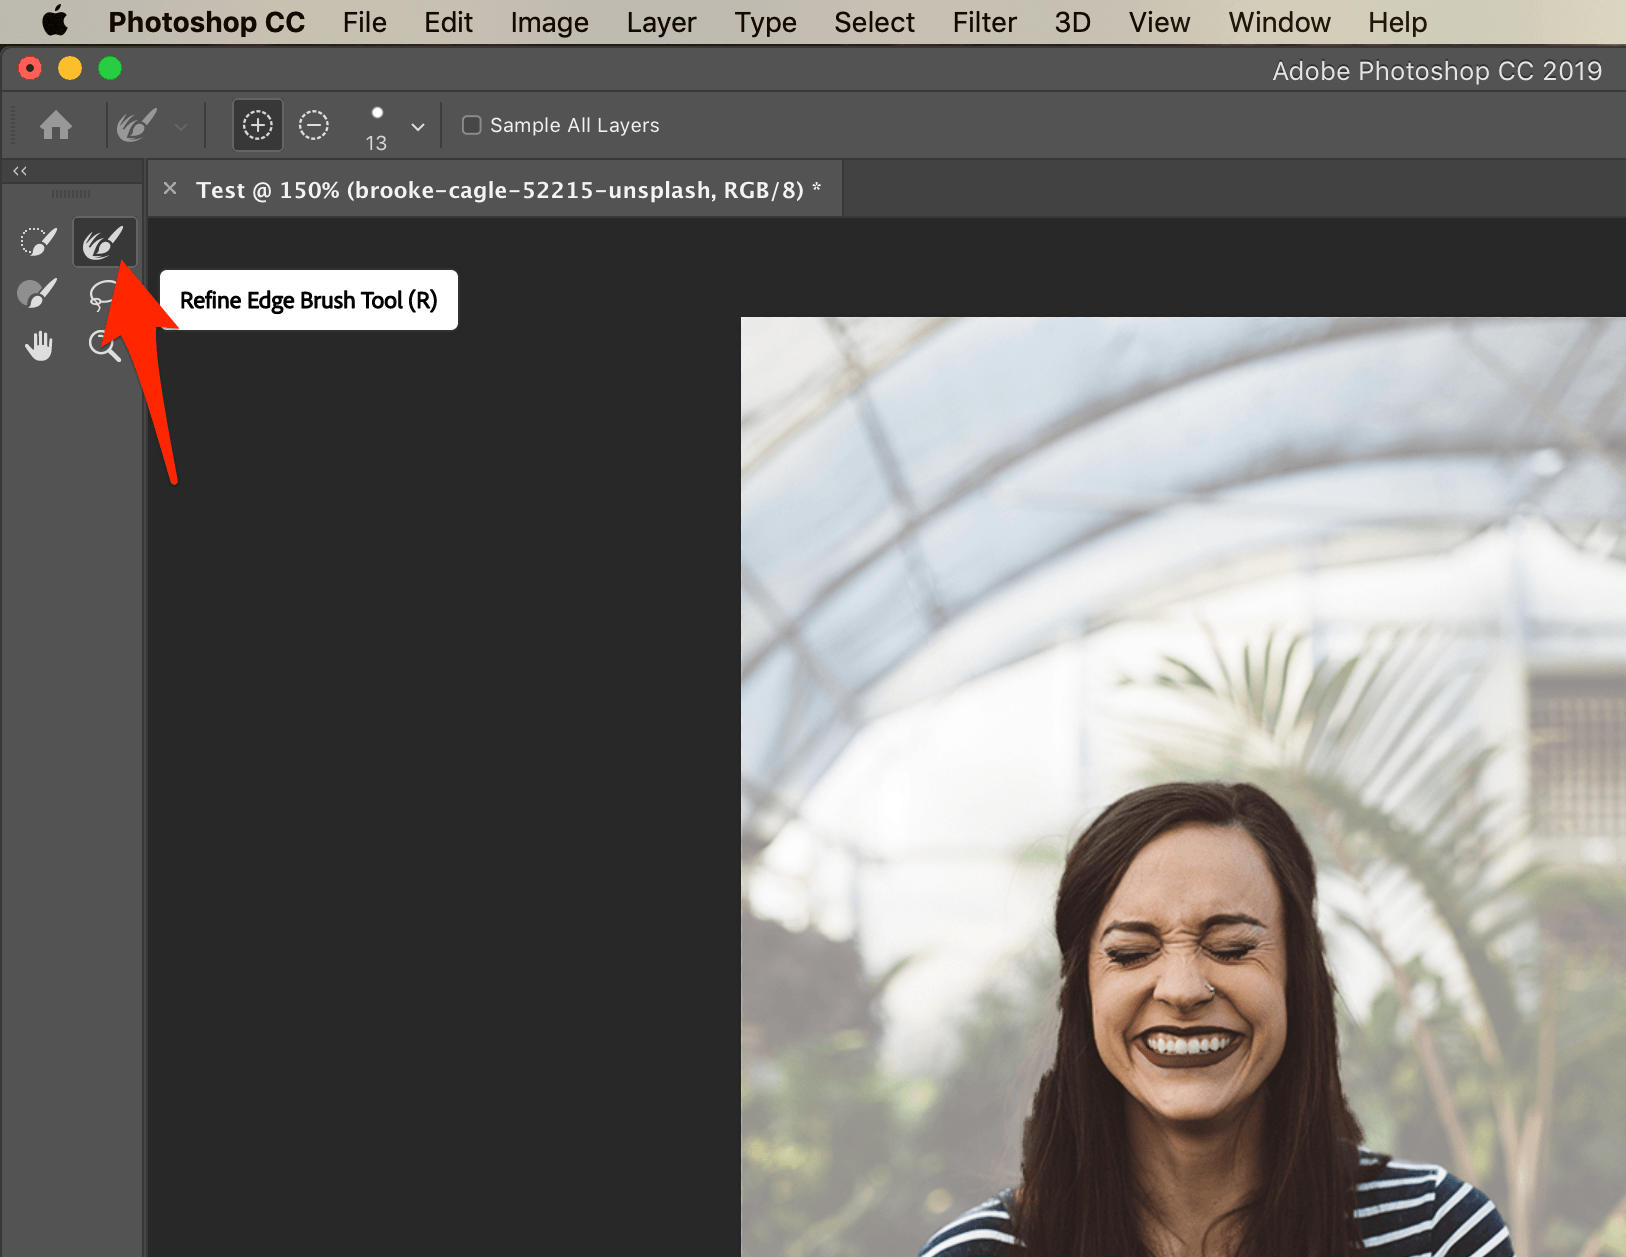
This tool is great for capturing fine details such as hair or splayed fingers – compared to the image above, notice the difference between the model’s hair in the image below:
6. Change the View to “On Black” to Continue
At this point, you’ll need to thoroughly check your selection. To do this, change the view setting to “On Black.”
Then change the transparency level to 100%. This will clearly show you which areas are most in need of attention.

7. Use the Brush Tool to Select Any Areas You’ve Missed
In this view, it’s much easier to notice the areas you’ve missed.
In the example below, large portions of the model’s striped shirt weren’t picked up by the Selection tool earlier on.

Make sure to select all of the areas you’ve missed before continuing.
8. Remove Selected Parts of Your Image
Once you’ve selected all of the areas of the image you want to keep, it’s time to remove the parts of the image selected by accident.
For example, when using the Refine Edge Brush tool earlier, some of the background was also selected.

To remove these parts of the image, simply hold the “Alt” key on Windows, or the “Option” key on Macs to select the areas of the image you don’t want to be included.
Remember, if you ever select an area of the image by mistake, just click “Edit” and “Undo.”
9. Save Your Edits as a Layer Mask
All done? Great – just make sure to save your edits as a Layer Mask.
You can do this in the bottom right-hand side of the window under “Output Settings.” Using the drop-down menu next to “Output to,” select “Layer Mask,” then click “OK.”

10. Change Background of Photo in Photoshop
Congratulations – you’ve successfully removed the background from an image using Photoshop!
To save your image with a transparent background, click “File” and “Save As.”

Then, make sure to save your file as a PNG file.

Remove Background from Image: Summary
Removing the background from an image can be the difference between a standard photo and a striking visual. It can be the reason a visitor clicks and converts on your store, over a competitors.
It doesn’t have to be difficult, time-consuming, or costly. Just watch this video on how to get professional photography for your store.
In summary, here are the tools we’ve covered that you can use to remove backgrounds from images:
- Remove.bg: Best for quick and simple background removal on the fly.
- Photo Scissors: Best for when you need more control than Remove.bg allows.
- Clipping Magic: Best for those who need more tools and editing options to refine their images.
- PicMonkey: Best for those who also need a basic, entry-level photo editor and design interface.
- Auto Clipping: Best for those who need a bulk image background remover tool.
- Fotor: Best for those who would like a basic photo editing tool with an emphasis on creating collages.
- Photoshop: Best for those in need of a comprehensive design tool.
Which tool is your favorite? Did we miss a great background remover?