
Facebook Ads Strategy: A Simple Guide
So you have a website or local business and you want to run some Facebook ads. Great!
Facebook ads are an excellent way to drive leads and sales to your business. The best part is that you can set up an ad today and have money in the bank tomorrow – unlike other marketing methods, Pay Per Click (PPC) ads have the potential to create immediate business growth.
But let’s back up for a second. First, how should you think about Facebook Ads for beginners? What’s the big picture? To answer that question, we have William Harris, a Facebook Ads expert and the founder of PPC agency Elumynt:

William Harris, Elumynt
“Before you turn on Facebook ads, you need to think critically about your goal.
You want sales – obviously – but it’s not always that easy. If your product is difficult to explain, maybe you need an awareness campaign (like a video) before you hit them with the direct response ad. If your product is expensive ($5,000+) you might actually need to drive them to a landing page for leads and then convert them offline.
But the bottom line is that you need to set a clear goal before you can execute a winning Facebook ads strategy.”
So goal-setting is a big part of Facebook advertising. But you have to keep in mind that, like any new marketing strategy, Facebook ads have a big learning curve. You need to test, tweak, and be prepared to fall on your face a few times before things succeed. Jordan Bourque, dropshipping entrepreneur states:

Jordan Bourque, dropshipping entrepreneur
“Test everything. You are going to be exposed to countless numbers of strategies that people are using for their businesses, that won’t always work for yours.
In the beginning, you have to have the mindset that you are spending money to gain data and knowledge as opposed to just throwing it away. The more time you spend within the ad platform, the more you become familiar with it and learn what works.
Don’t get too attached to your campaigns. When I first started, there were times where I would let ads run longer than I should have. After some time, you become familiar with the KPIs to look for, and have a better understanding of when to scale or kill a campaign.”
Now, this book will get very technical. Step by step, we’ll guide you through exactly how to set up, run, test, tweak, and optimize your Facebook ads campaigns. You’ll be creating ad campaigns with 48 different ad sets, each testing a different element.
It sounds complicated, but we break it down so you know where to go, what to do, and how to do it. You’ll get screenshots for every step, plus videos and GIFs, so you’re never left guessing about the next action to take.
In this chapter, we’ll cover:
- Setting Initial Goals for Your Facebook Ads Strategy
- Visualizing the Facebook Ads Funnel
- What to Expect In Terms of Traffic and Engagement
- Examples of Successful Campaigns (And What You Can Learn From Them)
Let’s get started!
Setting Initial Facebook Ads Strategy Goals
Like William shared above, your goal will vary depending on the complexity and cost of your product or services. If you sell a commodity, like clothing or basic home decor, your ad goal can be strictly sales.
But if you sell something expensive (more than ~$150) or something that people aren’t familiar with (like a L’Oréal UV Sense – a small gadget worn on your fingernail that senses UV radiation), then you may need to run an awareness campaign meant to build awareness of your brand/product and trust with your audience.
For example, check out this ad by LIV Watches:

Notice the call to action – ‘Learn More’. While this is a sales ad, it’s meant to build awareness and interest. Even their ad copy is intended to be enticing: “For the man who won’t be told what to do.”
You have to decide for yourself what the intention of your Facebook Ads strategy will be – sales, leads, or awareness? This is something only you know, because only you know your products.
Visualizing the Facebook Ads Funnel
Now that you understand the overarching goals of Facebook ads, let’s dive into an actual ads funnel.
A typical sales funnel looks like this:

An ad leads to a landing page where the visitor buys something. Super easy, right?
However, Facebook ads can get much more complicated than this. You can have a lead capture campaign that funnels clicks to a lead magnet, such as a free ebook or consultation, where they enter their contact information. From there, you can send an email nurture campaign that continues to build trust between your leads and your brand, until you finally send a promotional email that gets the sale.
The complexity of your product and the goals you chose in the previous section will determine the length of the purchase funnel. So don’t skip that step!
What to Expect In Terms of Traffic and Engagement
Now you’re probably wondering – what kind of traffic, engagement, and sales should I expect when I run a Facebook ad? This is a really difficult question to answer, but let’s break it down.
Average Click-Through Rate (CTR)
According to a study by WordStream, the average CTR across all industries is 0.90 percent.
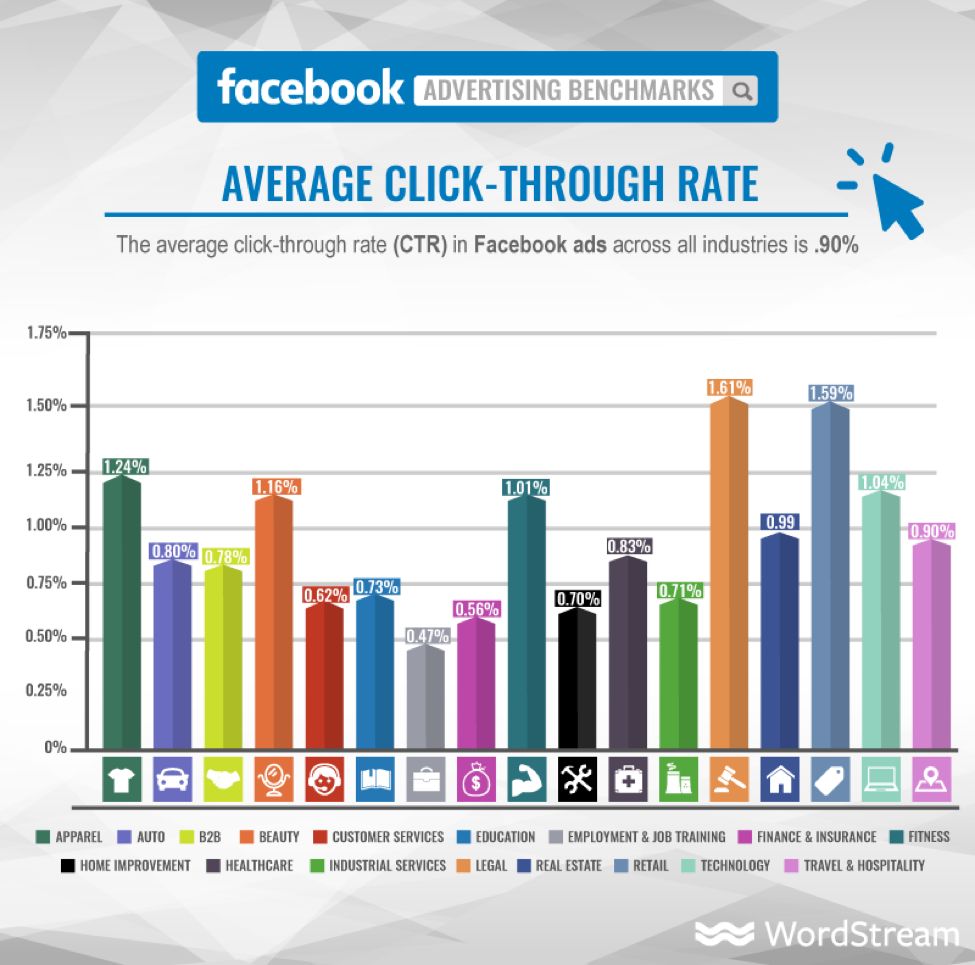
However, this is pretty much because most people are terrible at running Facebook ads. They just don’t understand how to target the right audience, run split tests, or optimize their ads and ad offers to get a decent CTR.
Luckily for you, we’ll teach you about all of that in this guide!
Average Cost Per Click (CPC)
Facebook ads have an average CPC of $1.72 across all industries.

Average Conversion Rates (CVR)
On average, Facebook ads have a whopping 9.21% conversion rate across all industries.

That’s pretty dang good for an average, considering the average landing page conversion rate is a measly 2.35%!
That said, there’s a huge gap between industries – the lowest being technology at 2.31% and the highest being fitness at an incredible 14.29%. So keep your industry in mind when setting your Facebook Ads strategy.
Average Cost Per Action (CPA)
CPA is the cost for a specific action on your post, such as link clicks. Facebook ads have an average CPA of $18.68 across all industries.

That said, as you can see, it’s skewed pretty heavily by the top five most expensive industries:
- Technology
- Home Improvement
- Automotive
- Finance and Insurance
- Industrial Services
For everyone else, the ads are significantly cheaper. If that’s you, you’re in luck! Otherwise, things might be a bit pricey for you.
That’s it for costs – what about engagement?
Average Facebook Engagement Rate
The average engagement rate of Facebook posts is a measly 0.17%.

In other words, it’s really hard to get people to interact with your content organically. After all, people are on social media to watch funny videos and interact with their friends and family – not engage with your advertising content.
But obviously, something about Facebook ads works, or people would stop responding to them. So let’s take a look at some incredibly successful ad campaigns and what they did differently!
Examples of Successful Campaigns (And What You Can Learn From Them)
To give you an idea of the full Facebook Ads strategy funnel, I’ve compiled three Facebook ad examples that worked really well. Let’s dive in!
1. Club W
Club W ran an excellent ad with a great offer – 3 bottles of wine for $19.

What makes this ad so great:
- It’s visual. You can see exactly what you’re getting right in the ad image.
- It’s relevant. My aunt LOVES wine, and this showed up in her newsfeed. That’s about as relevant as it gets!
- It has a very enticing value proposition. Three bottles of wine for $19? That’s a steal! I don’t drink a ton of wine, but I’d even take up this offer.
- It has a strong call to action. The word ‘get’ is a strong CTA word. It very blatantly tells people to click the box. A time limit would have made this even better.
2. CoSchedule
I love CoSchedule’s ads. Take a look:

What makes this ad so great:
- It’s visual. The color pops out at you among the photos, videos, and text posts in your feed. And that’s always a good thing!
- It’s relevant. I’m a marketer, and nearly all marketers struggle with the organization of their campaigns. I also run several blogs, so this software could help me.
- It uses social proof. 20,000+ other marketers and bloggers are using it? It must be good! As you’ll learn in this guide, social proof is a powerful ad strategy.
- It shows you the product. It’s hard to show off software with an image, but they manage to do that well in this ad.
3. Asos
Asos uses dead simple advertising that gets results.

What makes this ad so great:
- It’s visual. What you see is what you get – new shoes!
- It’s relevant. This was actually a remarketing ad to people who looked at the shoes on their website. You’ll learn all about remarketing ads in this guide!
- It uses a big, bold, powerful statement. Having a big red box with the word ‘SALE’ in all caps is sure to catch anyone’s eye and make their ears perk up. It’s a powerful word.
- They get their audience. The only text – “What? It’s treat day.” – is relatable. By encouraging you to treat yourself, the copy helps you justify buying their products.
And there you have it! Three successful Facebook ads and the strategies behind why they worked. Now, let’s dive into some more specific Facebook advertising costs and how to calculate your budget for ad spend.
Facebook Advertising Costs
Facebook ads can be a money machine.
It’s every entrepreneur’s dream to create something that makes more money than what you spend.
Of course, you can only achieve that if you get advertising right. And winging something like Facebook ads is a quick way to burn a hole in your wallet.
That’s why we created this eBook – to help you learn how to turn your Facebook ads into a money-making machine. And to help you lower your Facebook advertising costs and increase your ROI.
Why Facebook ads?
Because Facebook has proven to be the largest social media outlet with the most options for targeting new (and current) customers to your website.
And with over 3 million business advertisers sharing success stories on Facebook, it’s easily one of the best platforms to use to grow for your online business.
Moreover, you’ll never waste money on Facebook ads if you have the right mindset for entrepreneurship.
In this quick intro chapter, we’ll cover how much Facebook ads cost, what kind of an ROI you can expect, and how to set goals and KPIs before diving into setting up your first Facebook campaign in Chapter 3. Let’s get started!
Here’s a quick glossary of terms and acronyms to help you understand everything:
| CPC | Cost Per Click | How much you pay whenever someone clicks on your ad |
| CPM | Cost Per 1,000 Impressions | How much you pay per 1,000 views of your ad |
| CPA | Cost Per Acquisition | How much you pay to acquire a new customer from an ad |
| ROI | Return on Investment | The money you make back from your ad spend |
| CVR | Conversion Rate | The percentage of people that convert from your ad |
| CTR | Click-Through Rate | How many people click on your ad after seeing it |
| KPI | Key Performance Indicator | A metric to compare your performance to, to ensure you’re on track to reach your goals |
How much do Facebook ads cost?
In a study done by AdEspresso, the average CPC (cost per click) on Facebook in 2016 was between $0.20-$0.80. In the US specifically, the cost averaged $0.26 per click. 
Naturally, costs have risen since a few years ago. But it’s safe to say that ad costs haven’t risen too much. $0.20 to $0.80 per click is still a good benchmark for your reference.
Many factors affect this CPC, as well as the Facebook CPM (cost per 1,000 impressions, or views, of your ad), including:
- Your audience targeting
- The engagement levels and relevance score of your ad
- The time of year
- Your campaign objective
- The maturity of your Facebook pixel
Let’s talk about each of these a bit more.
How your audience affects Facebook ads pricing
According to that same study by AdEspresso, it costs more to target people age 55-64 than to target people age 18-24.

Additionally, women are more expensive to target with ads than men (for Facebook ‘likes’ at least).

This doesn’t mean that you’ll struggle if you’re targeting women age 55-64; it just means you’ll need to work harder to nail down your offer and audience engagement to lower your Facebook advertising costs, which we’ll talk about in the next section.
We’ll also discuss audience targeting in-depth in Chapter 4.
How engagement and relevance score affect your CPC
You know how Facebook’s algorithm shows your posts to more people if it receives a lot of engagement shortly after publishing?
This holds true for Facebook ads as well. In fact, every ad you purchase receives a relevance score by Facebook based on that ad’s engagement and relevance to your audience.
For example, if you run a Facebook campaign about puppy food to people who hate puppies (that is, nobody), your CPC and Facebook CPM will be through the roof because your ad is completely irrelevant.
The higher your relevance score, the lower your CPC and the higher your click-through rate will be. In other words, more sales for less money.

Look at the huge difference between a 9 and a 10: we’re talking almost triple the click-through rate with less than half the cost per click. A measly $0.03 per click!
How do you get a higher relevance score? We’ll cover that in Chapter 5 when we discuss optimizing your campaigns.
Time of year and Facebook ad costs
Facebook ads work on a bidding system, sort of like Facebook ad auctions. You place a bid on how much you’d like to spend per click. (Facebook does this automatically for you unless you use the advanced settings. More on that in Chapter 4.)
Because of this, when lots of marketers are buying Facebook campaigns at the same time, the bidding cost goes up. Specifically, during major shopping holidays like Christmas and Black Friday, Facebook CPC goes through the roof.
AdEspresso found that cost per app install skyrockets in November and early December, likely due to the holidays.

While not the same as CPC, cost per app install tends to increase and decrease in junction with CPC, so you can view the trends similarly.
The takeaway? Expect higher Facebook advertising costs during major holidays. If you don’t need to advertise during those holidays, allocate more of your advertising budget in the spring and summer months.
That said, if you still make a profit despite the higher costs (factoring in customer lifetime value, which we’ll cover in the next section), you should continue to run them year-round.
Your Facebook Campaign Objective and how it affects costs
Whenever you start a new campaign, you have to choose from a list of ad objectives.

They fall into three categories:
- Awareness – when you just want people to know about you.
- Consideration – when people are aware of you and considering your product vs. a competitor’s product.
- Conversion – when people are ready to buy.
These objectives get progressively more expensive as you get closer to the sale. Reach and lead capture campaigns are the most expensive, which makes sense.
We’ll further discuss ad campaign objectives in Chapter 3.
How your Facebook pixel affects Facebook advertising costs
Your Facebook pixel is a snippet of code. You put this code on the pages of your site to collect data on whoever visits the site. We’ll discuss how to set it up and what it does further in Chapter 3, but for now, know this:
As your pixel collects data on the people who tend to click on and purchase from your ads, it uses machine-learning to learn who your best target market is. This is called ‘maturing’ your pixel, and it’s done simply by running ads over time.
As your pixel learns who your best customers are, it can improve your Facebook audience targeting to target people similar to past customers who are more likely to buy. This lowers your CPC while simultaneously increasing your click-through and conversion rates.
You can also use your pixel to run remarketing campaigns and create lookalike audiences, but you’ll learn all about that in Chapter 4. Just know that you definitely need to install the pixel if you want to run successful Facebook ads!
Now that you understand Facebook ads pricing, let’s talk about the important part – return on investment!
What’s the ROI on Facebook ads?
There are multiple case studies suggesting the average ROI of Facebook ads is somewhere around 400-450%.
Of course, that percentage varies massively by industry and the profit you make on your products or services. So take it with a grain of salt.
The real reason for this section isn’t to give you an exact number to expect as a return, but rather to set some expectations and explain how to calculate your own ROI.
Word of warning: It’s highly likely you will lose money on Facebook ads at first. In fact, many people continually lose money on their ads in order to get new customers, then make up for that loss with remarketing and lookalike audience campaigns.
To make sure you’re still making money in the long run, you need to understand your cost per acquisition (CPA) and your customer lifetime value (CLV).
CPA is how much you need to spend on ads before actually acquiring a customer. You need to know your conversion rate (CRV) to get this answer.
For example, if you need 10 clicks to get one customer, and your CPC is $1, your CPA would be $10.
Avg. # Clicks Per Sale * CPC = CPA
10 * $1 = $10
Your CLV is how much money you make over the lifetime of a customer.
If they spend $10 on that initial ad, you break even (or lose money if you have other costs). But if they come back to your store from a remarketing campaign and the CPA for the remarketing ad is only $2, then you make $8 ($10 – $2).
Avg. Order Value * # Of Orders Per Year * # of Years as a Customer = CLV
$10 * 10 * 1 = $100
If they purchase from you 10 more times over the course of a year, you made another $80. So with that math, your CLV from that customer is $110, with an $80 profit (before other costs).
CLV – (CPA * # of Sales) = Profit
Or, if you want to get fancy:
CLV – Initial CPA – (Remarketing CPA * # of Sales) = Profit
In other words, despite losing a few dollars on the initial ad, you made $80 in profit from that customer over the course of a year. See how that works? That’s why it’s important to understand your numbers.
We’ll talk more about numbers and metrics in a second. For now, let’s do a quick recap.
Quick recap: What affects your Facebook ad costs and ROI?
To tie it all together, in order to avoid losing money on Facebook ads, you need to understand your CPC, CPM, CPA, and CLV.
The average CPC is somewhere between $0.20 to $0.80 depending on the ad location, time of year, audience, and relevance. Just to give you some rough benchmarks.
Your CLV can be calculated by adding up all the purchases of a customer over their lifetime (the time from their first purchase to their last). Do this for a handful of customers, add them all up, then divide by the number of customers you did the math for. That’s your CLV.
Now that you know what affects Facebook advertising costs and how to calculate your necessary ROI, let’s set up a few goals and deliverables to keep your campaigns on track.
Deciding on your goals and KPIs
As they say, what gets measured, gets managed.
Having clear, written goals and deliverables on your Facebook ads makes it easier to know if you’re on track, or if you need to make changes to your campaign.
Key performance indicators (KPIs) are metrics, such as engagement, CPC, number of likes, etc., which you can use to compare your performance.
Which KPIs you choose depends on your goals. Do you want to:
- Increase brand awareness? Use the ‘brand awareness’ objective and measure impressions.
- Increase engagement? Use the ‘engagement’ objective and measure likes, comments, and shares.
- Capture leads? Use the ‘lead generation’ objective and measure leads captured.
- Increase sales? Use the ‘conversions’ objective and measure sales made.
We’ll discuss the objectives you should use based on campaign type in Chapter 3, but for now it’s a good idea to know what your overall goal is for your Facebook campaign.
The absolute must-track metrics, if you want to calculate your ROI, are your CPA and conversion rate (CVR). Your CPC, engagement, and impressions are all vanity metrics in comparison.
This is because CPA and conversion rate are the two metrics required to calculate true ROI.
Let’s say we have two campaigns – A and B. If we compare them in terms of CPC and pure clicks, we might get something like this:

It looks like Campaign A wins, right? But let’s factor in the conversion rate (CVR):

Now you see that despite having a higher CPC and fewer clicks, Campaign B actually brought us more conversions for the same ad spend.
This is why it’s important to decide on an objective and which KPIs you’ll measure ahead of time, and to always prioritize CPA and CVR unless you’re just running ads for brand awareness.
Go ahead – write down your goals and KPIs in a Google Sheet or Word doc now. For example, you may have the goal of increasing sales with a 20% CVR and $10 CPA.
Setting Up Your Facebook Pixel and First Facebook Campaign
In the previous chapter we introduced you to Facebook advertising costs, average ROI, and how to set a goal and measure KPIs for your ad campaigns.
Chapter 3 is all about getting you set up and running your first campaign!
First, you have to set up your Facebook pixel on your website. The Facebook pixel is a snippet of code you put on your website pages to track activity on those pages. It captures information on your visitors, such as whether they bought, what pages they visited, and more.
After we set that up, we’ll talk about the best Facebook ad objectives and formats to hit your goals, explain how Facebook’s bidding system works (and how to get the most out of it), and finally how to keep your Facebook campaign organized as you build more and more ads.
Let’s dive in!
What Is A Facebook Pixel?
As we explained above, your Facebook pixel is a snippet of code that tracks your visitors.
It works by sending data back to Facebook from your website by tracking the pages they visit and the links they click. It can also track events, such as whenever a visitor adds an item to their cart, makes a purchase, or abandons their cart, to name a few.
According to Facebook, the Facebook Pixel the Facebook Pixel enables you to evaluate the effectiveness of your ad campaigns by understanding the actions visitors perform on your site.
Once the Facebook pixel code has run on your site for at least 24 hours, you’ll be able to retarget those visitors in remarketing campaigns, as well as create lookalike audiences. Your pixel is the key to getting the best possible ROI from Facebook ads, so make sure you install it ASAP!
How to Set Up Your Facebook Pixel
In order to set up your Facebook pixel, you first need to create an ads manager account, which we explain how to do in the next section. So do that if you haven’t already.
Next, select ‘Pixels’ under the events manager in your Ads Manager menu.
![]()
Finally, click ‘create pixel’. Name it whatever you want (mine’s just named after my website) and proceed to download the code.
From here, you have multiple options to set it up on your site.
- Do it manually by embedding the code in the <head> tag on every page you want to track.
- Use Facebook’s WordPress plugin to install it automatically.
- Have your developer install it for you.
Luckily, if you’re using Shopify, it’s as simple as adding the Pixel ID – the ID, not the full code – to your settings.

And that’s all there is to it!
To check if your pixel is working properly, either use the Facebook tag manager or send test traffic to your site (Facebook can do this if you just press the ‘send test traffic’ button on the pixel settings page) and check the pixel analytics to see if it tracked the traffic or not.
Pro tip: You can also install different pixels for each product you offer. This is a more advanced tactic, so it’s not recommended for beginners. But it can help you optimize your ads for each individual product separately, which is perfect for scaling.
Once you’ve allowed the pixel to run, you can see how it’s performing and check out the demographics of your site visitors (and what pages they visited and actions they took) by visiting the Analytics report in your Ads Manager. We’ll explain more about how to navigate the various reports and menus of the Ads Manager in an upcoming section.
How to Use Facebook Ads Manager
The Facebook Ads Manager is where you create, organize, and track all your Facebook ads. Without an Ads Manager account, you won’t be able to create Facebook ads.
Note: There used to be a tool for editing Facebook ads called the ‘Facebook Power Editor’. This tool has since been taken down, and its features are now built into the ads manager.
Creating an Ads Manager Account
To create an account, click the arrow in the upper right of your Facebook advertising account and select ‘Create Ads’.

Facebook will generate an account for you and guide you through setting up your first ad campaign. Either go through Facebook’s setup or close it out and go to the menu in the top left to begin using the system.

Understanding the Ads Manager Menu
The Ads Manager menu is broken up into five sections:
- Plan
- Create and Manage
- Measure and Report
- Assets
- Settings
Let’s break them down.
Plan
The plan section has tools that help you understand your audience and come up with creative ad ideas.
Audience Insights: The Audience Insights tool shows you detailed analytics on any audience targeting metrics you choose. When you select this tool, Facebook prompts you to choose an Audience to start with.

It doesn’t matter which one you choose, as you can select any audience from any selection. The one you choose just affects where Facebook points you to make changes – you don’t have to make these changes if you don’t want to.

These are your options for selecting an audience. For example, if you want to see data on the people who like your page, just select your page under ‘People Connected to’.
If you find that the majority of your audience are men, you can run more masculine ads. Or if they like a particular product, you can offer that product on your store and run ads to it.
You can see everything from their demographics (like age, gender, location, etc.) to their psychographics (likes and dislikes) and even the device they’re using to view Facebook.
Pro tip: If you look at the ‘Page Likes’ tab, you can see what pages your audience likes. If you notice that a lot of the people who have ‘liked’ your page also tend to ‘like’ another page, you can create ads targeting people who like that other page.

Creative Hub: The Plan section also has a tool called Creative Hub, which allows you to create ad mockups to share with your team.

Create and Manage
The Create and Manage tools are what you’ll use to create and manage your Facebook advertising.
Business Manager: If you have multiple Facebook pages or a team that you work with, the Facebook Business Manager allows you to manage all of them from one account, as well as share access with anyone you see fit.
Ads Manager: This is the tool you use to create and run your ads. It’s where you create your Facebook Pixel, create custom reports, and see data on your ads.
Page Posts: This tool shows you the engagement of your Facebook posts. You can filter to see only page posts, only ads, or any other post type you have. You can see who’s engaging with your posts and how.

You can use this tool to see which of your posts is more engaging, then create more of that kind of post. In the example above, my video post did much better than my image posts. So I know video resonates well with my audience!
App Ads Helper: App developers can use this tool to drive traffic to apps for more downloads.
Automated Rules: You can use this tool to set up rules for your ad campaigns. For example, you can limit your daily ad spend or automatically stop ads when their conversion cost goes higher than $10.

Measure and Report
The Measure and Report tools allow you to measure the results of your ads and create custom reports based on your goals. You can use them to track goal conversions and see how well ads are doing.
Ads Reporting: This tool lets you create custom reports on your ads. You can set a date range to see how they performed during certain times. By reviewing your ads, you can see what’s working and what isn’t to create better ads in the future.
Our favorite way to use the ads reporting tool is to compare campaigns to see which performed the best. For example, you can compare your ads to see which had the better click-through rate or the lowest CPA.
Test and Learn: This tool lets you A/B test your ads to see which variants convert better. You can also compare different ad campaigns and/or Facebook pixel events.

Analytics: Use this tool to analyze your Facebook pixel data. Once you start running ads with an active pixel, this is where you’ll see all the results (such as CPC, CPA, reach, engagement, etc.) from those ads. You’ll be visiting this tab alot.

Custom Conversions: Your Facebook pixel will track standard events on your site, such as what pages are viewed. But with custom conversion pixels, you can define a specific action or set of actions, such as watching a video or clicking on an image to zoom in.
The Custom Conversions tool lets you review that custom conversion pixel data. You can also see previous data on all the custom pixels you’ve created.

You can have up to 40 conversion pixels per ad account. If you need to create additional pixels, you’ll have to delete old pixels.
To create a custom conversion pixel, click the ‘Create Custom Conversion’ button and fill in the box that pops up.

You have to enter a specific URL to track data on. You can also track multiple URLs, if you wanted to target people who have visited more than one page on your site. Once you’ve created the custom pixel, you’ll be able to select that pixel when you create a conversion-focused ad.
For example, you could run an ad that leads to a sign up page. After someone signs up, they’re redirected to a thank-you page. You could put the thank-you page URL in the custom conversion pixel, and any time someone lands on that page, the pixel will track that result.
Note: You should refresh the page that you create the custom pixel on. That way the pixel will fire and you’ll know it’s working. If it doesn’t fire, something is wrong. You can also use Facebook’s tag manager to test the page and see if the pixel was installed properly.
Assets
The Assets section of tools allows you to view your custom audiences, images, product catalogs, and physical business locations.
Audiences: Here you can create custom or lookalike audiences. You can also view and manage all the audiences you’ve saved in the past, and search through them with filters.
Images: This tab lets you view and manage all the images you’ve ever uploaded to or shared on Facebook.
Catalogs: Here you can manage your product catalogs. You can upload a product catalog by going to www.facebook.com/products/catalogs/new and following the instructions. This is important when running certain ad campaign types, such as a product catalog ad.
Business Locations: This tool shows you data on your physical locations, if you have them. By setting up physical locations, you can more easily create local ads to drive foot traffic.
And that’s it for navigating the ads manager! Next up, we’ll talk about the different Facebook ad objectives and which you should use.
Settings
This section is where Facebook stores all the information related to your account. Go here to see the pages linked with your account, update your email, change payment information, and so on.

Note: Be sure to add your tax ID number to your settings. This is important for claiming your ad spend on your taxes. (I am not a tax consultant and cannot give you tax advice – please consult a business lawyer or CPA for help on your taxes.
One important piece of the settings tab is your attribution window. According to Facebook, “Your attribution setting determines how Facebook measures actions that result from your ads. Facebook uses last-touch attribution model. You can set your attribution window, or the period of time for which you want to count actions people take after clicking or viewing your ads, which will affect the results you see for your ads.”
Basically, this is just for your own tracking purposes.By default, Facebook sets this to 28 days after someone clicks an ad, or 1 day after someone sees the ad in their feed (called the “view window”).
And that’s it for navigating the ads manager! Next up, we’ll talk about the different Facebook ad objectives and which you should use.
Understanding (And Choosing) Facebook Ad Objectives
Facebook ad objectives tell Facebook what you want people to do when they see your ad.
There are three ‘categories’ of objectives:
- Awareness
- Consideration
- Conversion
Under those three categories, you have multiple distinct objectives.

Let’s quickly break them down so you have a better understanding of what to choose.
Awareness Objectives
There are two campaign objectives under the ‘awareness’ category:
1. Brand Awareness
Brand awareness is strictly used to increase your audience’s awareness of your brand. Only use this objective if you just want to get your brand in front of people and don’t necessarily care about an immediate ROI.
You’ll only be charged per impression and Facebook calculates the bidding automatically – you can’t change your bid. It’s also one of the least expensive ad types.
However, I personally wouldn’t use this objective because it’s so difficult to calculate the ROI.
2. Reach
Reach is simply designed to show your ad to as many people as possible. Like brand awareness, you are only charged per impression, not per click.
This objective is best if you have a small audience and want to reach as many people in that audience as possible. Otherwise, you’ll just be showing your ad to lots of people who may or may not be potential customers.
Consideration Objectives
The ‘consideration’ category has a whopping six objective types:
1. Traffic
The traffic objective is designed to send people straight to your website, without completing a specific action like entering the contact details or making a purchase.
This objective is best used when sending traffic to content on your website, like blog posts or articles. It’s a key part of a solid content marketing strategy.
2. Engagement
An engagement ad is used strictly to get more engagement, such as likes, comments, or shares, on your post.
These ad types are usually used when a post performs well organically and you want to increase their reach and engagement. This ensures the lowest cost and highest return.
The only time we’d use an ad like this is if we posted something we really want people to engage with, such as a quiz, survey, or giveaway contest.
3. App Installs
App install objective is exactly what it sounds like – a way to get more installs of your app.
For this objective, you pay per install of your app. So if you have an app, this is obviously the best choice.
4. Video Views
Video views are also exactly what they sound like – a way to get more views of your Facebook video. What’s cool about this objective is that you can choose to be charged per impression OR per 10 second video view.
Native Facebook video is one of the highest engaged types of posts, so if you have the skills to create a video ad or a video guide with a call to action, this can be a lucrative objective type.
5. Lead Generation
Lead generation campaigns are the second most-popular campaign type next to conversion campaigns. This is because these campaigns bring you direct leads for your business, which can be calculated in an ROI equation, unlike engagements or impressions.
What’s interesting about lead generation campaigns is that users can populate the information fields with the click of a button using their Facebook details. This is one of the biggest reasons Facebook advertising work so well – you can build a list without sending people to a landing page outside of Facebook.
6. Messages
The messages objective prompts users to have a conversation with you in Facebook messenger, to complete purchases, answer questions, or get support.
The best use of this ad type is to convert people who may be on the fence about your product. For example, you can run a remarketing ad to people who abandoned cart on your store to get them to come back and seal the deal.
Conversion Objectives
There are three objectives in the ‘conversion’ category:
1. Conversions
Conversion objectives are used when you want people to perform a certain action, such as submit their contact details or buy a product.
This is the most common type of Facebook ad, as it is directly tied in with your ROI. You can use conversion ads to make sales or capture leads on a separate landing page.
2. Catalog sales
The catalog sales objective is specific to eCommerce websites that have uploaded their product catalog to Facebook. It allows you to remarket to anyone who visited your catalog but didn’t buy.
You can upload a product catalog by going to www.facebook.com/products/catalogs/new and following the instructions.
3. Store Visits
The store visits campaign objective is for people who have multiple physical businesses. You can advertise to people who have physically visited one of your stores.
The Takeaway: Which Objective Should You Use?
You should choose your objective based on your campaign goals. Someone who simply wants to improve brand awareness will use a different objective than someone who is very ROI-focused.
The two objectives you’ll most likely want to use are lead generation or conversion-focused campaigns. Again, this is because they are the only objectives directly tied in with ROI.
The only exception would be if you have a Facebook catalog, in which case you may want to use the catalog sales objective, or if you have physical locations, in which case you may want to use the store visits objective.
Next, let’s move on to the types of Facebook ad formats, and which ones you should use in your ads!
Types of Facebook Ad Formats (And Which To Use)
Facebook ad formats are the kinds of ads you can create. Like objectives, we can break down the ad formats into multiple ‘categories’ based on your ad goals. (These categories aren’t set by Facebook, we’re just putting them into our own categories based on how we’ve used them and seen them used.)
Here are the Facebook ad format categories:
- Traffic & Leads
- Sales & Product or Service Leads
- Likes & Engagement
- Mobile & Desktop App Installs
- Physical Visits to Your Store or Event
First, we’ll break them down so you know what each one does, then we’ll tell you the best one to use for ROI purposes.
Traffic & Leads Formats
If you want to drive traffic to your website or capture general leads like email subscribers (not sales leads), there are three ad formats you can use:
1. Link Click Ads
Placements supported by Facebook: Desktop Newsfeed, Right Column, Mobile Newsfeed, Audience Network, Instagram

Link click ads like the one above are designed to drive clicks to your website. They are the staple of Facebook ads, and one you’re probably familiar with.
This ad format is best used to drive traffic to a blog post or landing page. The example above takes me to an article that teaches you how to add eCommerce functionality to WordPress using GoDaddy – so it promotes their service without directly asking for the sale.
Specs:
- Recommended image size: 1,200 x 628 pixels
- Ad copy text: 90 characters
- Headline: 25 characters
- Link Description: 30 characters
2. Video Ads
Placements supported by Facebook: Desktop Newsfeed, Audience Network, Right Column, Instagram, Mobile Newsfeed

We already mentioned how Facebook video posts are one of the strongest performing posts you can create in terms of user engagement. Video ads are just like link click ads, but instead you’re paying to have people watch your video.
This format is a great way to show off how your product works, then drive sales from the video. Bonus points if you can make the video funny!
Specs:
- Ad copy text: 90 characters
- Aspect ratios supported: 16:9 to 9:16
- File size: up to 4 GB max
- Continuous looping available
- Video can be as long as 120 min., but optimal time is 30-90 seconds
3. Boosted Page Posts
Placements supported by Faceebook: Mobile Newsfeed, Desktop Newsfeed, Audience Network, Instagram

Whenever you post to your Facebook page, you have the option to ‘Boost’ that post. This shows your post to more people, in order to get more engagement and clicks.
Once you click ‘Boost post’ you can set up an audience to target with your post. Many Facebook marketers use this feature to boost their post to people who have liked their Facebook page, as this helps your followers see it.
Pro tip: Only boost posts that have already showed some good initial engagement. If you try to boost a post that no one wants to engage with, you’re only wasting money. Facebook’s algorithm makes it cheaper and more lucrative to boost naturally well-performing posts.
Specs:
- Recommended image size: 1,200 x 628 pixels
- Ad copy text: unlimited
- Headline: 25 characters
- Link Description: 30 characters
Sales & Product or Service Leads Formats
Next up, we have the ad formats meant to directly increase your sales or sales leads. There are five formats that fall under this category:
1. Multi-Product (Carousel Ads)
Placements supported by Facebook: Mobile Newsfeed, Desktop Newsfeed, Audience Network, Instagram

A carousel ad allows you to advertise up to 10 images in a swipe-able string from left to right. You can also display videos, headlines and links, or calls to action in each box.
The two main uses for a multi-product ad are eCommerce stores looking to promote multiple products, or marketers who want to promote different posts or offers to see which one converts best. From there, you can run solo ads for the highest performers.
Pro tip: You can also have some fun with these ads with multiple images that form one big image, enticing people to keep scrolling out of curiosity. Like this one for The Beatles, for example:

Specs:
- Recommended image size: 1080 x 1080 or 600 x 600 pixels
- Ad copy text: 90 characters
- Headline: 25 characters
- Link Description: 30 characters
2. Dynamic Product Ads (DPA)
Placements supported by Facebook: Mobile Newsfeed, Desktop Newsfeed, Right Column, Instagram, Audience Network

Dynamic product ads can be carousel ads or single product ads. What makes them unique is that they’re like remarketing ads, but better.
As you can see in the image above, you can combine them with customer data and carousel ads to show visitors items they viewed, plus additional items that are similar to those they viewed. This increases conversions and gets previous visitors to come back!
Note: In order for DPAs to work, you must have the Facebook pixel installed, as well as your product catalog uploaded to the Facebook advertising platform.
Specs:
- Recommended image size: 1,200 x 628 pixels or 600 x 600 pixels
- Ad copy text: 90 characters
- Headline: 25 characters
- Link Description: 30 characters
3. Facebook Lead Ads
Placements supported by Facebook: Desktop Newsfeed, Audience Network,Mobile Newsfeed, Instagram
Lead ads, just like the ‘lead’ objective, are used to capture information from Facebook users without them needing to visit an external landing page.
This is a great way to get potential customer’s email addresses so you can send them lead nurturing campaigns.
Once a customer signs up, their information is stored in your ads account. From there, you can export it to a spreadsheet and import it to your email marketing platform.
There are also tools that automate this process, such as AdEspresso. (I’ll reveal more Facebook marketing tools in Chapter 6.)
Specs:
- Recommended image size: 1,200 x 628 pixels
- Ad copy text: 90 characters
- Headline: 25 characters
- Link Description: 30 characters
- Context card can be in paragraph form (no character limit) or 5 bullet point form (80 characters per bullet)
- Context card headline: 60 characters
- Context card button: 30 characters
- Privacy Policy and website URL links are required
4. Canvas Ads
Placements supported by Facebook: Mobile Newsfeed

Canvas ads are unique in that they are an interactive ad. Users can swipe through a carousel of images (like a carousel ad), tilt the image in different directions to see it from different angles, and zoom in or out with their fingertips.
They’re currently only available on mobile because it’s a little difficult to tilt around your desktop screen!
Fun fact: Canvas ads load 10 times faster than standard mobile web applications.
Specs:
- Recommended image size: 1,200 x 628 pixels
- Ad copy text: 90 characters
- Headline: 45 characters
-
Canvas has the following possible components:
- Header including logo
- Image (full-screen)
- Text block
- Offsite links’ button
- Carousel image
- Video (auto-play)
- Full-screen tilt-to-pan image
- Product set
5. Collection Ads
Placements supported by Facebook: Mobile Newsfeed

A collection ad lets you display a collection of products. You can showcase one featured image, with multiple images underneath that users can scroll through and click on.
You can also feature a video instead of an image, with the products from the video in the image boxes below.
Specs:
- Image Size: 1,200 x 628 pixels recommended
- Image Ratio: 1.9:1
- Your image may not include more than 20% text. Check how much text is on your image.
- Headline: 25 characters recommended
Likes & Engagement Ad Formats
Next up, we have four Facebook advertising formats designed to get more ‘likes’ on your Facebook page or engagement on your posts.
- Page Like Ads
- Page Post Ads
- Page Post Video Ads
- Page Post Text
Let’s dive in!
1. Page Like Ads
Placements supported by Facebook: Right Column, Desktop Newsfeed, Mobile Newsfeed

Page like ads are used to get more ‘likes’ on your Facebook page.
If used without care, they can easily burn a hole in your wallet. But if you use them strategically, like Jon Loomer did in the example above, they can be a great way to get your website visitors to also like your Facebook page.
Since these people already know who you are (since they’ve visited your site), they are more likely to ‘like’ your page and engage with your content thereafter.
2. Page Post Photo Ads
Placements supported by Facebook: Desktop Newsfeed, Right Column, Mobile Newsfeed

Like a page like ad, a page photo ad’s goal is to get more likes and engagement on your page. However, with the photo ad, the call to action is less prevalent.
We don’t recommend using this Facebook advertising format.
3. Page Post Video Ads
Placements supported by Facebook: Desktop Newsfeed, Right Column, Mobile Newsfeed

Finally, page post video ads let you get more page likes through video. Again, this is difficult to monetize, but it can be a good medium if you’re exceptional at video and get your ad targeting right.
Specs:
- Ad copy text: 90 characters
- Aspect Ratios Supported: 16:9 (full landscape) to 9:16 (full portrait)
- File size: up to 4 GB max
- Video can be as long as 120 min, but most top-performing videos are 15-30 seconds
- Audio: Stereo AAC audio compression, 128kbps + preferred
4. Page Post Text
Placements supported by Facebook: Desktop Newsfeed, Right Column, Mobile Newsfeed

Lastly, we have a simple page post text ad. No fancy images or videos – just text and a ‘like this page’ button.
Unless you’re an insanely good copywriter, we suggest avoiding this ad format altogether.
Mobile & Desktop App Installs
If you offer a mobile app or Facebook app, these ad types are for you. There are three types total: one for Facebook-specific apps and two for mobile.
1. Mobile App Ad
Placements supported by Facebook: Mobile Newsfeed

Mobile app ads are only available on the mobile newsfeed. They also have one of the highest conversion rates of all ad types, since clicking the CTA ‘Install Now’ takes the user straight to your mobile app in the app store. (Works for iOS and Android.)
You can also create ad targeting based on which platform they’re on (iOS or Android), whether they’re on a certain device (like Samsung vs. Motorola), and mobile vs. tablet.
Specs:
- Recommended image size: 1,200 x 628 pixels
- Image ratio: 1.9:1
- Ad copy text: Up to 90 characters
- Your image may not include more than 20% text.
2. Desktop App Ad
Placements supported by Facebook: Desktop Newsfeed, Right Column

Desktop ads are only usable if you have a Facebook app. It’s also only targetable to desktop users, since Facebook apps are not usable on mobile.
Specs:
- Recommended image size: 1,200 x 628 pixels
- Image ratio: 1.9:1
- Ad copy text: Up to 90 characters
3. Instagram Mobile App Ads
Placements supported by Facebook: Instagram

Instagram mobile app ad types are just like regular mobile app ads, but instead of showing your app on Facebook, it’s displayed on Instagram.
Since virtually all of Instagram’s users are viewing the social network on the mobile app, it makes sense to advertise a mobile app of your own here.
Specs:
- Image ratio: 1:1
- Image size: 1080 x 1080 pixels
- Minimum resolution: 600 x 315 pixels (1.91:1 landscape) / 600 x 600 pixels (1:1 square) / 600 x 750 pixels (4:5 vertical)
- Maximum resolution: 1936 x 1936 pixels
- Caption: Text only, 125 characters recommended
Physical Visits to Your Store or Event
Finally, we have Facebook ad types designed to attract people to your physical store or event. There are three types you can choose from.
1. Event Ads
Placements supported by Facebook: Desktop Newsfeed, Right Column, Mobile Newsfeed

Event ads are, you guessed it, ads that promote an event. For maximum impact, keep your event ads to the local area, city, or region of your event. (Unless you hold a major conference like Social Media Marketing world or Internet Retailing Expo, which get visitors from all over the world.)
Pro tip: You can also use this ad type to advertise to people who have visited your store or website, or create a lookalike audience using your email list. More on ad targeting in Chapter 4.
Specs:
- Recommended image size: 1920×1080 pixels
- Image ratio: 1.9:1
- Ad copy text: Up to 90 characters
- Headline: 25 characters
- Link Description: 30 characters
2. Offer Claims
Placements supported by Facebook: Desktop Newsfeed, Right Column, Mobile Newsfeed
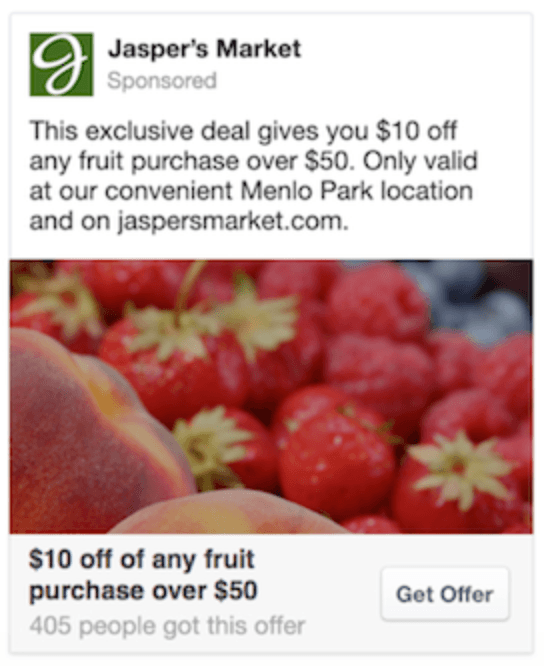
If you own a brick-and-mortar store, this ad type will be your best friend. You can offer coupons or BOGOs to people in your local area to attract foot traffic to your store.
When someone clicks ‘Get Offer’, they’ll get an email with the coupon code, which they can bring into your store and use.
Note: Your Facebook page needs at least 50 likes to run an offer ad.
Specs:
- Recommended image size: 1,200 x 628 pixels
- Image ratio: 1.9:1
- Offer title: Up to 25 characters
- Ad copy text: Up to 90 characters
3. Local Awareness Ads
Placements supported by Facebook: Desktop Newsfeed, Right Column, Mobile Newsfeed

Have you ever been scrolling through Facebook while you’re out on the town, when you see an ad for a store that’s less than a mile from you?
That’s a local awareness ad. You can target people who are currently near your store to get them to drop by. You can create CTAs like ‘Call Now’ or ‘Send Message’ to get users to contact you.
Specs:
- Recommended image size: 1,200 x 628 pixels
- Image ratio: 1.9:1
- Text: 90 characters
- Headline: 25 characters
- News Feed description: 30 characters
How to Create Your First Facebook Ad
Phew – it’s finally time to create your first Facebook ad!
To start your first Facebook advertising campaign, go to the Ads Manager. From here, you’ll have to choose a marketing objective. (If you skipped the section explaining marketing objectives, go back up and read through it.)
Once you’ve chosen an objective, give your campaign a name. Remember, this is your entire ad campaign, not your individual ad. This campaign can contain multiple ad sets, which can each contain multiple ads. So name your campaign appropriately.
For example, I might name my campaign ‘T-Shirts’ to contain all the ads for my t-shirt products.
Next, you create an ad set, which is where you dictate the audience, ad placement, and budget. You’ll learn more about audience targeting in Chapter 4. For placement, either leave it automatic or choose the best placements based on what we covered in the previous section. You can also test various placements to see which perform the best (more on split testing in Chapter 5.)
As for the budget, we recommend a minimum ad spend of $100 to test a campaign. You can spend as little as $5-$10 to get a minor boost, but you won’t have enough data to make a decision at that spending level.
Pro tip: A good way to test an ad is to set a $5-$10 daily budget across 5-10 days. By that point you should have a good idea of whether the ad is working or not. Keep in mind that losing money can still be a successful ad if you factor in CLV, and your first few ads are likely to lose money anyway. Breaking even can be a good thing as well, since you’re basically getting free email leads to remarket to.
Now, before we dive into creating the actual ad, I want to discuss Facebook’s bidding system.
Maximizing Facebook’s Bidding System
Facebook’s pre-arranged settings make it so you let them automate how much you spend per click (or whatever goal you’re aiming for).
In theory, this is great – you “get you the lowest cost results, based on your optimization for ad delivery”. However, Facebook also says that they “bid more as needed to spend your budget.”

This essentially means that they will try to spend your budget as quickly as possible if you don’t set a bid cap or an average bid amount.
Note: To edit the bidding, you have to click on the ‘Advanced Settings’ button linked in blue at the bottom of the ad set page.
You can also set an average or maximum bid amount for certain campaign objectives.

The average bid will use a strategy called pacing, which essentially paces your ad throughout the day rather than spending all the budget in the morning on low price ads. This means you may spend less on some ads and more on others to average your bid price.
Here’s a visual:

If you want to maximize profit and minimize CPA, use the ‘maximum’ bid.
If you want to maximize ad delivery and get as many conversions as possible (even if they cost a bit more), use the ‘average’ bid.
That leaves the question – how much should you set as the average or maximum bid amount?
The answer depends entirely on how much you can spend while still making a profit (at least in the long run). This is why it’s crucial to know your CPA and CLV (If you don’t have these yet, go back to Chapter 1 and calculate them).
And that’s it for bidding! Now, let’s set up the actual ad.
Creating the ad
At this point you’ve created an ad campaign, targeted an audience at the ad set level, set up a budget, and set a maximum or average bid amount. Now it’s time to actually create the ad!
Name your ad and choose a page to represent it. You can also add an Instagram account.
After that, choose the ad format you’d like to display it as. If you’re not sure what format to use, go back to the section above on the different ad format types and select the one that makes the most sense for your ad.

Finally, add your image or video, copy, website URL and headline.
Pro tip: If you don’t yet have an image, you can use Canva to create Facebook advertising images. They have free Facebook ad templates to easily create ad images. Keep in mind that your ad shouldn’t contain more than 20% text or your reach may be limited.
For more help creating awesome images, we have Nadya Khoja, the Director of Marketing at Venngage:
 “At Venngage we decided to run a test where we created 50 different images to promote an ebook we were working on at the time about social media graphics. We A/B tested it against the same audience and ensured that all the copy remained the same (even in the images themselves).
After running this test for a couple of weeks we were able to identify which images resulted in the lowest cost per clicks. The main elements of some of the best performing images were:
- That they had a darker background
- They had a clear call to action
- They included a photograph of a location
- They included charts to suggest new research
- And also the ones with sans serif fonts performed better.”
Note: In most cases, we’ve found that what determines your ad’s success or failure is not the ad itself, but the audience targeting and the offer. If you’re not seeing results, tweak one of these first. More on optimizing your ads in Chapter 5.
If you go under the advanced settings, you can also change the display link (to show a URL without the UTM tracking code so it’s less intimidating), add an additional link description in the news feed, create URL parameters to track your campaigns in Google Analytics, and turn on pixel Conversion Tracking.
And that’s all there is to it! You now have a Facebook ad you can turn on and watch the money roll in (hopefully).
Keeping Your Facebook Ad Campaigns Organized
Once you start creating multiple campaigns and ad sets, things can get out of hand quickly. You should instill a few best practices to keep your ad campaigns organized and easy to navigate.
Organizing at the Campaign Level
First of all, you should have one campaign per objective. For example, you could have a traffic objective to drive traffic to your blog content. It would look like this:

In this case, I would simply name the campaign ‘Blog Traffic’. That way I can see reporting on all the different blog posts and audiences within a single campaign.
If you have products you’re advertising to, you could create one campaign with the conversion object and title it ‘Products’. Then, you could set different products under difference ad sets (audiences) and see the performance of all your products at a glance.
If you’re running evergreen promotions that you’ll continue to advertise, it’s also a good idea to create separate campaigns for each promotion. Like this:

Organizing at the Ad Set Level
Following the campaign level you have your individual ad sets. One of the best ways to organize ad sets is by audience targeting.
Some ways you can break down targeting include:
- Remarketing – website users
- Lookalikes of website users
- Custom List uploads
- Lookalikes of custom list uploads
- People who liked your page
- Lookalikes of people who liked your page
-
Manually targeted audiences (interest/behaviors)
- Variation 1 – Broad
- Variation 2 – Narrow
Then you can target further down the funnel:
- Conversions
- Lookalikes of conversions
And some advertisers like organizing their ad sets by:
- Geographic location
- Language
- Placement (i.e. Instagram, desktop, mobile)
So for instance,
So for instance, one ad set can be set up targeting remarketing to site users only, another for lookalikes of these users, and likewise. This helps you decipher which audience is performing best for you (since most ads succeed or fail by the audience or the offer alone).
Name the ad sets to reflect this. I would literally name my ad sets ‘Remarketing to Website Visitors’, ‘Lookalike of Website Visitors’, etc.
Pro tip: If you didn’t already know, you can save any audience you create by clicking the ‘Save This Audience’ button and giving it a name.
Organizing at the Ad Level
Finally, we have our individual ads.
This is the easiest part. Just name your ads based on the offer or product you’re advertising. For example, if you’re running ads to blog posts, put the name of the post. If you’re running ads to a certain product, put the name of the product. Easy!
And we’ve made it through Chapter 3! If you’ve been following along, give yourself a pat on the back. This was a lot of information to dig through.
By now you’ve created and run your very first Facebook ad. Next up, it’s time to tweak your audience targeting to ensure you’re only showing your ads to the people who are likely to convert.
Facebook Custom Audiences and In-Depth Ad Targeting
Excellent Facebook ad targeting is the key to a successful ad campaign.
You could have the best offer in the world and the coolest product, but if you’re targeting the wrong people, no one will buy. Simple as that.
In this chapter, we’ll discuss three main types of targeting:
- Facebook custom audiences and lookalike audiences
- Interest-based targeting
- Facebook Remarketing Ads (AKA Retargeting ads)
But before we get into those, let’s discuss what a custom audience is and how to use it.
What is a Facebook Custom Audience?
A Facebook custom audience is a specific group of people you can show your ads to, such as a list of your past customers This is done by uploading a hashed customer list.
You can laser-focus your Facebook ad targeting to the audience you’ve created on Facebook, Instagram, and Audience Network.
How to Use Facebook Custom Audiences
According to Facebook, here is the exact process to create a custom audience:
- Go to your Audiences
-
If you already have audiences, click the Create Audience dropdown and select Custom Audience.
If you don’t currently have an audience, Facebook will show you audience creation buttons, instead of dropdowns. Choose Create a Custom Audience. - Click Customer File
- Click Add from your own file
From there, there are five parts to creating your Custom Audience:
- Add Customer File
- Edit Data Mapping
- Hashed Upload & Creation
Below, we’ll break down each one.
1. Add Customer File
To add a customer file:
- Choose whether you’ll upload your customer file as a file (.txt or .csv) or copy and paste it.
- If you choose to upload, click Upload File and select your customer file. If you choose to copy and paste, do so in the ‘Paste your content here’ field.
- Give your audience a name and description if you want to.
- Click Next.
Tip: You can download a data file template Facebook created that’s set up to help their system map your data more easily. Click Download file template to check it out.
2. Edit Data Mapping
Facebook will show you a preview of your data and how they’ve classified it. There are three statuses you may see in this preview:
![]() means Facebook thinks they know what type of data this is (but you can correct them if they’re wrong – see below) and will use it when trying to match the information in your customer file to people on Facebook. Only the data with this symbol gets uploaded for matching.
means Facebook thinks they know what type of data this is (but you can correct them if they’re wrong – see below) and will use it when trying to match the information in your customer file to people on Facebook. Only the data with this symbol gets uploaded for matching.
![]() means Facebook isn’t sure what type of data this is or you’ve told them to leave it out of matching. You can tell them what it is (see below).
means Facebook isn’t sure what type of data this is or you’ve told them to leave it out of matching. You can tell them what it is (see below).
![]() means the data type has been identified (either by Facebook automatically or by you), but they can’t detect a supported format. You may have to reformat the data in your file or select a formatting option from a Choose format dropdown (see below). For instance, birthdays can be written in varying formats such as DD-MM-YYYY or MM/DD/YYYY. The data type can also be left out of matching (see below).
means the data type has been identified (either by Facebook automatically or by you), but they can’t detect a supported format. You may have to reformat the data in your file or select a formatting option from a Choose format dropdown (see below). For instance, birthdays can be written in varying formats such as DD-MM-YYYY or MM/DD/YYYY. The data type can also be left out of matching (see below).
Note: If a lot of errors appear, it might be that Facebook is seeing a different delimiter (a wrong one). Delimiter is the puntuation mark that plays the role of seperating data points. You can modify it by hovering your mouse over “modify the delimeter” and selecting a new one.
Facebook allows you to interact with your data preview in three different ways:
- Changing the data type
- Removing the data from match consideration
- Changing the data format
To change your data’s type, click the dropdown and choose what type of data you’ve provided. From this dropdown, you can also choose Do Not Upload, which tells Facebook not to use that data when matching.
To change your data’s format, click the Choose format dropdown and choose what format Facebook should be using to match your data.
Note: Every data piece needs a type to be usable, but formatting details are required only by some kinds. If it’s needed, you’ll see a “Choose format” dropdowno.
If you need to change anything about your customer file to maximize the number of identifiers Facebook can use, do so now. Once you’re ready, implement the above-mentioned steps once again. When you’re satisfied, click Create & Upload.
3. Hashed Upload and Creation
Facebook will hash your data, upload it and create your audience for you. This may take a little while if your file is large. Feel free to continue working in another browser tab or window while you wait.
Next Steps
When we’re done creating your Custom Audience, we automatically generate a list of next steps you can take to get the most out of it. You can take one of those next steps immediately or click Done to finish.
And that’s all there is to it! You now have Facebook custom audiences ready to see your ad campaign.
Next up, let’s dive into the three types of Facebook audiences:
1. Facebook Lookalike Audiences
Facebook lookalike audiences are simply Facebook custom audiences who are similar in demographics and interests to a current audience you’ve saved.

For example, you can create a lookalike audience of people who are similar to your current customers. (More examples in the next section.)
Lookalike audiences are one of the best ways to scale up your advertising, since you’re essentially getting more of your highest converting customers!
Pro tip: Your audience size moves on a scale of 1% to 10%, with 1% being the most similar demographics and interests to your current audience. So start your campaigns at 1% until you achieve a higher reach, then slowly increase it one percent at a time until your CPA goes above your budget.
Types of Facebook Lookalike Audiences
Other than lookalikes of current customers, you can also create other lookalike audiences, such as:
- Website visitors
- People who visited a specific page on your site
- People who performed a specific action on your site (like viewing a video)
- Lookalikes of your email subscriber list
- People who engaged with your Facebook posts or viewed a Facebook video
- Lookalikes of your Facebook page likes
Depending on which audience you’re creating a lookalike of, the steps vary slightly. However, they all follow the same beginning path.
How to Create a Lookalike Audience
To create a lookalike audience, go to your Ads Manager, expand the ‘All Tools’ section, then click ‘Audiences’.

From here, click ‘Create Audience’ -> ‘Lookalike Audience’.

Here’s where the steps vary based on what you’re trying to do. You need to choose a source to draw your lookalike audience from.

This is typically a custom audience you created (such as your email list), but you can also choose to create it based off any of your pixel’s data, your Facebook page audience, or your Facebook page’s engagement.
Then, choose the country you want your audience to be located in. Finally, select your audience size. I recommend starting with 1%.
Pro tip: Under ‘advanced options’, you can create multiple audiences based on the audience size percentage. For example, you can target a 1%, 3% and 5% audience to see if a larger audience hurts your conversions or CPA.
And that’s all there is to it! You’re now ready to target your lookalike audience with your Facebook advertising. Next up, we’ll talk about interest-based targeting.
2. Interest-Based Ad Targeting
Interest-based targeting is probably the least reliable targeting method on Facebook.
This is because, unless you do a lot of solid market research, your ads could be a complete flop. It’s like throwing darts in the dark.
Interest-based targeting is also the most complicated and difficult targeting method. It’s the only targeting method where you decide on the audience, rather than uploading people who are already engaging with or buying from you, or letting Facebook use their algorithms to create the audience for you.
That said, if you don’t have a lot of website visitors, customers, or Facebook page engagement, interest-based targeting is pretty much your only option. It’s the only method that doesn’t require you to have any prior data.
How to Create An Interest-Based Audience
To create an interest-based audience, go to your ads manager and create a new saved audience in the ads manager.

In the pop-up window, name your audience (remember to give it a good descriptive name so you’ll remember what it is, such as ‘Soccer Moms 25-45’ or something). Choose your country, age range, and gender.
Then, scroll all the way down till you see the detailed targeting box.

Here you can type in a specific interest, demographic, or behavior.
Alternatively, you can browse through all the targeting options by selecting ‘browse’.

Note: I highly recommend being as specific as possible with your interest targeting. This is because broad-match interests, like ‘online marketing’, include loads of specific interests, like ‘Facebook advertising’ or ‘content marketing’. If you’re targeting your ad to Facebook advertisers, you don’t want to target all online advertisers, or your conversions will suffer.
Keywords you type in here are a blend of fan pages, buzzwords, and more.
These can be totally hit or miss. They can generally be placed in two categories: Fan Pages and Other. In general, fan page targeting performs better than using other keywords unless you layer your targeting.
For example, if I have a shirt that says “All I need is my cat and a Harry Potter book”, targeting people who like cats and Harry Potter could yield greater results than simply targeting a Harry Potter or cat fan page.

Note: If a keyword isn’t linked to a fan page, it’s usually a ‘like by association’ keyword. Meaning a keyword Facebook uses to describe you that you haven’t actually ‘liked’ yourself, but rather one Facebook’s algorithm has given you, based on your behavior. Such as commenting on a post, talking about something in messenger, or in other subtle ways you’ve interacted with the topic.
Now that you know how to create an interest-based targeting, let’s talk about how to get the most out of them.
Interest-Based Targeting Tips
Here are a few ways to kill it with interest-based Facebook ads:
1. Hyper-target highly engaged fan pages.
Targeting any old fan page around your topic simply won’t do it. You need to find highly engaged fan pages. That way you know it’s not just a bunch of random people invited to like a page, but rather people who are genuinely interested in and care about a topic.
To find solid fan pages, start with Facebook’s search bar. Type in your target keyword (like ‘Harry Potter’) and start browsing the pages that come up.

Some things to keep in mind:
- Don’t just go for the ones with the most likes. Likes =/= engagement.
- Click through on them to see if people are engaging.
- Consider filtering your search to ‘Cause or Community’ as these are typically the most engaged.
- Look for pages that don’t use title case (like ‘harry potter’ instead of ‘Harry Potter’). For whatever reason, these tend to get more engagement.

But sometimes Facebook won’t allow you to target certain fan pages. What do you do then?
2. Use creative problem-solving to find ‘hidden’ Facebook fan pages.
You may try to target a page but can’t seem to find it (to target with ads) even if you type it’s exact name in the search bar.
Attila from Iamattila.com came up with a genius way to target those pages without actually targeting those exact pages. Here’s how:
Step 1. Go to the page or group and check out the about section for keywords (and tags) that are used to the describe it.
Step 2. Set up a campaign where you target keyword #1 AND keyword #2 AND keyword #3 or however many you see fit from your research – obviously, the more you pick the more specific you can target.
This won’t target that page exactly, but chances are high that Facebook’s algorithm will show your ad to that same audience who liked that page.
If the page you found doesn’t have tags (like the harry potter page in the example above), there’s another method you can try.
You can find some ‘unavailable’ fan pages by searching keywords around their topic, such as the company category mentioned on their fan page. This is because fan pages are all (theoretically) targetable, but some are incorrectly tagged.
For example, a company page won’t be targetable if they change the name of their company (and the name of their Facebook page) but don’t change the tags to reflect that update. If you search their old company name, their page will come up – but it won’t if you search their new company name.
Moving right along!
3. Go deeper with your targeting.
OK, so there are loads of people who ‘like’ Harry Potter. It’s so popular that even people who have never read the books or seen the movie ‘like’ the page, just because.
Same things with tons of other topics. Not everyone who ‘likes’ Tiger Woods page actually likes golf. Not everyone who ‘likes’ Robert Downey Jr’s page likes Iron Man.
But, someone who likes ‘First State Potion Masters – Harry Potter Alliance Delaware Chapter’? Now they are true Harry Potter fans, not just people jumping on the bandwagon.

Another example: Someone who likes ‘Dustin Johnson’ is much more likely to be a golf fan than someone who likes ‘Tiger Woods’, because Dustin’s name isn’t as well known among non-golfers. Just like someone who likes ‘Iron man suits’ is more likely to be a true Iron Man fan than someone who likes the Iron Man official movie page.
You get my point – people who like specific parts of something are more likely to be true fans than just surface-level ‘likers’.
4. Use layering to get hyper-specific.
Remember above how I said you need to target multiple keywords for a broad keyword to be effective? That’s called layering, and it’s the only way to create successful broad targeting keywords.
I gave the example of a cat/Harry Potter shirt targeting people who like ‘cats’ and ‘Harry Potter’.
To do that, you need to ‘Narrow’ your audience.

This means you target people who like the first interest AND the second interest, rather than the first interest OR the second interest.
You can also narrow it further to keep adding keywords.

But did you notice the ‘Exclude People’ button?
5. Don’t be afraid to exclude people.
By excluding people you can get even more hyper-focused with your Facebook advertising.
For example, you might target people who like the ‘Field and Stream’ magazine, but then exclude hunters so you only target the fisherman. (Of course, there are better ways of using targeting fisherman, but you get my point.)
The takeaway is this:
You want to get as hyper-focused to the right audience as you possibly can. Facebook gives you the tools to do that by selecting highly-engaged fan pages, layering keyword interests, and excluding the wrong people from seeing your ad.
You need to understand your buyer persona and do your market research to learn the exact interests, behaviors, and even slang your target customer uses if you want to be successful with interest-based Facebook ads.
3. Facebook Retargeting Ads (AKA Remarketing Ads)
Get this: Website visitors shown Facebook retargeting ads are 70% more likely to convert!
Facebook retargeting ads (also called Facebook remarketing ads) are one of the best and easiest ways to increase your traffic and sales without much effort. They show your products to people who have already seen them on your site.
While you can retarget website visitors and people who viewed a particular product, I’ve found the highest-converting ads to be retargeting abandoned carts.
How to Set Up Facebook Retargeting Ads
Creating a retargeting ad is easy. All you need is to have data on your pixel.
Specifically, you need two custom conversions:
- Whenever someone adds an item to cart.
- Whenever someone purchases an item.
Once you have that data, the first step is to create a new Facebook custom audience based on website visitors. Include people who initiated checkout, but exclude people who purchased (or saw your order complete page).

Once that’s done, simply create a Facebook ad campaign targeting your new custom audience. That’s all there is to it!
You can also retarget website visitors simply by creating a custom audience of previous website visitors, or retarget people who viewed a particular product (but didn’t add it to their cart) by using the ‘People who visited specific web pages’ option.
Beyond products, you it’s a good idea to retarget your blog content to people who have viewed it previously. This is particularly useful if it’s a very long article, and you could target people who only spent a minute on page (not long enough to get through the full thing and subscribe).
One strategy that works particularly well was shared with us from Ross Simmonds, a marketing consultant who helps eCommerce stores grow:

Ross Simmonds, marketing consultant
“One of the most underrated yet powerful ways for an eCommerce brand to drive results with their customers is third party validation. Whether it’s validation from a friend or validation from a blogger, people love getting recommendations from other people. For this reason, I often advise eCommerce brands to put media behind articles that reference them as must-try products or solutions.
Let’s say you’re selling products that are targeting young parents. Rather than promoting your products to this demographic with an ad telling them to buy now – warm up your target audience by promoting an article titled: “8 Things Every Young Parent Needs To Stay Sane In 2018” but includes a reference to your product. Once they’ve clicked on that article, you could retarget them with your product and increase your likelihood of conversion.”
Facebook Ad Targeting Conclusion
You’ve made it through this chapter and learnt all about Facebook ad targeting!
If you take nothing else away from this chapter, remember this:
Your ads are only as successful as the audience you show them to.
It doesn’t matter how great of an offer you have or how much you spent designing the perfect ad and hiring the best copywriter. If you’re showing the ad to the wrong people, it just won’t convert.
Your audience is always the first thing you should test when an ad isn’t performing. If you have the audience right, the next thing to check isn’t the ad itself, but rather the offer.
In the next chapter, you’ll learn how to optimize the ad itself. Let’s dive in!
Facebook Ad Optimization
You’ve got your offer. You’ve set your goals. You have an audience. You know how to create a Facebook ad.
But your ads just don’t seem to be converting. What’s the problem?
Chances are, if your target audience was selected well, they simply don’t care about your offer. Either it’s a product they’re not interested in or a deal that’s not enticing enough.
How do you know?
In this chapter, you’ll learn about Facebook ad optimization. We’ll cover:
- Facebook’s Analytics Reports
- Ad creatives
- Ad frequency
- Facebook Split Testing (AKA Facebook Creative Testing)
- Localization
- Seasonality
- Text in ads
Let’s dive in!
Facebook’s Analytics Reports
Before you start optimizing your Facebook ads, you have to know which ads you need to optimize. (Unless you’re only running one ad – in which case, you should be creating more to split test. But more on that later in this chapter.)
Now, in Chapter 2 you learned how to navigate your Ads Manager menu and visit your analytics tool to see your Facebook reports.
Here you’ll see an overview of any ads reports you’ve created, with details on impressions, conversions, CPC, and more. If you haven’t created any reports yet, this page will be blank.
To get started, click the blue ‘Create Report’ button. Here you can filter your ads data by objective, buying type, placement, # of impressions, and more.
You can also change which columns to display, break down the data by day, week, month, etc., and choose which level (account, campaigns, ad sets, or ads) to show. There’s a lot to play around with.
For your first Facebook reports, let’s keep it simple. We’ll identify the campaigns that are costing you too much money per acquisition.
Simply add a filter for CPA > $1 (or whatever your max CPA is). The CPA filter is under the ‘Metrics’ tab.
Now you’ll see which Facebook ads have a high CPA. These ads are costing you money, so you should work on optimizing or removing them first.
You can also filter by CPC or raw # of conversions if filtering by CPA isn’t helpful.
Now that you know which ads are underperforming, let’s look at your ad creative.
How to Craft Click-Worthy Ad Creative
Let’s face it: words matter.
Good advertising is about copywriting. Just ask copywriting legend Joe Sugarman – he was able to sell over 100,000 pairs of blue light blocking glasses in less than 6 months with nothing more than a newspaper ad. Did I mention these sunglasses cost $300 a pair?
That’s right – $30 million in 6 months selling glasses. Not too shabby!
So how can you follow in Joe’s footsteps? Here are a few tips:
1. Write using your audience’s language.
Harry Potter nerds use words like ‘Expecto Patronum’ and ‘Avada Kedavra’. (Yes, those are Harry Potter spells.)
But beyond literally using a fan bases unique language, you can also talk using the wording people use to describe their pains, hopes, and dreams. Let me give you an example:
Let’s say you’re selling a wireless parking sensor. You’re advertising to the right group and you need to know what to say. So you start scouting forums your audience might visit, and you come across this post:
Now you know your user’s language. They want something that’s ‘easy to install’, they’re ‘not much for wiring anything’, and they don’t want anything ‘extremely complicated or expensive’.
You can translate this to your Facebook advertising creative. Your ad headline might be something like “Finally! A Wireless Parking Sensor That’s Easy to Install!” or “Not much for wiring anything? These wireless parking sensors are ridiculously easy to install”.
See how you can use your audience’s language? It’s like you’re speaking directly to them.
To figure out how they word things and the phrases they use, you can do a Google search for forums around your product/niche or prowl some Facebook groups you’ll be targeting. It’s easy to do, but also easy not to do – so don’t skip this step!
2. Run different ads for different audiences.
I hope you’re starting to notice a trend – Facebook ads are successful because of their ability to hyper-target the right people.
They aren’t like billboards or TV ads where you need to appeal to a broad group of people. You can make the perfect ad that speaks directly to your target audience.
And you should go even further to hyper-target segments within your audience.
For example, there are Harry Potter fans. But then there are people who specifically love Gryffindor, or Slytherin, or Hufflepuff or Ravenclaw. Each will have their own language, pains, wants, and dreams.
There are golfers. But then there are competitive golfers, casual golfers, and amateurs who only play a few times a year.
There are beer drinkers. But then there are people who love IPAs (or even specific IPAs), people who will drink anything that’s cold on tap, people who like light beer, people who like specific brands, etc.
You get my point. The more specific you can be, the better your ads will convert. The better you know that specific customer, the better your ads will convert. Run multiple hyper-focused ads rather than one blanketed ad.
3. Make sure your ad copy matches your image.
Sometimes an image is just slapped on and the focus is on the copy. But when that happens, it’s easy for the visual to not make sense with the text.
Always make sure the image matches the text. It’s a simple step, but an often overlooked one.
I recommend getting a second pair of eyes on your Facebook ads formula – someone who doesn’t work with the company or at least doesn’t work on the ads – to get an outside opinion. Sometimes it’s hard to see the most obvious things when your head is down on the grindstone.
4. Keep it short and show value first.
People don’t care about the features of a product. They care about the benefit – what’s in it for them?
This goes back to doing proper market research. You need to know what your customers really care about so you can lead with their desire (or pain point).
- Are they frugal? Lead with how much money they’ll save.
- Are they trying to lose weight but struggling? Lead with how 500 people already lost weight with your product.
- Do they absolutely hate doing dishes after cooking dinner? Lead with how your frozen dinners don’t require dishes and even come with pre-packaged plastic utensils.
I’m pulling examples out of nowhere here, but I hope you get my point. Lead with the deep desires or solutions to pain points of your target market.
5. Follow KISS: Keep It Super Simple.
A great writer (and copywriter) is not the one who knows the fanciest, most complex words. It’s the person who can take fancy, complex jargon and break it down into its simplest terms.
In the words of Leonardo Da Vinci:
“Simplicity is the ultimate sophistication.”
Write your ad so even a 5th grader could understand it. When someone sees your ad, they should immediately know:
- What you’re offering
- How it benefits them
- What to do next
Let’s look at SoFi’s ad, for example.
While the image could do a bit better of a job (it’s kind of a stretch), the copy is spot-on. You immediately know what the benefit is: pay off loans faster. What student doesn’t want that?
They even have ‘PAID IN FULL’ in caps. It helps you imagine that sweet, sweet feeling of being debt-free, which entices you to click. Nice and simple.
6. Don’t hide the price.
There’s nothing that pisses people off more than clicking on an ad expecting one price, only to see a higher price when the page loads.
Plus, leading with the exact prices helps build trust and shows transparency, which leads to higher conversions for the people who do click.
Car companies do this well. Take a look at this ad from Ball Honda:

They tell you the exact monthly cost, up front deposit, loan length, and more. They even tell you the residual value at the end of your lease term! Now that’s transparency!
If you’re doing this for eCommerce, a way to do this is to say things like ‘$X (Tax not included)’ or ‘$X plus shipping’. No hidden fees!
Note: Expensive fees are actually the #1 reason people abandon their shopping cart. So the more open you can be about fees, the fewer people will abandon ship!

7. Spy on the competition.
If all else fails, look at your competitor’s ads. What benefits are they highlighting? What offers are they promoting? What’s their sales copy and ad creative?
You can borrow from their ads to improve your own.
To see competitors’ ads, you have a few options:
There are other Facebook advertising spying tools as well if you search around. Just find something you like that’s in your budget and go with it.
If you notice your competitors are all using specific wording or offers, try them out for yourself. It could be the key to higher conversions!
But enough about optimizing your ads. There’s something else you need to learn about to avoid burning out your audience or spending too much: Ad Frequency.
All About Facebook Ad Frequency
Ad frequency refers to Facebook’s method of tracking how many times a display ad was shown to the same person.
You can calculate it by dividing the number of impressions delivered by an ad by the number of unique visitors reached by an ad. The frequency of an ad is also influenced by the budget of your acccount as well as your target audience (e.g. their interests and behavior).
Ad Frequency = Impressions ÷ Reach
Frequency of an ad important because it’s the only metric that tells you why you may have reached (or failed to reach) a certain performance level. Other metrics, like CPC, impressions, clicks, etc., only tell you how it’s performing, not why.
It is also important because it can help you avoid ad fatigue and banner blindness.
- Ad Fatigue refers to people getting sick of seeing the same ad over and over again, to the point where they stop clicking on it. Your Facebook ad frequency will continue to go up while your CTR goes down.
- Banner Blindness is when your ad looks too much like a banner ad and, since people have been overexposed to banner ads, they tend to ignore them. A high frequency and low CTR can also mean your ad is suffering from banner blindness.
So how can you tell? If your CTR starts out high but drops as frequency increases, you’re probably experiencing ad fatigue. If your CTR is low to start and continues to be low even after increased frequency, you’re probably suffering from banner blindness.
A good ad frequency is typically around 1 to 2.
Anything under a 1 suggests your ads are too spread out and aren’t reaching your target audience. A frequency that’s above 4 in the news feed (or 8 in the right column) means you’d typically start to experience ad fatigue and banner blindness.
You can put a cap on your ad frequency by capping your CPC bidding. If your bidding is lower, Facebook won’t be able to show it to people as often, since to do so would increase the CPC beyond your threshold.
Note: Keep in mind that if your audience is very small, you are likely to see much higher ad frequencies (since there aren’t as many people to show the ad to).
How to Combat Facebook Ad Fatigue and Banner Blindness
If you do start to experience ad fatigue and/or banner blindness, it simply means you need to start switching up your ads. A new image is usually enough to keep things fresh, so start there.
Ideally you’ll want to rotate your ads as soon as you start to see a dip in efficiency.
Some experts say to rotate your ads weekly or every two weeks, others suggest every three days. Others say to have two or three ads revolving constantly. But every business is unique, and you’ll have to find the best timing for yourself.
The Takeaway: Change your ad when your frequency increases and your CTR decreases.
The easiest way to know when to rotate an ad is to watch your response graph of clicks and actions in your analytics. When you see these metrics start to dip, rotate.
Eventually, however, you may need to present a new offer altogether. You’ll know when that happens if you continue to see low CTR and conversions despite changing the image and/or text several times.
Now that you understand ad frequency, let’s talk about one of the most important aspects of Facebook advertising: Split Testing!
Facebook Split Testing
Split testing (or A/B testing) is displaying two or more near-identical ads at the same time, but changing one variable (such as the copy, image, headline, etc.) to see which performs best.
Here’s a visual explanation:

You show half of your audience one variation of the ad, and the other half another variation, in order to see which variation converts better. It’s important to only test one element at a time, or else you won’t know which change caused the increase.
Let’s dive into the how-to!
How to Split Test Your Facebook Ads
Facebook has a built-in split testing tool to easily test your ad creative. It’s super easy to use, here’s how:
- Create a new ad campaign just as you normally would.
- Check off the ‘Create Split Test’ box on the ad objective page.

- While choosing your Ad Set settings, you’ll notice a box titled Variable. Here you can choose exactly what to test: Creative, Delivery Optimization, Audience, or Placement

- These tests are organized by creating an ad set for each ad variable, NOT by creating multiple ads under the same ad set.

- Once you’ve set up the ad, you need to set up your test budget. By default, your total budget is split evenly between all your ads. However, if you select the drop-down, you can choose a ‘weighted split’ option, which allows you to set certain percentages to different ads.

And that’s all there is to split testing your Facebook advertising! Now you just let them run and see which performs the best, then scale that version up with a higher budget. Or better yet, continue running creative tests to continue to optimize your ad.
Note: Your split test needs to run for at least 3 to 14 days in order to be conclusive, depending on your budget. However, there is an option to end the split test early once a winner has been found, so you can always set it to 14 days and turn this on.

Now let’s talk about how to maximize your split tests.
The Ultimate Facebook Creative Testing Strategy
For this section I’ll hand the mic off to Azriel Ratz of Ratz Media, a Facebook ad expert who’s spent over $1 million testing Facebook ads.
Ratz recommends you create three sentence variations for your ads:
- Sentence A in the Text Post
- Sentence B in the Headline
- Sentence C in the Description

From here, he recommends you create your ads like you normally would (select the image or video and duplicate them), but switch the placement of two of the sentences. Duplicate this process until you have every possible combination (6 in total).
It looks like this:

Next, duplicate all six of those ads and use a different image/video (or video thumbnail) for each variation. Ratz recommends trying at least four image variations.
Finally, repeat that process with three different sentences (D, E, and F) to create a grand total of 48 ad variations!
Note: Facebook only allows 50 ad variations per ad set, which is why he recommends the exact numbers or variations above.
If you really want to dive in, you can also create 5-10 additional ad sets, each with the 48 ad variations, each targeting a different audience. Pretty cool, right?
Two quick tips:
- Allow your ad variations to run for at least 48 hours before you compare them. Anything less than that isn’t giving Facebook enough time to show your ad to the audience.
- Add UTM parameters to each ad set so you know which audience is performing the best and it’s easier to compare their time on site.
Once you’ve let them run for two days, here’s what you should compare:
First, look at Facebook CPM (Cost Per Impression). A higher CPM for a particular ad set means either 1) the ad is good, but it doesn’t appeal to the targeted audience or 2) you’re targeting a good audience, but the ad is bad.
In the first case, you need to test new audiences. In the second case, you need to create different ad offers.
Next up, look at CPC (Cost Per Click). If your CPC is too high, you need to create more compelling ads. Your audience and offer are good, but you’re not being aggressive enough getting them to click.
In this case, you should create a more assertive CTA (Call to Action), such as literally saying ‘Click here’ or telling them explicitly what they need to do.
After that, look at time on site. This is where those UTM parameters come in handy, as you can’t see this data on Facebook analytics. Head over to your Google Analytics account and compare those UTM parameters time on page.
To do this, go to ‘Behavior’ in the left-hand menu, then click ‘Site Content’ -> ‘All Pages’. Then click ‘advanced’ next to the search bar and type in the UTM campaign name you created.
If your ad gets a lot of clicks, but has a very low time on page (like 10 seconds, for example), something is wrong. According to Ratz, this could mean:
- You’re spending too much on Audience Network.
- You’re targeting the wrong audience.
- The ad and the landing page have a message mis-match.
The solution here is to make sure your landing page matches the ad you’re showing. For example, if the ad says ‘Half price books’, the first thing people should see when they click the ad is big bold letters saying ‘Half price books’.
Pro tip: If you’re sending traffic to a product page, be sure to have epic product descriptions!
You should also look at desktop versus mobile visitors to see if there’s a difference here. Your mobile landing page may be broken or not user-friendly.
To see desktop vs. mobile on Google Analytics, add a secondary dimension of ‘Device Category’. Click the secondary dimension dropdown and type in ‘device’ to find it.
Finally, we want to look at your ads’ conversion rates. It’s possible that you’re targeting the right people with a great ad and you’re getting loads of clicks and a high time on page, but still aren’t getting people to buy.
In this situation, here’s what Azriel Ratz recommends:
- The audience doesn’t like this offer, so offer something else.
- You’re asking for too much information. Stick to three or four fields max.
- You’re asking for information they don’t want to share.
And that’s all there is to it! If you’ve followed along, you’ve now performed a solid Facebook ad split test. Give yourself a big pat on the back!
But there’s more to learn, young padawan. We haven’t talked about localization yet!
Facebook Localization And You: Targeting Other Countries
Facebook advertising and split testing is easy enough when your audience is all in one country. But what if you have an international audience who speak different languages?
That’s where Facebook’s Dynamic Language Optimization tool and localization come in.
What is Dynamic Language Optimization?
Dynamic Language Optimization makes it super easy for Facebook to serve your ads to international audiences in multiple languages without manually creating separate ads and ad sets.
This is great in two situations:
- Advertising to one country that’s dominated by two or more languages.
- Advertising to multiple countries at the same time.
However, there are a few restrictions on this tool. Namely:
- Only Facebook News Feed (desktop and mobile), Instagram, and Audience Network are currently eligible.
- You can only have up to six languages.
- You’re restricted to certain objectives.
- Only one image can be applied to all variations, and text in the image won’t be translated.
Disclaimer: Keep in mind that although this tool is extremely helpful and saves a lot of time, you still need a translator or a way to translate your text accurately. If you don’t have that, you may not want to dive into this yet. You also want to keep in mind that people might comment in the language you’re advertising in, and you’ll need to comment back in the same language!
New, let’s set one up!
How to Set Up Dynamic Language Optimization
Create an ad as you normally would. But this time, choose multiple languages to display your ad in on the ad creation page.
As mentioned before, this feature is only available for certain ad placements.
Once you click ‘Remove Additional Placements’, you can submit your separate language in these locations:
- Website URL
- Headline
- Text
- News Feed Link Description
Then let ‘er rip!
To view the results of your campaign, simply go to your Ads Reporting tool and break down the results by Dynamic Creative Asset -> Text.

This is a tough strategy to master, but this is a complete guide to Facebook advertising, so I wanted to mention it!
You’re almost through the chapter. Two more things to discuss: seasonality and text in your ads.
How Seasonality Affects Your Advertising
If you suddenly see a dip in your impressions or an increase in your CPC and you can’t seem to figure out what’s causing it, it could be due to seasonality.
As mentioned in Chapter 2, the time of year affects the costs of your ads. It can also affect conversion rates and CTR. This is because some things people simply aren’t buying at certain times of the year.
There’s the obvious examples, like holiday decorations and Christmas gifts. But seasonality can affect other industries as well.
For example, I run an RV blog that teaches people how to live in an RV and gives travel tips. We’ve been running it for about two years now, and sure enough, our traffic always dips in the winter months. Obviously, people aren’t thinking about RVing in the snow!
If you’re unsure of the seasonal trends around your product offerings, a simple check on Google Trends can tell you. Just type in the name of the product or the niche you blog about, and Google will tell you the average search volume over the last few years for that keyword.

Here we can see the term ‘RV’ is most searched for from May through September, with a dip after that – this correlates perfectly with what I’ve seen over the last two years.
This doesn’t mean you can’t run ads in the off-months. In fact, the CPC may even go down in the off months, since people aren’t buying ads during that time. (On the same token, it could go up because people are still buying ads but they’re shown to fewer buyers. That’s why it’s important to test for yourself!)
The Takeaway: Use Google Trends to see if your products or niche has seasonality. Then, test your ads during those times to see if you’re still able to make money or if you should shut off ads during that time.
Keep in mind that even if you’re breaking even or losing a bit, it may still be worth running the ads just to stay top of mind. That way, when your hot season comes around, people have already been exposed to your brand for the last few months!
Wrapping Up Optimization
You’ve made it to the end of Chapter 5 – congratulations!
By now you understand how to create a Facebook ad campaign, split test that campaign, and optimize it for the best possible CVR and the lowest CPA. That’s a massive accomplishment!
Now, let’s take a look at some Facebook Advertising FAQs.
Facebook Advertising Strategy FAQs
By now you know how to run a profitable Facebook ad campaign. But you may still have some questions. That’s where this Chapter comes in.
Most of the Facebook ads questions were answered throughout this eBook, but the answers are easy to miss. So, we created this list of Facebook advertising FAQs to put all the answers in one place!
The most commonly asked questions are:
- How much budget should I allocate to my ads?
- How often should I update my ads?
- Why does my CPC/CPA keep increasing?
- If I’m already running Google AdWords campaigns, do I still need Facebook ads?
Let’s dive in!
1. What’s a good Facebook Ads Budget?
The actual minimum Facebook ads budget you’re allowed is $1 per day, or twice your CPC.

But back in Chapter 3, I mentioned you should have a minimum test budget of $100. So what’s the best Facebook ads budget to start with?
Truthfully, your budget shouldn’t just be a number you pulled from an article as a recommended minimum. It should be tailored specifically to your goals.
For example, your goal might be to:
- Grow your audience to 10,000 fans
- Sell 100 widgets this week
- Attract 50 hot leads
- Or get 1,000 new email subscribers
Each of those will have a different cost associated with them.
In addition to that, your minimum budget will be affected by your niche/industry.
The entertainment industry has extremely low CPC and CPM. But a ‘boring’ industry, such as construction or law, usually have higher advertising costs. After all, people are on social media to connect and be entertained, not to find a lawyer.
It also depends on your starting point. Are you building a Facebook audience from scratch? Or do you already have engaged fans? These factors affect the cost of advertising.
So, while $100 is a good starting test budget, this figure should be used to figure out your REAL budget. Base your future budget off the results from your initial test campaign.
Let me explain.
Say you test an ad (using the split test method we covered in Chapter 5) and you find your CPA is around $2. If your profit margin on a product is $2 or more, you can scale this ad up almost infinitely and continue to make money, especially on remarketing ads and your growing email list.
In this case, I would spend as much budget as possible on ads. After all, you’ve achieved that sought-after ‘money machine’.
But say you’re losing money on every variation. At that point, you’ll need to assess a few things:
- Is your audience right?
- Is your offer right?
- Is your website and landing page high-quality and user-friendly?
- Does the message on the landing page match your ad?
- Do you have the budget to continue testing ads, even if you continue to lose money?
Of course, the specific culprit of why your ad might not be working was addressed in Chapter 5, so if you are unsure, go back and read that chapter. But the point I’m making is this:
The best Facebook ads budget for you depends on your specific circumstances. Start with a $100 test budget and review from there.
2. How often should I update my ads?
In Chapter 5, we discussed two important concepts: banner blindness and ad fatigue.
Both of these essentially mean that your ads will eventually become less effective and cost more, forcing you to rotate or change your ads.
How often you should update your ads depends entirely on your own experience. Every industry, offer, and audience will have different tolerances for ad frequency.
The only way to determine the best time to rotate your ads is to review your ad performance periodically. Personally, I would take a quick look every day or two just in case a dip happens, so I can catch it right away. However, looking once or twice a week is acceptable as well.
To review your ads, head over to your Ads Manager. The default page is an overview of your ad campaigns and their performance, but you can also see all your ads at a glance by going to the ‘Account Overview’ tab and clicking ‘Creative Reporting’.

Here you’re looking for increases in your CPC or Cost per Result, decreases in your impressions or reach, or a lower ad frequency. These are all signs of ad fatigue, meaning it might be time to change your ads.
What should you change?
The image is usually the first and easiest thing to switch out. The text can be changed to some effect as well. However, if changing your ads doesn’t improve the metrics, it could mean that your audience is burned out or uninterested in your offer. In that case, you need a new ad campaign entirely.
There’s more information on ad rotation back in Chapter 5.
3. Why does my CPC/CPA keep increasing?
The first thing I look to when CPC/CPA continually increases is ad fatigue or banner blindness, like we covered in the answer above.
However, your costs could also be increasing due to several other reasons, including:
Seasonality in your niche – It’s possible costs are simply higher in some months compared to other months. More on this in Chapter 2 and Chapter 5.
Your maximum bid is too high – In Chapter 2 we covered how to make the most of Facebook’s bidding system. Part of that is setting a maximum or average bid. Facebook does this automatically, but you can cap it yourself.
Your relevance score dropped – Facebook assigns a relevance score to each ad you create, which indicates how ‘relevant’ Facebook believes this ad to be to your target audience. If this score drops, your CPC goes up and your reach goes down.
To fix this, you’ll need to make your ad more relevant to your audience. Either change your audience to be more specific to your ad, or change your ad to match your audience.
You have too much text on your ads – Facebook used to have a 20% text rule. If your ad contained more than 20% text (according to their grid tool) it would be rejected or taken down. However, the tool was glitchy and inconsistent, so they updated this rule to instead be based on a sliding scale of text. The more text your ad had, the more limited it would be.
Here’s Facebook’s official image explanation:

Your ad frequency peaked – Frequency is the number of times people in your audience see your ad. A frequency of .5 means half your audience saw your ad, while a frequency of 2 means everyone in your audience saw the ad twice.
Data shows that people usually click on ads either the first or second time they see them. By the third impression, people are getting tired of the ad, and if they see it more than that, they’re more likely to hide the ad or click to stop seeing ads from your company. Both of those are actions that will drop your relevance score and reduce ad frequency.

If you reach an ad frequency of 3+, it’s time to create a new ad or target a new audience.
Your competition is increasing – Over time, Facebook will naturally acquire more advertisers. As they do, obviously CPC will rise and ads will cost more to run. If none of the other reasons laid out above seems to fix the issue, this could be the culprit.
In this case, you’ll just have to suck it up or find a way to decrease CPC, such as targeting a different audience or working on your relevancy score to beat the competition.
4. If I’m already running Google AdWords campaigns, do I still need Facebook ads?
This is such a great question – we’re getting away from the specifics of Facebook advertising, and getting closer to overall business growth decisions.
The answer to this question, like most of the others on this list, is that it depends.
Obviously, if you can make both of these mediums profitable, do it. There’s no reason not to – it’s just more money for your business. AdWords tends to have a higher CPA, but also a higher CVR because there’s greater intent. People are literally searching for they want on Google; Facebook is more a means for connecting with friends/family and entertainment.
If you’re already running successful Google ads, keep doing it. But test Facebook ads as well if you have the time. You may be able to get cheaper conversions on Facebook, and that’s always a good thing.
At the same time, realize that both of these platforms have a significant learning curve (you just read a 20,000-word eBook on Facebook alone), so starting, maintaining, and split testing multiple campaigns on two separate platforms can be a major undertaking and huge time sink.
I recommend you either hire a PPC agency or freelancer to help you with this (if you have the budget for it) or sticking to one platform until you’ve automated it to a point where it takes less time to maintain. Unless you just really like running ads, in which case maybe you should start your own agency!
5. What if I can’t find my audience on Facebook?
There are more than 2 billion people on Facebook. Your audience is almost certainly on the platform. The problem is figuring out how to target them.
In Chapter 4 we covered in-depth targeting tactics to find your exact audience. But if you’ve run through all the tactics in that chapter and still can’t seem to find the right target market, here’s a little hack that can help:
First, create a video ad. You can either shoot one yourself or hire someone on Fiverr or Upwork to create it for you.
Next, target a big, broad audience who might be interested in your video. This doesn’t have to be hyper-specific like I recommend in Chapter 4 (you’ll see why in a second).
Run the ad and put an average bid at $0.01 per view. That way you can get a lot of views without spending a ton of money, and only those who are truly interested will see the video.
Finally, run a lead generation retargeting campaign to all the people who viewed the video for at least 10 seconds. Make sure the ad covers the same topic and is related to the video.
You now have an audience on Facebook! Start running ads to them.
6. Where can I find more Facebook ads resources and help?
This eBook was pretty exhaustive. But Facebook advertising is a massive subject and it can’t all be covered in one location. Perpetual learning is key to running winning Facebook ads, especially on a platform that’s constantly changing.
The following people and blogs had a big impact on my own advertising knowledge and in running this eBook. Check them out!
There are loads of other places to learn more about Facebook ads, but these are four of our favorites. Of course, you can also check out the Oberlo blog, which includes many topics around Facebook ads for beginners.
7. What tools are available to help me run Facebook ads?
While Facebook’s Ad Manager provides you with a number of tools to do everything from creating your ads to testing and analyzing the results, there are plenty of other online tools that can help you run better ads.
Canva is a free image editing and creation software that has templates you can use to create awesome Facebook ad images in minutes – even if you’re not a designer!
AdEspresso is more than just a Facebook advertising blog. They also have a Facebook ads tool that lets you split test your campaigns more easily, optimize different elements of the campaigns, see advanced analytics in easy-to-digest graphs and charts, and more.

Perfect Audience is a Facebook retargeting tool. While you can run retargeting ads to your Facebook audience without a separate tool, Perfect Audience lets you use your Facebook pixel data to retarget your audience on other platforms, such as mobile apps and other websites!

Again, there are tons of other Facebook advertising tools out there. But these are a few that I’ve used and enjoyed.
Conclusion
You’ve just made it through a 20,000-word eBook. Give yourself a pat on the back – but don’t rest just yet! You still have to execute the Facebook advertising strategies you’ve learned.
If you have any questions about Facebook advertising that weren’t answered in this book or in the FAQ, contact us and let us know so that we can add it in. This is a living and evolving resource that we plan to keep up-to-date as Facebook makes changes and we learn more tips and tricks.
Facebook ads can truly be a money-making machine for nearly any business – especially for online stores. If you’re not taking advantage of this platform, you’re missing out on huge sums of money. Start running Facebook ads today!