
Introduction
Welcome!
Maybe you’re here because you’ve been thinking about starting a dropshipping store, but you’re unsure and maybe a little overwhelmed by the process.

Tim Kock
Maybe you’ve already started, but could use some more guidance to get to your first sale.
Maybe you flat-out don’t believe it’s possible to make it happen in just 21 days.
Either way, I’m glad you’re here. Because I’ll show you step-by-step, day-by-day, exactly how to build an awesome store and make your first sale in 3 weeks flat.
I know it’s possible because I’ve been there myself. After a horrible bike crash in 2014 that left me in a coma for a week (and basically broke my whole body), I was forced to change the way I lived.
I opened my first dropshipping store in Germany, after the country’s leading matcha tea manufacturer agreed to sell its products with my labels. Don’t laugh… but I actually thought I invented dropshipping. I was pretty disappointed to learn I’m not a revolutionary.
After building that business and eventually selling it to the manufacturer, my passion for ecommerce and dropshipping was born. And it hasn’t gone away, either. To date, I’ve made more than $500,000 in sales doing what I love.
You can check out my case studies: the one where I made $6,667 in less than 8 weeks or the one where I made $8,873 in 31 days.
So you could say that I’ve got some experience.
But enough about me.
Throughout this course, we’re going to follow my friend Amanda – a new dropshipping entrepreneur who asked me for some help starting her first store. She’s agreed to share her process with you so you can see how attainable it really is.

Amanda Gaid
This is Amanda Gaid, the brain behind the women’s fashion scarf store Evooli. She’s a writer and digital marketer who started with zero dropshipping experience.
We’re going to follow her entire journey – from before she even picked her niche, to building out her store, to getting her first sale. Along the way, she asked me lots of awesome questions that we’re excited to share with you. We think they’ll answer a lot of your questions too.
The #Oberlo21 challenge will document each step of the way with directions and screenshots, covering everything from picking a niche to building the website to advertising and promoting it online.
[highlight]IMPORTANT: If you haven’t done it yet, remember to download your Calendar now, add your name with a marker, print it and hang it somewhere you can see it everyday. Snap a picture and post it on Instagram, hashtag: #Oberlo21.[/highlight]
Before we start, I want to put an end to a few dropshipping ‘myths’ you may have heard…
- You don’t need to pay for an expensive dropshipping course to learn how to succeed.
- You don’t need a huge budget – we’ll set ours at $500, but you can even spend less if you need to.
- Picking an incredible, perfect, ‘winning’ product is less important than you might think – so don’t obsess over it.
- You can still succeed if other people are already selling similar (or even the same) items.
Forget what you’ve heard about dropshipping and follow me.
By the way, I hope you have printed out our calendar. Trust me, it will help you stay motivated and on track.
Let’s do this!
[highlight]We’ve made a master file that contains all the template spreadsheets included in this program. Here’s where you can find it. I’ll also let you know in the corresponding day – so don’t worry about diving into it just yet.[/highlight]
Day 1: First things first – pick your niche

1. Tweet today’s quote → 2. Get to work!

One of the biggest and most stressful questions a new dropshipper asks themselves is: “What should I sell?”
Obviously, this defines your whole business. But don’t lose sleep over it. (Like Amanda did.)
Because no matter what you do – no matter how many hours of research you put in – you’ll never know how well your store will perform until you get out there and try. When I started my first business, I wasted weeks trying to come up with product ideas.
And here’s a secret that most people won’t tell you: it’s not really about what you sell… it’s about why you sell it. In the end, even an amazing product is nothing without a valuable experience for shoppers. (I’ll show you all about that when it’s time to build your store and create a brand.)
One more thing. I have a bit of an unpopular opinion… but I truly believe that there’s no such thing as a saturated niche. I think that if you really put in the time, you can find success selling just about anything.
All that said, there are some steps to help make sure you’re choosing promising niches in 2020.
Today, we’re going to:
- Choose a dropshipping niche (but not necessarily your products yet), with the help of our spreadsheet template
- Validate the niche to make sure people are actually buying
- Sign up for Shopify and DSers so you can poke around
[highlight]IMPORTANT: If you haven’t done it yet, remember to download your Calendar now, add your name with a marker, print it and hang it somewhere you can see it everyday. Snap a picture and post it on Instagram, hashtag: #Oberlo21.[/highlight]
Let’s get started, shall we?
How to find your niche
Before you find a niche, you should probably know what it is. A niche (short for a niche market) is a distinct, targeted market segment inside a bigger segment.
For example, you can divide the clothing market into niches like men’s, women’s, and children’s clothing.
But these are still huge.
Once, I worked with an aspiring entrepreneur who wanted to sell shoes. When I asked him to be more specific, he had a blank stare on his face. He was disappointed to learn that this wasn’t going to cut it. He needed to be able to answer some questions… What kind of shoes? Who were they for?
So you can – and should – even go smaller, say women’s clothing styles like bohemian, vintage, punk, high-fashion, or minimalistic. And even then, you can still go smaller.
Remember the sunglasses store I built which made $8,873 in 31 Days? My niche wasn’t just sunglasses. This would have been too broad. I only marketed these sunglasses to bloggers and people with a social media presence. I aimed for people who love to share their newest fashion accessories on Instagram.
The key takeaway is that the people buying these types of niche items have more specific wants, needs, and buying habits.
That’s why you should cater to a niche instead of being like a big chain or department store that sells a little bit of everything.
There are some key benefits to this strategy:
- When you’re marketing to a niche audience, it will be waaaaay easier to find and reach your best customers, because they’ll share super-specific traits and habits.
- Generally, the more narrow your niche, the less competition you’ll have.
- You’ll have a better chance of getting loyal customers who trust you to meet their unique needs and wishes.
And in the game of dropshipping, loyal and trusting customers are a golden ticket.
Here are some more niche ideas. Keep in mind that this is just barely scratching the surface!
Beauty
Fitness
Health*
|
Fashion accessories
Home
Tech
|
*Note: Be careful in the health category. Some countries have laws and regulations about what you can sell. If you choose a health niche, make sure you do your research.
[highlight]Pro Tip: I like to avoid clothing and other items that need sizes. When you go for a ‘one-size-fits-all’ kind of niche, you won’t have to deal with all the returns from people who didn’t find the right fit the first time. Or even worse – those shoppers who order multiple sizes on purpose and send back all the ones that don’t fit![/highlight]
Amanda came to me feeling overwhelmed about choosing her niche. She felt like it was a huge investment, and she was nervous about choosing the wrong one.
I advised her to answer some key questions about her search.
Steady or trending?
A steady niche (aka ‘evergreen’) is one that will have demand all-year round, for the indeterminate future. It’s the kind of product category that isn’t going away, like various types of clothing and accessories, personal hygiene products, home goods, and sports and hobby items.
You can check easily if a niche is steady or trending with Google Trends. For example, I typed in ‘men’s sunglasses’ and U.S. as the location and ‘2004 – present’ as the timeframe.
You can see that it’s a pretty steady niche that’s actually growing. Since 2004, more people are looking for men’s sunglasses online.
As you can see, searches peak every June and July – which makes perfect sense, since that’s the peak of summertime sunshine.

I can personally vouch that selling sunglasses is very viable. You recall the case study I mentioned earlier where I made $8,873 in 31 days selling them. (I sold women’s sunglasses, but men’s are a great option too.)
Back to Google Trends. You can also change things like your time range and the region where people are searching.
Here, you can see results for ‘smart speakers’ from users in England over the past 12 months. You can see that it’s fairly steady too. It peaked in November and December, which shows that it’s probably a popular holiday gift.

A trending (aka ‘fad’) niche is more temporary – it might be a hot-seller now, but the trend will eventually die off. Like fidget spinners or the recent unicorn-theme craze. There’s definitely money to be made jumping into a trend (if you can get into it early enough), but keep in mind that your business will slow a lot once the trend is over.
For this reason, you should choose a steady niche if you plan to have a solid, long-term store.
Back to Google Trends, see what I mean about fidget spinners? A massive peak in May 2017, then it disappeared.

Passion or profit?
Do you want to sell things you’re personally passionate about, or just go for things that look profitable? Ideally, you can find a combination of these two.
If you’re passionate about your store, you have a special level of knowledge that can help you with choosing good products and being a good source of information for your customers.
Ask yourself some questions and write down all the answers:
- What are your favorite websites, blogs, and social media accounts?
- Do you collect any products?
- Do you have any obsessions?
- If you had $100 to spend right now, what would you buy?
You can even pick some of these questions to ask your friends and family, too. The more data you can get, the better.

Amanda Asks
“How can I get some good ideas for a steady niche?”
When she first started her research, Amanda knew she wanted a steady niche, but had trouble narrowing down the millions of options she saw. She asked me for some advice on how to pick one.
My answer: one of the best ways to get niche and product ideas is to simply look around you, at your own buying habits and what others are buying.
Check yourself
- What are the last things you bought online? Where did you buy them and how did you come across them in the first place?
- What kinds of products do you buy even if you don’t necessarily need them?
- Which online stores do you shop on the most?
When I started my first online store ever, a tea business, I simply sold something I personally consumed every day. The product itself wasn’t any different than my competitor’s. The only difference was the way I marketed the product.
Back then, almost all companies marketed tea in a very feminine way. I’m a man and didn’t like their marketing. I thought if I had this issue, there are probably other men who have the same issue. That’s why I came up with strong and masculine marketing that turned out to be very lucrative.
Check your surroundings
Go to the mall or some other public place and people watch.
- What are people wearing, using, and carrying? Clothes, jewelry, accessories, shoes, and tech are all fair game.
- What kinds of products are they buying?
- Go to some retail stores. What’s on the shelves? Are any particular products sold out?
Check influencers
Follow some popular social media influencers on Instagram, Facebook, Snapchat, Twitter, Pinterest, and YouTube. Look up ‘product placements’ and see what types of products other brands are trying to promote with the help of those influencers.
This can work well if you’re following ‘high fashion’ influencers (luxury brands like Gucci, Armani, D&G, etc.). You’ll be able to offer similar styles but for way less money.
[highlight]If you want some more ideas, check out Oberlo’s ‘What to Sell’ section, as well as the Oberlo YouTube channel.[/highlight]
Traits of a good dropshipping product
- Less than $100. When products are too expensive, there’s a longer sales funnel, which means more work for you before you can get a customer’s trust to buy. You might also need to worry about warranties and more returns.
- Not super common. Don’t sell something available at a store down the street. If it’s so common, what incentive do customers have to buy from your store and wait 2–3 weeks to get it?
- Impulse buy items. The kind of thing you don’t really need, but you want anyway! Affordable and unique impulse buy products are a perfect way to rack in sales that don’t require much thought or planning in advance.
- Not easy to guess the price. If it’s something unique enough that you can’t really guess the price, it can help avoid the issue of customers trying to find it somewhere else online for cheaper.
After some thought, Amanda decided to go with women’s fashion scarves. She chose this niche because:
- Scarves are incredibly popular – you see them everywhere you go.
- Since she was opening her store in fall, she knew it was high season as the weather gets colder.
- By selling trendy fashion scarves, she could target this season’s ‘high fashion,’ luxury brand styles for people with lower budgets.
- She has a lot of her own scarves, and it’s one of those products she and her friends found themselves buying even though they didn’t really need them.
Pick 3 of your top niche ideas. Then use the next section to check how popular and promising they are.
Validate your niche idea
In a way, we’ve already been low-key validating. Using Google Trends, checking your surroundings, and looking at social media are all small-scale forms of niche validation. After all, it’s proof that people are buying and using these products.
Let’s go a little further by looking at the 3 top tools to find solid product ideas in high-performing niches:
- Oberlo
- Amazon
- AliExpress
As you’re finding products in promising niches, write them down quickly in the first tab of our templates spreadsheet. The tab is titled ‘D1: Product Brainstorm.’
Just write 3 things: the niche, item name, and URL where you found it.

This will help you choose your specific products to sell on Day 4, so you don’t have to go back fishing if you need them. Plus, having a list now will help you narrow it down later.
[highlight]Don’t spend too much time on this list now – it’s just a reference point to keep track of your thought process. We’ll refine the list on Day 3.[/highlight]
1. DSers
To access the product search, you’ll need to sign up for your free trial and install the DSers app. I’ll show you how.
- Go to www.shopify.com. Fill in your email address and click the ‘Get started’ button.

- A popup will ask you to create a Shopify password and enter your store name. Fill them in and click ‘Create your store.’
- If you don’t have a name yet, that’s okay. You can write in something like ‘[Your Name] Test Store’ for now. (Keep trying until you get a name that isn’t taken already.)
- Note that this will be your .myshopify.com domain forever and you can’t change it. But since we’re going to buy and connect a proper .com domain name anyway, customers won’t see it.
- You should note that this will be your ‘username’ that shows if you message suppliers inside DSers in the future. So name it appropriately!
- Answer a few questions and click ‘Next.’ You can just fill out what’s below:

- On the next page, fill out your home address (or whichever address you want your default business address to be) and click ‘Enter my store.’

- Voilà. You’re in the dashboard of your shiny new Shopify store!

- Now it’s time to install DSers.
- Click ‘Apps’ in the left sidebar
- Click ‘Visit Shopify App Store’ button at the top right
- You’ll be taken to the App Store. Type ‘DSers’ into the search bar
- Click ‘DSers’ (the first result)
- Click ‘Add app’
- You’ll be redirected to your store. Scroll down and click ‘Install app’
And you’re ready to roll.
[highlight]FYI: We’re going to install a few more apps, and they’ll all use the same process as you just did with DSers. Two clicks and done.[/highlight]
After you install, you’ll be taken to the Dsers dashboard and home screen.
Here, you can type whatever you like into the search bar to explore any particular niches or items you have in mind.
I recommend poking around on this home screen, as DSers will show you loads of recommended products, like:
- Best selling products
- Fast shipping products
- Trending products
- Seasonal products (Autumn/Winter fashion for Amanda)
- Discounted products

Drilling down farther, you can choose options like:
- Best-selling products with great reviews
- Products available with ePacket shipping (will also discuss on Day 4)
- Products shipped from US warehouses so they can get to US customers faster
You can also change your country if you’re not in the US, of course.
It’s pretty great.
P.S. Don’t worry about suppliers and shipping just yet. We’ll get to this later on Day 4, when it’s time to choose specific items to add to your store.
Moving on, look for products that have high ratings, lots of orders, and lots of good reviews to get an idea of how successful that niche might be. Same goes for these other channels.
In your spreadsheet, jot down whatever catches your eye.
Just a note – whenever you want to get to DSers from now on, log into your Shopify account. In the left sidebar, go to ‘Apps’ and click ‘DSers.’ This is also the same place you’ll find the other apps we’ll install later.
2. Amazon
Check out the Amazon Best Sellers page for more inspiration. You can also look at ‘Amazon Most Wished For.’

You can browse by category on the left sidebar to investigate the types of products that you’re leaning toward.
Look at the products’ ratings and what people are saying about those products in their reviews. You can get some insight into things that people love or wish were better.
Amanda checked out the ‘Clothing, Shoes & Jewelry’ category and found a scarf in the #2 spot – a perfect validation that she was on the right track.
She realized that beanies are also pretty popular (which makes sense… if your neck is cold, your head is probably cold too). She kept this in mind for later consideration.
3. AliExpress
If you’ve never heard of it, AliExpress is owned by Alibaba, a Chinese powerhouse company that spans all sorts of sectors like retail, ecommerce, Internet, artificial intelligence (AI), and more.
AliExpress can be a valuable tool for you, because you can use it to look for product ideas and also actually sell those items in your store. There are many companies that use AliExpress suppliers for dropshipping.
I strongly recommend going through DSers, because the process will be a lot easier for you. But that said, you can also go through AliExpress if you’re a daredevil like that.
We can get into using AliExpress suppliers and products later. For now, we’ll just talk about how to use the platform for picking and validating your niche.
Go to the AliExpress homepage. You can type items into the search if you have specific ideas, or you can use the ‘Categories’ tab on the left sidebar.

When you click a category, it will show all sorts of good stuff like best sellers, top stores (suppliers) on AliExpress, and top niches. For example, searching ‘Women’s Clothing’ brings up top ‘Chic’ stores, which must be a popular category of women’s clothing.

If you use the search bar, type in your query. On the results page, go to ‘Sort by’ and click ‘Orders’ in the dropdown menu. This way, you can see the most-ordered products.
Take note that under the search bar, AliExpress also shows you suggestions for related searches. This can be an awesome tool for getting more inspiration and validation.
Amanda typed ‘women’s fashion scarves’ and saw helpful suggestions for:
- Winter scarf
- Silk scarf
- Cashmere scarf
Sounds like silk and cashmere are pretty popular.

Once she sorted by orders, she could see the top-performers. Looks like plaid is popular – and if you recall, we saw a top-selling plaid scarf on Amazon too.
Right from the search results, you can see that these top results have great ratings, lots of reviews, and lots of orders. Good contenders.

As you can see, finding a good niche and product ideas is all about digging and observing. Keep going until you’ve found an idea that you feel good about.
Pick your store’s name
Typically, I don’t like spending too much time on picking a business name, and instead aim for a short, snappy business name.
A short, snappy business name works best for several reasons: It’s easy to write, it’s memorable, and it seamlessly fits in the header area of an ecommerce website’s homepage.
For example, I named my sunglasses store ‘Sunyez.’
At that time, my aim was to find a couple of words which I can mix and match to make my store name. After a few minutes, I locked Sunyez in. The name appealed to me because it had a different spelling to ‘sunnies,’ which is a nickname for sunglasses.
You could also try combining 2 or more words, make up a word, or tweak an existing one. Trust me, it’s not that hard to figure out something compelling.
Amanda named her store ‘Evooli’ which is ‘I loove’ backward.

Good store names come from all types of ideas, though, and may be the same ones as rolling through your competitor’s head, which is why it’s smart to brainstorm 3-4 business names and moving on from there.
If you’re not feeling inspired or short on ideas (it happens to the best of us), you could take a few ideas from a business name generator. I personally use Oberlo’s.

It gives you hundreds of name ideas for your niche with the click of a button. All you need to do is put in a keyword that is related to the core concept of your store, and click ‘generate names’. The generator will then present you with pages listing dozens of potential names to choose or take ideas from.
After you decide on a business name, look it up on the WIPO Global Brand Database to ensure it is not associated with any other company – I did the same for Sunyez.

If the database says ‘no documents match your query’, you’re good to go.
As the last step, see if the .com domain is available for your business name on Domize. It’s a website that lets you quickly see domain name availability for .com and other extensions, highlighting available domains in blue and the ones that have already been taken in red.

Domize also has advanced features that enable you to create new domain names.

The tool lets you quickly search for a wide range of terms by entering a comma-separated list of words, numbers or letters between square braces [ ]. You can choose things like endings, propositions, colors, verbs, and phonetic alphabets to come up with a new domain name.
For example, if you write [color]scarf in the Domize search bar, it will present you with domain ideas based on different colors.

Day 1 Recap
Today was a beast of a day with a lot to cover (and to think about). But look at all the awesome things you accomplished:
✓ Got your feet wet and explored the wide world of dropshipping
✓ Picked a solid, promising niche (and an idea of the products you’ll sell)
✓ Validated your niche by confirming that people really are buying these types of products
✓ Opened your shiny new Shopify store – complete with DSers!
✓ Picked a name for your business
Great work. Now get some sleep and I’ll see you tomorrow.
Day 2: Get out there and make some e-friends

1. Tweet today’s quote → 2. Get to work!

With a great niche at your disposal, the next logical step is to build a supportive network of e-friends.
E-friends? I’m referring to the people who will support and engage with your store. Some of these people will be willing to promote it, while some will be interested in shopping.
In the ecommerce industry, some of your best e-friends might be the people who are known as ‘influencers.’
Every day leading up to your launch, we want to be posting something, somewhere to help build excitement for when the store actually launches. (But not spamming anyone, of course).
And the key to building these connections is through having authentic engagements with influencers, groups, and potential customers in your niche. Today will be the start of a critical daily engagement routine.
Aren’t you excited?
Today, we’re going to:
- Learn about and research micro-influencers
- Build a mini influencer database using the template we’ll give you
- Build a Facebook groups database using another template
- Join and start engaging with these Facebook groups in your niche
[highlight]LAST REMINDER: If you haven’t done it yet, remember to download your Calendar now, add your name with a marker, print it and hang it somewhere you can see it everyday. Snap a picture and post it on Instagram, hashtag: #Oberlo21.[/highlight]
Okay, let’s go.
What’s the deal with influencers?
For those unfamiliar with them, influencers exist on social networking platforms like Instagram.
They have the ability to affect the buying decisions of others because of their position, expertise, or knowledge about a particular niche.
As such, they are usually regarded as credible by the devotees of that niche.
What’s intriguing is that an influencer doesn’t have to be an Instagram superstar, a famous YouTuber, or a high-profile celebrity.
They could be everyday people like you and me, with the right connections and social authority.
Another name for these everyday influencers is ‘micro-influencers.’
They don’t have a massive social following to brag about, but are able to drive loads of engagement (as high as 60% compared to high-profile influencers) among their smaller, more engaged audiences.
Here’s a little more detail on how micro-influencers differ from conventional influencers:

The basic structure of working with micro-influencers is pretty straightforward: Give an influencer a free sample of your product and they’ll share the said product with their followers in return.
Most of the micro-influencers I’ve worked with follow this structure. Some, however, expect you to pay them before they post about your product or brand. The bigger their following and reach, the more likely they’ll want to be paid. This is part of why we’re shooting for micro-influencers to begin with.
Regardless of however you compensate them, they’re unlikely to want to work with someone who is ‘unappropriate’ for their audience.
Hence, you need to find micro-influencers who closely align with your brand.
And, honestly, that’s something you can’t do within a couple of hours, which is why I advised Amanda to dedicate an entire day to this task up-front. (Plus many more hours throughout the course of these 21 days.)
You should also join Facebook groups that have audiences with similar interests.
Unlike Facebook Pages, which require you to ‘boost’ content or create ads to reach people on a wider scale, Facebook groups allow you to reach everyone who is a part of those groups.
By joining Facebook groups relevant to your niche, you’ll make way for new channels that you can tap into for supporting and marketing your store.
If you want to find out more about influencer marketing, you’ll learn everything you need to know in our Complete Guide to Getting Started with Influencer Marketing.
How to find the right micro-influencers for your store
There are many social media platforms out there, and each of them contains micro-influencers. The most popular ones, as you likely know, are Instagram, YouTube, Facebook, and Snapchat.
Based on their niche, ecommerce entrepreneurs can run an influencer marketing campaign on one or a combination of these platforms.
The ideal platform for influencer marketing is the one where your target audience is.
For example, if you’re planning to dropship lawn trimmers, you’re more likely to find a target audience on YouTube. YouTube makes it easy to watch detailed tutorials of such products before making a purchase decision. In this case, you’d want to work with micro-influencers on YouTube.
Because Amanda had picked a fashion product to sell, she concentrated on Instagram.
By nature, Instagram fits the preferences of people to whom the visual and ‘experience’ dimensions are important: purchases generally associated with the feeling of immersing in an experience.
Fashion junkies can binge on the latest looks from runways, get style ideas, and witness new releases from their favorite brands. No wonder the average engagement rate for fashion brands is the highest on Instagram.

The even better aspect of Instagram? It lets you find relevant micro-influencers by searching for hashtags.
With her niche in mind, Amanda looked for people who recently posted an image with hashtags like #fashionaddict, #fall2018, #winterfashion, and #scarfstyle. The results that came up made it clear that female micro-influencers will be most suitable for her influencer marketing campaign.
For example, here’s the sort of content Amanda saw when she searched for #scarfstyle.

A quick look at this Instagrammer’s profile indicates that she is a micro-influencer (aka everyday person) with an engaged audience (over 150 people had commented on her scarf-related post).

You can replicate the same strategy by searching for the hashtags related to your niche.
For quick hashtag ideas, use Hashtagify (it’s an online tool that allows you to find the right hashtags).
But, why did Amanda research influencers right after she chose a niche?
She wanted to ensure she already had a list of people to reach out and send products to when she starts pre-marketing for her store. This is also an incredibly valuable research into the niche, which you can use basically every day you’re on the grind trying to make sales.
[highlight]Start with a list of at least 20 micro-influencers that you can reach out to on Day 12 in preparation for your launch. Shoot for 10 to work with, but have a list of 20 ready because it’s pretty unlikely that every person you message will agree (some may not even respond!). Don’t overthink it for now – just focus on building a big list. On Day 12, we’ll go over what to really look for in a ‘good’ influencer before you start reaching out. [/highlight]
To make her list, Amanda searched for females who fit into these requirements:
- Have used a fashion-related hashtag
- Have received a minimum of 10% engagement from followers on recently posted content
- Have a minimum of 3,000 followers (preferably 5,000 or more though)
After an hour of scrolling through people’s feeds, Amanda came up with a rough list of female micro-influencers to reach out to. The next step was to get it organized.
Building a mini influencer database
As you begin to identify more potential influencers, create a mini Excel or Google Sheets database and input their information. This will help you later, as you reach out to the different influencers for potential collaborations and ship samples.
Here’s what I recommend to include in the database:
- Instagram handle
- Number of followers
- Editorial schedule (number of times they post in a day)
- Email ID (listed or not)
- Website link (mentioned or not)
- Location
Once you create an influencer database, easy access to your influencer’s information will save time and effort.
You won’t need to remember who you wanted to contact or analyze an influencer’s profile again in detail – you can just look it all up through your mini influencer database.
Here’s what the database looks like in Excel:

If you want to create something similar but don’t have much time, you can download and use the 2nd tab of our templates spreadsheet. The tab is titled ‘D2: Insta Database.’
You can create a similar database for YouTube, Facebook & Snapchat influencers. Consider building one to ensure you have all the information at hand when you’re pitching a collaboration idea or reaching out just to say hi.
As you’re searching, you’ll find loads of people who don’t quite fit the bill as an influencer – maybe they only have a couple hundred followers. But if they look like they would be a potential customer for your brand, add them to a separate list.
Later on, we’ll start a direct message marketing strategy where you’ll actually message potential customers. (FYI, my strategy is usually to ask them for feedback on the way my store looks, then offer them a discount code as a special ‘thank you.’ This technique has gotten me hundreds of customers! I’ll show you more about this on Day 15.)
Join Facebook groups
Once you’ve done with building an influencer database, it’s time to move toward Facebook groups.
As I mentioned earlier, Facebook groups give you access to the conversations started by your target audience.
Being a part of these conversations will help demonstrate your knowledge in areas relating to your niche. Plus, you’ll have a useful resource that you can tap into for all kinds of promotional activity.
The main way we’ll use these groups is to post your giveaway on Day 6. But there’s a lot of value in them otherwise when you can tap into the right groups.
Of course, the Facebook groups you join need to be relevant to your niche.
If you don’t have a clue about how to find such groups, follow these steps:
- Write the name of your niche in Facebook’s search bar.

- Click the ‘Groups’ tab.

You should now see a list of groups that are relevant to your niche.
That’s all.
Start interacting in the group to get them warmed up and familiar with your name. This way, it won’t look like you’re spamming them when you want to promote your store.
If the group admin says new members aren’t allowed to post links, aim for value-based communication for at least a couple of months before making an attempt to post about a giveaway or product.
Be picky about the groups you join. If the content posted in a group feels like spam or there’s no engagement, you’re unlikely to drive traffic from the group. Limit your efforts to quality groups.
Amanda, for example, could look at how many members a group had, the engagement on posts in those groups, and how she could incorporate a giveaway into a post that provides value to the members of those groups.
Moreover, she could create a mini database for Facebook groups, like she had done for influencers, to keep things organized.
The database could be a simple one like this:

You can create one for your own niche by downloading and using the 3rd tab of our templates spreadsheet. The tab is titled ‘D2: Facebook Database.’
I recommend joining and becoming an active member of several Facebook groups.
Aim for ones with a big audience count and good engagement, instead of a hundred small groups.
And always keep this in mind: becoming a credible member of the group will take time and dedication. You really need to be able to add value to the group before they’ll want to buy things from you, so don’t just go selling right off the bat. Engage with them and ‘fit in.’
Be patient, and keep working on building relationships with the different members of the group – that’s the key to establishing credibility.
[highlight]Like I mentioned earlier, this is something you’ll want to work on every single day. From now on, dedicate at least 30 minutes every day to joining groups and engaging with them authentically.[/highlight]
Day 2 Recap
Today, you:
✓ Identified micro-influencers that you’ll collaborate with to hype up your store’s launch
✓ Built a mini influencer database that you’ll be able to reference later
✓ Took note of lots of potential customers, who you’ll be able to direct message later
✓ Got a better understanding of how Facebook groups work, and how you could leverage them for pre-marketing
Awesome. See you tomorrow.
Day 3: So, what do you really-really want?

1. Tweet today’s quote → 2. Get to work!
Before we go any farther, you need to set a goal – just one!
What do you hope to accomplish in the short-term? I encourage you to dream big and set some long-term goals too, but for now, we’re just going to set one short-term goal.
Goal-setting keeps you accountable, and it gives you something clear and defined to work toward. It also tells you if you’re succeeding (duh).
Set a goal
 Amanda Asks
“How do I set a good goal?”
My answer: I like to set S.M.A.R.T. goals:
- Specific – no vague or unclear goals
- Measurable – you have to be able to track it
- Achievable – make sure it’s realistic
- Results focused – focus on results, not efforts
- Time-based – set a date for when it should be accomplished
Since Amanda has digital marketing experience, she already had an understanding of what needs to be done to promote an online business and get some sales. So she set a goal of making $1,000 in revenue within 2 months of her launch day.
Here are some more goal ideas you can set:
- I want to make 5 sales within 2 weeks after my launch day.
- I want to earn back my financial investment (aka ‘break even’) within 3 months of my launch day.
- I want to have 50 leads by launch day, so I can use email marketing to turn them into customers.
Notice that all of these are specific, they’re measurable within your Shopify dashboard, they’re achievable, they’re focused on actual results, and they all have a clear ‘deadline.’
Make a financial plan
I mentioned earlier that you really don’t need much investment money to build a successful store. At the very minimum, you’ll need to buy a few things:
- About $12-14 to buy a domain name
- $39 per month for Shopify (keep in mind you have a free trial)
- If you don’t have any graphic design skills, you might want to pay a designer to make you a company logo. You can do this on websites like Fiverr for as little as $5 (beware that you get what you pay for). We’ll cover this on Day 7.
- Samples of the items you’ll want to sell – while this theoretically isn’t 100% necessary, I strongly recommend it. This can cost anywhere from $20–100, depending on what you’re selling.
The bare-minimum costs come to about $50.
[highlight]Going back to setting a goal, one idea for low-budgeters is: ‘Earn $50 in 1 month after launch day.’[/highlight]
If you have some more money to invest than the bare minimum, but you’re not exactly sure how much to invest, ask yourself:
How much money am I willing to lose without interrupting my life?
We’re trying as hard as we can to succeed, but we have to be prepared to fail. Don’t invest money that you need to pay rent, feed yourself and your family, or handle other necessary bills and life costs.
Especially on your first shot, because there’s so much learning and growth ahead of you!
For those of you who plan to invest in Facebook Ads, remember: more than anything, your first campaigns will be you paying Facebook for valuable data on your ideal audience. And as you go, you’ll be tweaking and optimizing your budget incrementally based on your results.
As you figure out which people are actually buying from your store via your ads – as well as their buying habits, location, and all that fun stuff – you’ll also learn about the ad budgets and strategies that are best for reaching them.
[highlight]Remember when I said we’re going to use a $500 budget? We’ll spend a fair amount of that running Facebook Ads. I’ll show you all about it on Day 16 and Day 17.[/highlight]
Day 3 Recap
Today, you:
✓ Set one S.M.A.R.T. goal that you’ll work toward these next few weeks
✓ Figured out how much you’d like to invest in this new business
✓ Got a better understanding of what you’ll need to spend, and what that money will get you
Now you’re primed for success. See you tomorrow, when we’ll dig into the good stuff and find your products.
Day 4: Here’s how to find what you’ll sell

1. Tweet today’s quote → 2. Get to work!

On Day 1, you got an introduction to Oberlo and AliExpress to validate your niche by looking at popular products.
On Day 2, you got a feel for how people are talking about your niche online through social media.
On Day 3, you set a goal that you’ll be working toward throughout our 3 weeks together.
Today, you’re going to use all this knowledge to choose the specific items you’d like to sell in your store.
Today, we’re going to:
- Pick 10 products to add to your store
- Order product samples so you can check the quality for yourself
Remember that handy spreadsheet you made on Day 1? That might be useful if you wrote down some top-performing products. (If you didn’t, no worries. We’ll handle it all today).
You can download and use a new, more detailed spreadsheet from our templates. You can find this on the 4th tab, titled ‘D4: Product Selection.’

If you already have some products in the first spreadsheet from the niche you ended up choosing, you can transfer them into this spreadsheet.
And as you see great options today, paste in the item name, URL, and item rating at the very least. (You don’t need to fill in all columns at first, because that can quickly become a waste of time. But later when you’ve settled, you’ll want to have a single place with all this info.)
I recommend that you start with the name, URL, and rating because you might find more than one supplier selling the same items. In these cases, your final decision might come down to item and supplier ratings and reviews.
What to look for to find ‘good’ products
[highlight]Since you don’t have time to test your products before selling them, it’s critical that you find quality products. This means making sure they have stellar reviews and ratings.[/highlight]
There are 3 key elements for choosing a good product that will make and keep customers happy:
- The quality/demand of the product itself
- The reputation of the supplier
- The shipping options to your customers
Let’s break these down.
| Product |
|
| Supplier |
|
| Shipping |
|
 Amanda Asks
“What’s the deal with ePacket?"
My answer: ePacket is a type of shipping that’s an absolute lifesaver for dropshipping businesses. It’s faster, trackable, and cheaper – you don’t have to worry about exorbitant shipping costs or high international tariffs.
ePacket is offered by suppliers in China and Hong Kong. While standard shipping methods might take more than 50 days, ePacket generally gets to customers within 30 – usually less.
In addition to speed, another great perk is that you can track the package through services like EMS and USPS. Other shipping methods might not let you track packages, which can create some big problems for your customer service.
To be eligible for ePacket shipping, the product must:
- Weigh less than 2.2 kg (4.4 lbs)
- Have dimensions of 60 x 90 cm (24 x 36 in) or smaller
- Have a value of less than $400
As of 2018, ePacket shipping is available to the United States and 35 other countries:

I strongly recommend choosing products with ePacket delivery available.
Dig into product research
You’ve done a lot of research finding and validating your niche, plus all the social media research you did on Day 2. That means you have a pretty solid idea of ‘what’s happening’ in that niche and what kinds of products are popular.
So when you start your product research, you can just type in what you’ve been seeing and look at specific products that are available. Evaluate them through the lens we discussed above, about the product, supplier, and shipping.
Search via Oberlo
Go to your Oberlo dashboard and get going.
Amanda started super broad with ‘scarf,’ then worked her way down to more specific terms like:
- Plaid scarf
- Blanket scarf
- Silk scarf
- Cashmere scarf
- Scarf set
In the search bar, type in a search term, then click the ‘ePacket’ box to see what fits the bill.
In the top right, click ‘Sort by:’ ➜ ‘Order count’ to see items with the highest demand.

Clicking the top result, Amanda looked at a few things:
- Does this seem like something my niche audience would want?
- How are the photos? Are they appealing to use in my store?
- Do the product and shipping costs seem reasonable?
- Is the description helpful, or should I message the supplier for more info?
- What’s the shipping time to key countries? Is ePacket available?

To see shipping options to different countries, click the little downward pointing arrow in the ‘Shipping’ section. You can then type in any country to see if they have ePacket and how long it’s estimated to take.

Amanda also checked the ‘Oberlo Product Statistics’ section underneath each product, which shows:
- Imports: how many Oberlo users have imported it into their store
- Pageviews: the total number of times a visitor has viewed the specific webpage for this product on all of those stores combined
- Orders (30 days): how many times the product was ordered in the past 30 days
- Orders (6 months): how many times the product was ordered in the past 6 months

No customer reviews yet, but it’s gotten loads of pageviews and plenty of orders.
This one looks solid. So she added it to her spreadsheet and continued her search.

Now that you know how to find key product and supplier details in Oberlo, let’s look at AliExpress.
Search via AliExpress
Before you start, download the Oberlo extension for the Chrome browser. If you don’t use Chrome, I recommend downloading it and using it for Oberlo.
To download the extension, click here from inside Chrome and then click the ‘Add to Chrome’ button.

Then click ‘Add extension’ when the little confirmation window pops up.

And bam, you’re done.
Now, when you go to AliExpress, you’ll see that many of the results have green boxes around them. That’s the extension telling you if the product has ePacket and how long the processing time takes for each order.
And when you hover your mouse over a product, you’ll see the blue Oberlo logo icon. When you click that, it will push the product to your import list automatically, so you can add it to your store.
Convenient, isn’t it?

So let’s get back to the search results.
If you look at the first page of results, you’ll see a lot of information before you even click on a listing. Like:
- The product cost per piece (including any current sales)
- Shipping cost and ePacket availability
- The product’s rating, including how many people rated it
- How many people ordered it
You can see that the top results are strongly rated (around 4.7 stars) from around 2,000 reviews, and have been ordered between 8,000 and 12,000 times.

While these are quite solid, these strong numbers aren’t completely necessary. I would say that you’re good to go around 100 orders at a minimum and 4.8 stars or higher. Below 100 and you start playing with fire.
Let’s click a listing and see what we find.
At the top, you’ll see the supplier’s rating. Don’t bother with any supplier that’s rated lower than 95%.

In the main section, you can see all the variations of a listing – like different styles and colors available.

You’ll also be able to see the shipping options. Similar to Oberlo, just click the arrow and you can explore shipping options and prices for different countries.

Then if you scroll down, you can see more details about the products as well as more photos.
Keep looking until your spreadsheet has 10 solid product recommendations from Oberlo and/or AliExpress.
Those will be your store!
[highlight]Don’t stress over which products you choose – you can always change or update them later. Plus, you’ll never know how they’ll perform until you try.[/highlight]
Populate your product import list
Once you’ve decided which products you’ll sell, add them to your import list.
This is super easy. In Oberlo, just click the ‘Add to import list’ button above the details on the product page.

In AliExpress, click the blue Oberlo logo that shows up next to the product (we talked about this earlier).

FYI, that same button shows up at the bottom right corner when you’re inside an AliExpress listing, too. It does the same thing there.
Once your list is populated, you can look at it by going to the left sidebar inside Oberlo.

Message every supplier
I strongly recommend messaging every supplier to inquire about the products and listings. If anything, this is just to make sure the listings are correct and that the supplier has good customer service.
If you don’t do this, you can run into extra stress last-minute.
Amanda learned this the hard way and had to swap out several of her products right before her store launch. The listing on AliExpress said that they had a U.S. warehouse that shipped the scarves to U.S. customers in 4-7 business days, but this simply wasn’t true in the end.
If your supplier doesn’t respond in 24 business hours, that’s a red flag from the get-go.
In AliExpress, click the supplier’s name in the dropdown on the product’s listing, then click ‘Contact now.’

Price your products
Many new dropshippers don’t realize the importance of pricing – and because of this, many of them actually lose money in the end.
Do not be one of these people!
I like to make sure I’ll have at least $5 profit on every item when I choose my pricing. But to make sure this is the case, you need to consider costs like:
- The actual price you pay for the product
- The shipping cost to get to each customer
- The transaction fees through your payment system (Shopify, PayPal, etc.)
- Any currency change fees, if you’re international
- Taxes in your origin country, state, city, etc. (for example, sales tax is 19% in Germany)
- Acquisition costs, like money you spend on advertising and marketing – this includes any special programs, like an affiliate program
- Fixed costs, like Shopify’s monthly payment and any paid apps
This can seem like a lot to consider, but trust me, it will save a lot of stress down the road.
I made a calculation spreadsheet for a previous case study I wrote for Oberlo. You can download and use it from our templates and fill in your own numbers. Find this on the 5th tab, titled ‘D4: Pricing Calculation.’
To use this spreadsheet:
- Fill in the ‘Product costs’ cell with the cost of the product
- Fill in the ‘Shipping costs’ cell with the shipping cost
- Adjust where needed, like the ‘Tax’ cell for your country
- Type in a number in the ‘Listed Selling Price’ cell, and the rest will automatically update to show your profit
P.S. The ‘Affiliate’ column is a plan for affiliate marketing – if you want to have a program where you give an influencer 15% commission for every sale they bring in for you.
Even if you don’t do an affiliate program later, you can still use this to calculate a product discount, like when you’re having a sale or offering a personal discount to certain customers.

Apart from this basic strategy of minimum profit margins, there are some other things to consider:
- What kind of item is this? Is it a ‘luxury item’ that can be more expensive?
- Who is my general audience? Are they willing to spend more money, or are they ‘budget’ shoppers looking for a deal?
- Does this item have a special value or competitive advantage that allows me to charge a higher price? This applies to products that are fairly unique and tougher to find.
If you’re on the fence, try a lower price (that covers your costs) first. Then once you get some sales and customer data, you can experiment and optimize your pricing to make a higher profit margin. Finding the perfect price will take some time and testing.
[highlight]Pro tip: Consider having a ‘grand opening’ sale where you offer a considerable discount – maybe 20% or even more. If you want to take this angle, make sure to include that in your pricing so that you don’t take a loss. Amanda decided to have a ‘buy one, get one free’ sale on blanket scarves, so she calculated the costs accordingly.[/highlight]
And that’s a wrap for today.
Day 4 Recap
Today, you:
✓ Learned how to do in-depth searches on Oberlo and AliExpress
✓ Got a strong feel for the types of products and suppliers in your niche
✓ Found 10 quality products that you’ll sell
✓ Populated your import list in Oberlo, so you’re ready to customize and add them to your store
✓ Figured out how much to charge for them to still make a profit
Tomorrow we’ll pick right back up where we left off, and add these to your store. See you then!
Day 5: Give your products some personality

1. Tweet today’s quote → 2. Get to work!

You know what products you want to sell. Now it’s time to seal the deal and add them to your store.
By now, you’ve read all the descriptions for your products. And you’ve seen how terribly unexciting some of them are.
That’s why it’s 100% necessary for you to write your own product descriptions. You need to set your store apart from the rest and really communicate value to your visitors.
And of course, you need to find a good price to sell them at so you can still make a profit.
Today, we’re going to:
- Learn about how the Oberlo import list works
- Customize your inventory – from descriptions to images to pricing
- Add them to your store so they’re ready to buy once your site is live
- Organize them into collections so they’re easier to shop and manage
- Order samples so you can test them out yourself
Let’s go.
Anatomy of the import list
For every product in your import list, you’ll see 4 main tabs:
- Product: This will automatically import the title and primary photo of the listing from Oberlo or AliExpress. The new title will be what shows up on your store.
- Description: The product’s description from Oberlo or AliExpress – you MUST change these to give it your own flair.
- Variants: How many different variations of that product are available, like colors, styles, etc. You can split these up into separate items if you want.
- Images: The images available for all variants – these are all free for you to use in your store.

You’ll also see 2 other buttons on the top right:
-
More actions: This dropdown lets you do 3 things:
- Select Product to Override: This is for after you’ve imported a product to your store, but you want to ‘swap it out’ for something else. It keeps all the other info intact so you don’t have to restart from scratch. Handy, but you don’t need this right now (if ever).
- Split Product: See how this product has 24 different variants? The ‘split product’ feature lets you split it up into separate items for your store. So you can have 24 different items instead of just one, or you can get more creative like grouping them into 4 products with 6 variants each, for example.
- Remove Product: Kicks it off your import list if you change your mind.
- Import to store: Pretty self-explanatory, eh? Don’t click this until you’re all done.

How to customize and import products
Let’s walk through the process of getting a product ready for your store.
Write awesome product titles & descriptions
These details can make a big difference in getting people to buy.
Amanda Asks
“How do I know if my descriptions are good?”
My answer: Good descriptions come in all forms, shapes, and sizes.
But there are some basic guidelines that can help ensure you’re doing a good job:
- Be descriptive. Use the kinds of keywords, terms, and phrases that people search for when they’re looking for this kind of product. Try scouting other websites to see the types of details they’re talking about and words they’re using.
- Be creative. There’s a balance here – you want to make sure you choose descriptive words, but don’t be too plain and boring or your products won’t be memorable.
- Show, don’t tell. If the product is awesome, you can’t just say “This is awesome.” What makes it awesome, appealing, useful, and valuable? Why would customers buy it? Express that in your descriptions.
- Tap into emotion. If you can make them feel something, you’re one step closer to a sale. What’s the personal value? How will this product impact their life or make it better? Can you tap into feelings like joy, comfort, or relief?
- Keep it digestible. Don’t write a novel – hit all the main points swiftly, while building some personality along the way.
As a female who understands the plight of trying to wear a beanie with a ponytail, Amanda knew that this really has a functional value for women who are too busy to worry about their hair at every moment.
So she wanted to make sure she expressed that while tapping into the very common problem that this product solves for her key demographic of young women. Also, she’s a generally silly person, so she wanted to make it fun.
Here’s what she wrote for the ponytail beanie set:

Of course, these descriptions all tie into your brand’s ‘story’ – what you are and what you offer to your customers. Even if you don’t feel inspired right now, you can always go back and tweak things as your brand develops.
This is definitely a work in progress. So do your best and keep on going!
Use a description template
It can be helpful to write yourself a ‘template’ that you can apply to different products, to keep some consistency across your store while making the process a little more simple.
Consider a simple 3-step template like:
- Give the customer a compliment or boost that relates to your product.
- Mention a product feature and its benefit.
- Give them a simple recommendation.
Say you’re selling unicorn makeup brushes. It could be as easy as something like:
- You’re one of a kind, just like this unicorn brush.
- Synthetic bristles make for smooth application while staying easy to clean.
- Pair these with our mermaid brushes for a unique, magical set of your own.
Keep it simple when in doubt.
Don’t forget to add tags to each product
You’ll want to add a tag to every product that identifies a category that it fits into. This is for when we create our automatic collections. We’re going to make it so that every product with a specific tag gets organized into its matching collection.
For example, say you’re a jewelry store. You can have a collection for necklaces, earrings, and bracelets so customers can easily find the types of things they’re interested in.
Amanda has 4 types of scarves she decided to sell: ponytail beanie and scarf sets, blanket scarves, silk scarves, and infinity scarves.
So she created a collection for each.
Just to give you a visual of what I mean, here’s a screenshot of her finalized ‘collections page’ that shows her collections:

We’ll get into this more shortly, but what you need to know for now is to add a ‘tag’ for each type of product. So for this ponytail beanie set collection, she chose the tag ‘PonyBean’ (because she was proud of the catchy name she made up).
Note that these tags won’t be seen by customers, so name them whatever makes the most sense for your personal organization.

[highlight]Note: Don’t be confused by the ‘Collections’ section you see on the product tab. These are only for ‘manual’ collections, but we’re going to create ‘automatic’ collections to save some work down the road.[/highlight]
Change your pricing
In the ‘Variants’ tab, you can update the pricing to reflect your calculations from yesterday. Oberlo gives you a handy recommendation based on what some other people are doing, so you can use this to help guide your decision if you need an extra ‘opinion.’
Take this with a grain of salt, though – there are a lot of factors that determine the right price, and Oberlo is just giving a suggestion.
If you click this button, it will automatically update every variant with that price.

If you want to set a different price, you can click ‘Change All Prices’ under the ‘Price’ column. Click on ‘Set New Value’ and add your own, or multiply it using the ‘Multiply by’ option.

The ‘Profit’ column will show you how much money is left after the product’s costs are paid for. Keep in mind that this doesn’t count the other costs that we calculated yesterday, like taxes and payment fees.
How to split product variants
If you want to take a simpler approach to your store, you could just take 2 or 3 items with several variants, and split the variants into 20 or 30 total items. I’ve definitely had success with this model before, so I can say with confidence that it’s possible.
Consider this ponytail and beanie set. It has 24 variants. That’s a lot.
Let’s look at how to split it up.
When you click the ‘Split variants’ option, you can either split every variant into its own product automatically, or you can pick and choose manually. 
If you click ‘Split to X Products,’ it will create that number of items in your import list for you to edit and import into your store separately.
If you click ‘Split manually’ in the top right corner, you’ll be able to select which ones you want in a single product.
As you can see, this product comes in two styles: regular beanie and visor beanie (set A and set B). So let’s say you want to split this into 2 products, one for each set.
Go to ‘Split manually’ and check all the variants you want in this product.

Scroll down and click ‘Split product.’

And voilà. It’s now 2 products in your import list.
[highlight]Before you split, make sure you have all the details filled out as much as possible: title, description, and pricing. This way, you won’t have to change these basic details individually after they’re split. That’s a waste of your precious time.[/highlight]
Make sure you edit your variant names if they’re ugly or weird, because these names will show up in your store when your customer is choosing which option they want.
Instead of all the ‘solid set A-white’ madness, Amanda changed hers to simple colors. You can get fun here if you want, like using the word ‘midnight’ instead of black. Just don’t get too crazy or you might confuse your customers.

Choose product images
In the ‘Images’ tab, you’ll see all the images that the supplier included in the listing. You’ll notice that if you split the variants, Oberlo will often know which images are which, and split those too.
But double-check just to be sure.
There will be a green border around the photos if it’s selected to be imported to your store. Click the photo to select or deselect. If you want to see it larger, click the little eye icon at the top right corner of each photo when you hover over it.

Keep in mind that you can hide or delete any photos later. But if you’re on the fence about certain photos now, better to add them and remove later instead of adding them in later.
You’ll also be able to add in more photos to each listing if you find another source.
Import the goods
When you’ve triple-checked all the products and their details, you can click the ‘Import to store’ button on each one.
Or to import them all together, you can click the little checkbox at the top left of all your products, then click ‘Import all to store’ at the top of the page. (FYI, you can also use this method to remove several at once).

Create a few product collections
Collections are basically a way to organize your products. We’re going to make it so that all of your products are automatically sorted into a matching collection.
In your dashboard, go to ‘Products’ ➜ ‘Collections.’ Then click ‘Create collection.’

Add the name that you want to be displayed on your website. I recommend keeping this descriptive so that they know what they’re getting if they’re browsing your collection list.
Add a description if you like, but be aware that some themes won’t show them.
Next, scroll down to ‘Collection type.’ There are 2 types:
- Manual: you’ll need to manually add each new product into the collection
- Automated: you can set certain ‘conditions’ (like a tag, for example), and if a certain product meets these conditions, they’re automatically added to the collection
I’m a fan of automated collections because they make changing and scaling your store easier down the road.
So you can select ‘Automated.’
Under ‘Conditions,’ you can choose from several options, including a product’s title, type, price, tag, etc. You can also set more than one condition.
Say for example you’re a jewelry store having an earrings sale on certain types of earrings. You can create an ‘Earrings Sale’ collection by saying products must match 2 conditions: earrings tag and price under $20. Then you can easily promote this sale by showcasing this collection on your homepage. (But we’ll get into that later.)
For now, we’ll just set one condition for each collection, the tag. So select:
- Products must match: ‘any condition’
- ‘Product tag is equal to’
- Then write in a tag for each type of item
As I mentioned, Amanda used the tag ‘PonyBean’ for her ponytail beanie set collection. So that’s what she selected here.

Scroll down to the bottom and click ‘Save.’
And you’re good to go.
Order product samples
It’s important for you to test your products yourself so you know they’re actually good. But since it usually takes about 10-20 days for them to arrive, you likely won’t be able to test them by the time your store launches.
(Which is why we spent so much time finding products with lots of good reviews.)
But still, better late than never.
Plus, you’ll have to fulfill your own order… which means you’ll learn how to fulfill all your store’s orders – so it’s a big deal!
To order your products, you’ll need to make order drafts in your store.
And to make order drafts in your store, you’ll need to pick a Shopify plan. Don’t worry, they won’t charge you until your trial is over.

Click through and click the Basic plan for $39 per month.
Then in your payment details and click ‘Start plan.’

Now head back to the ‘Orders’ section and click ‘Create order.’
In the ‘Search products’ bar, start typing in the name of the product you want to order. Select it and click ‘Add to order.’

In the ‘Notes’ section, write a note to yourself that this is a sample order.
In the ‘Find or create a customer’ section on the right, click the bar and choose ‘Create a new customer.’ Add your own information and save it.

When everything’s set, click the ‘Mark as paid’ button so you don’t have to pay your store’s price.

A popup will ask you to confirm. Click ‘Create order.’

Fulfill your first order!
Now that you’ve created it, go to Oberlo and click the ‘Orders’ section. You should see that there’s 1 order waiting to be fulfilled.
Note that there’s also a convenient video called ‘Ordering products from a supplier.’ Watch it.

Click the orange ‘Order Products’ button.
Once you place the order, the orange ‘To Order’ tag on the left should turn blue and say ‘Order Placed.’
When the supplier ships the order in 2-7 business days, the tracking number will automatically be added, and it will be marked as fulfilled in the ‘Orders’ section of Shopify.
Fulfilling an AliExpress product order
If the product was imported through AliExpress, there are a few more steps to fulfillment.
Once you’ve ordered your samples, you’re all set!
[highlight]Important: At some point, AliExpress will put your credit card on hold and require you to verify your identity. You’ll need to submit a copy of a passport/driver’s license/other identity card, as well as a photo of your credit card and a statement from that credit card. Don’t be alarmed – this is normal and necessary. It will take 1-3 business days to be verified. Amanda was worried, but I assured her that it’s just how AliExpress prevents fraud on the site.[/highlight]
Day 5 Recap
Today, you:
✓ Customized your products so that they really how value to your future customers
✓ Added them to your store so they’re ready-to-go for your launch
✓ Created a few product collections and organize your products into them
✓ Ordered samples to make sure they’re good quality
✓ In the process, you learned how to fulfill all your future orders in Oberlo
Great work. See ya tomorrow.
Day 6: Everyone loves a giveaway

1. Tweet today’s quote → 2. Get to work!

You’re going to want some contacts to email once you launch your store. A giveaway is the perrrrfect way to do that.
We’re going to use an awesome free tool called KingSumo. It will let you give away whatever you want, for however long you want. People enter your giveaway by typing in their email only.
Then when the giveaway is over, you can export all of the email addresses so that you can market to them later!
How to choose a giveaway product
Choosing the right product is critical. You’ll want to choose something that appeals to your audience and is relevant to your niche specifically.
If you give away something generic like a Target gift card, you’ll have all kinds of people entering. In the end, this won’t be worth it because there’s no guarantee they’re actually interested in your brand.
So ask yourself some questions:
- Who’s in my target audience of customers?
- What do these people enjoy?
- What are their interests, hobbies, and habits?
- What gets them excited?
My general rule of thumb is to spend at least $100 on the giveaway. This way, people will actually be interested enough to sign up. If it’s too cheap, they might not think it’s worth it.
Amanda Asks
“How can I know which giveaways my audience
will really like?”
My answer: Since Amanda already knew that her target audience is young women who are into fashion, we can guess that they’re also into beauty. Those 2 industries go hand-in-hand.
So anything makeup-related is a solid choice in this case: brushes, cases, makeup sets, etc.
And since these people are incredibly active on social media – especially Instagram – I recommended that she go on these platforms to search for giveaways. Using hashtags like #giveaway is pretty straight-forward.

If you want some more ideas, there are lots of giveaway websites that you can browse through to see what kind of giveaways get people excited and ‘go viral.’ Try to think outside the box and get creative.
Spend 30 minutes browsing giveaway websites like:
If you’re struggling to come up with amazing and unique ideas, you can always just go for a gift card for a niche-specific store. Just make sure that this store isn’t one of your future competitors! Best to go after related interests instead.
[highlight]Some dropshippers like to give away their own products to generate interest. I don’t like to do this, because I don’t want my future customers to think “Oh, I won’t buy this now. I’ll just wait for another giveaway.” I want to create a sense of urgency and scarcity for them to buy now.[/highlight]
Amanda decided to go with a makeup set from the popular beauty line Zoeva. She also chose to give away 3 scarves from her store once it launched. (She’s a rebel.)
Her logic was that more this tactic could generate excitement for her store, and also get more sign-ups. More prizes = entrants might feel like they have a better chance of winning something.
Set up your giveaway
Now that you have your idea, let’s set it up on KingSumo.
- Go to KingSumo and enter your email address to start

-
Fill in the giveaway’s details:
- The title and description that your audience will see. Be descriptive, explain the value, and make it sound exciting.
- Start/end date and time – make this last 1 week, so that it ends the day before your store launch. This way, you can announce the winner on the day of your launch.
- When you’ll announce the winner (usually a day after it ends)
- The name and URL of your company (just put in your Shopify URL for now)
- The name of the prize and its monetary value
- One or more prize images – get these from the source’s website

- You can leave the sharing settings as-is

-
Since you don’t have any social media accounts yet, you can just keep the default bonus entries section. They’ll get 2 extra entries for every day they come back and click the link.
- Also, once they sign up, they’ll have the ability to get more entries for referring their friends. This will be an awesome tool for getting more entries and giving it the chance to ‘go viral.’

- Click ‘Save’ at the bottom
- The next screen will ask for you to create an account. Fill in your name and a password and click ‘Register’
- Your giveaway is alive! You can share on your personal social accounts and copy the link to post online.

Keep in mind that you can edit your giveaway anytime you want – even while it’s live. KingSumo is really convenient.
If you want to edit, just go to the Dashboard and click the ‘Promote’ button, then click ‘Edit.’ You can also see the page by clicking ‘View.’ Keep in mind that you’ll see the same thing everyone else does, so you can’t see a ‘preview’ if the giveaway isn’t live yet.

Here’s what Amanda’s looked like:

Collect emails through your Shopify password page
The giveaway page will have your store’s URL on it, which inevitably means that some people will click to see who’s hosting the giveaway.
Your Shopify store is password-protected and not live, but you can still collect email addresses through it, so I definitely recommend customizing it to get some pre-launch signups.
To customize the message on this page, log into your Shopify account. In the left sidebar, go to ‘Sales Channels’ ➜ ‘Online Store’ ➜ ‘Themes.’
On the ‘Themes’ page, click the blue ‘Customize’ button.

At the top left, click the ‘Home page’ dropdown and select ‘Password page.’

Click ‘Content’ in the right sidebar, and you’ll be able to edit the text and button that appears on the page when users visit your store before it’s live.

I recommend making an enticing pre-sale offer. Something like ‘Sign up to receive a 20% discount when we launch!’
This will increase your chances of getting more emails, aka more leads to potentially turn into customers through your email marketing efforts later.
When your giveaway is over, just head to ‘Customers’ ➜ ‘Email subscribers’ to collect the entrants and email them their pre-sale discount code.

Promote it far and wide
Once it’s live, you have to pump this baby out to every place you can think of.
After all, if no one sees it, no one will sign up for it!
Remember that list of giveaway websites and forums I showed you to get ideas and inspirations? Start by posting on those. You’ll likely need to make an account in order to post.
Another awesome way to get activity on your giveaway is to post it in relevant Facebook groups.
Whip out that handy list of niche-specific Facebook groups you made on Day 2.
But you can’t just go posting everywhere – you will get banned. I don’t think I need to tell you that getting banned is bad.
To play it safe, message an admin from each group to ask permission to post your giveaway.
To see a group’s admins once you’re a member, go to the ‘Members’ tab and you’ll see them all listed out.

If you’re not a member of a closed group, you can still see who the admins are on the main page.

Send them a message to see if it’s okay to post about your giveaway. Hopefully, they’ve seen your name once or twice from you being an active member.
Something simple like:

Using this technique, Amanda was able to post to a handful of groups and rack up some signups.
You should also definitely post on your own social networks.
Amanda got some great engagement and support from her friends and family.

The name of the game is post, post, post. Post it anywhere you think your target audience will see it and be receptive. But of course, don’t break rules and get yourself banned from valuable communities.
Day 6 Recap
Today, you:
✓ Got to understand your niche better by figuring out the kind of giveaway your target audience would respond to
✓ Made a free giveaway online using KingSumo
✓ Shared it far and wide on the internet to start collecting email addresses for your marketing
Woohoo. See you tomorrow.
Day 7: Creating a brand is easy (if you know how to do it)

1. Tweet today’s quote → 2. Get to work!

A brand encourages people to take action by highlighting the unique aspects of a business. It also gives depth to your online presence and tells your audience that they can trust your company.
Think about Nike and LEGO for a moment.
What attracts people to those websites? Personality. Branding.
So if you want to succeed in ecommerce, you need to create a memorable brand.
Building one from scratch, though, can seem intimidating.
There’s a logo to be designed, a story to be told, a font to be picked and the list goes on.
Yet if you understand what goes into each step of ecommerce brand building, you can make one that can help take your store to the next level.
Today, we’re going to:
- Create a logo
- Pick a font and color scheme
- Write an authentic brand story
Let’s go.
Create a logo
A logo is probably the first thing people notice when they visit an online store. And it’s not hard to understand why – it’s the face of a brand after all, and is potentially representing the company on all fronts, including the web, social, and even offline.
Coming up with a stunning logo, however, is not just time-consuming, but can also be a big challenge to overcome for non-designers like me and Amanda. We know the basics of how to use Photoshop – but we’re no graphics professionals.
That said, creating a unique, identifiable logo is still possible. And you have more than one option for achieving the purpose.
You can:
Outsource it
You can hire someone to design a logo for a low cost ($5-$20) on Fiverr.

The site connects you with designers who can execute your brand’s vision with a good-quality logo. It also lets you choose design partners if you don’t have a clear idea of what you need or want someone to help you pick a design direction.
I’ve personally used Fiverr to get a logo made for one my stores.
One of the main things I learned is that the instructions you provide to the designer need to be as clear as possible. Otherwise, you may end up being disappointed with the result.
Use Canva
You may be familiar with Canva as a social media tool, but it actually has many free logos you can use. Plus, if you don’t like the default look of a pre-set logo, you can change it to be more in line with your brand’s outlook.
Just choose a template you like, and customize it to your preferences using Canva’s drag-and-drop editor.

And though it does require users to pay if they want to upload custom fonts, you can always sign up for its 30-day free trial to test things out.
If you aren’t satisfied with its capabilities (extremely unlikely to happen), you can simply cancel the trial. The tool even sends you a notification 3 days before the subscription ends. That’s really cool!
Get help from a friend
Another thing you could do is see if any of your friends know Photoshop.
If you manage to find someone, see if they could put a logo together for you. You can even consider paying them a fee for it.
Amanda, however, knows how to use Photoshop, so she didn’t need to outsource or tap into her circle of friends.

But even with graphic design skills, it doesn’t have to take a lot of work to make a nice, simple, catchy logo. To make the Evooli logo, Amanda just went online to download a free font and changed the color of one letter to add a splash of personality. Boom.
[highlight]If you want to experiment with this route, be 100% sure that the font you use is free for commercial use. Otherwise, you can get yourself in big trouble legally.[/highlight]
Now, I know that everyone isn’t good at Photoshop. Fortunately, there is still the option of Fiverr and Canva – all 3 options can help get you a business logo in no time.
I recommend having your logo in a couple different file formats, including a JPG and a PNG. Create a folder on your computer to keep these branding elements in.
Pick a font & color scheme
Apart from your logo, your font and color scheme will be essential parts of your brand. You probably got an idea of different fonts if you were making a logo in Canva of Photoshop.
As you can tell by Amanda’s logo, she chose a handwriting style font to stay in line with stylish feminine brands. Your style of font can say a lot about your brand. For example, big boxed letters can be more bold and masculine. All caps is strong, while lowercase is calmer.
Take a minute to think about logos you’ve seen and what kinds of ‘moods’ they create for you when you look at them.
As for colors, you’ll just need 2 or 3.
If your target audience is feminine and super ‘girly,’ you might want to consider traditionally ‘feminine’ colors like pink and purple.
But there’s actually a surprising amount of research about color psychology.
Conversioner made an awesome graphic to show some basics of what certain colors ‘mean,’ and the types of emotions they can trigger in people when used in branding:

Write down the codes of your colors so that you have them handy for when you’re building your site. You can get this from the color picker in Canva or Photoshop, or ask your graphic designer.
For example, Amanda’s purple color is #6600cc.
Tell your brand’s story
What do leading ecommerce brands like ASOS, Forever 21, and Warby Parker have in common?
A great story behind their brand.
Telling your company’s story is a crucial aspect of brand building. It helps to shape how consumers look at you and allows people to start forging a connection with you and your brand. Get the story right, and you’ll lay a foundation that will enable you to set up a solid brand with an equally solid future.
Amanda Asks
“Are there any rules of thumb for writing a brand story?”
My answer: the key to a great story is to focus on how people might feel using your product.
Talk about what’s different about your audience or highlight how their lives have evolved along with their preferences.
Use a narrative to tie a positive experience to your products and company, so that people associate your brand with feelings like happiness, fun, relief, and relaxation.
Consequently, you can adopt metaphor and language that are commonly associated with those positive feelings.
Here’s an example:

Does it sound quirky?
Yes. But ThinkGeek’s brand story appeals to those who follow the geek culture or are into science fiction. The company also ties in a positive experience to its offerings by saying its products will stimulate its customers’ imaginations and fuel their geek core.
This brand story works for ThinkGeek not only because it helps potential customers imagine being better off with its products, but because it speaks its customer’s language: with the Force, geek out, and other phrases you see on their About Us page is common geek terminology.
Amanda came up with the following story for Evooli:

A brand story is an experience behind what you sell. And since people buy experiences, it is a great way to gain a competitive advantage and be more than just a stock mover.
[highlight]Coming up with a good narrative for your brand story is only half the battle: once you’re at it, you have to speak your customer’s language too. In fact, you should be doing this in most (if not all) of your communications. I’ll talk more about this aspect of ecommerce branding on Day 8.[/highlight]
Once you’re done writing your brand story, create an ‘About Us’ page in Shopify and add it there.
You’ll need to add a new page to your store. It’s easy:
- In the left sidebar of your Shopify dashboard, go to ‘Sales Channels’ ➜ ‘Online Store’ ➜ ‘Pages’
- On the top right, click ‘Add page’

You’ll do this for every new page you make – including the policies pages you’ll make on Day 9.
Add the title ‘About’ or ‘About Us,’ paste your story into the text editor, and click ‘Save.’

Day 7 Recap
Today, you:
✓ Created a logo for your store or had someone else help you with it
✓ Picked a font & color scheme that will help to represent your top brand qualities
✓ Wrote a compelling brand story that captures what you’re all about
✓ Created an ‘About Us’ page to tell that story to your visitors
Creating a brand can feel overwhelming – so great job! We’ll do a bit more branding work tomorrow to shape up the final pieces. See you then.
Day 8: Keep on branding

1. Tweet today’s quote → 2. Get to work!

Yesterday, you laid the foundation of your ecommerce brand by creating a logo and telling your company’s story.
Today, you’re going to learn how to speak your customer’s language – to engage your target audience more effectively and increase the appeal of your brand.
I’ll also walk you through the steps you need to take to set up Facebook and Instagram accounts for your store.
Today, we’re going to:
- Learn how to use the same language as your target audience, so that they connect with your brand
- Create Facebook and Instagram accounts and begin to fill them out
Here we go.
Speak your customer’s language
From both a linguistic and psychological point of view, people prefer doing business with companies that speak their preferred language.
‘Language’ here implies market preferences, industry terminology, and culture differences. Let me explain it with the help of an example.
Imagine 5 men and 5 women signing up for the same exercise session. The men are telling their peers that they want to ‘get lean,’ while the women are all saying they want to ‘tone up’ for the beach season. Both genders have a similar goal but speak a totally different language.
If you can figure out what language your customers speak and use it in your branding, you’ll change people’s perception of your store.
Amanda Asks
“How can I know if I’m really speaking my audience’s language?”
My answer: Look at their conversations in Facebook Groups, study their Instagram profiles, and exchange a few messages.
I consider these places to be a ‘language comfort zone,’ where audiences casually (and naturally) speak about their passions, interests, and problems. Here’s a quick look at how each of them can give you an insight into the word and terminologies your target audience regularly uses.
Facebook Groups
People join Facebook Groups to engage in casual discussions with like-minded people. Typically, they find it to be a safe place where they can share their thoughts with others, comment on breaking news, and open up a bit more. This is why it makes sense to observe the conversations that happen there.
For example, if you’re selling eco-friendly items through your store, you can join ‘sustainable living’ and ‘eco-friendly’ groups to see the type of language people use there.

I joined one of such groups to see if I could find any specific words and references for the ‘eco-friendly’ audience. And it worked!

One of the first posts I came across gave me some ideas of the language that could be used for an eco-friendly audience. People selling in the same niche could sprinkle phrases like ‘eco-warriors’ and ‘self-care routine’ in their branding to engage audiences better.
You can take a similar approach by joining Facebook Groups that are relevant to your niche.
Instagram feed
Another place you should explore is the Instagram feed of your ideal customer.
Let’s assume you’re selling wigs, extensions, and other hair-related products through your store. What you could do is search for product-related hashtags on Instagram to find people who are passionate about hair products, and then examine their Instagram feed to see the way they speak.
Here’s what comes up if I search for #wigs on Instagram.

Most of the content is from people who’re passionate about wigs and other hair products.

Digging further into their profiles, I came across a few words that someone selling hair products could use in their branding, like ‘rocking a wig’.
Just like their conversations in Facebook Groups, the Instagram feed of your target audience can help you gain an understanding of your customer’s language – you just need to do a bit of research.
Messages
Lastly, exchange a few messages with people who fit in your target demographic. These could be on Instagram, WhatsApp, Facebook, Twitter, or SMS – the choice of medium is yours to pick.
If you’re selling scarves like Amanda, for instance, you could exchange messages with women who’re into lifestyle and fashion.

From this example, you could take the phrase ‘peaceful serene vibe’ and use it on your About Us or product pages.
By using your customer’s language, you’ll be able to create copy and updates that sound like their own, setting the expectation that your brand is familiar with their interests.
Set up Facebook & Instagram
Facebook and Instagram are marketing channels that you simply can’t ignore.
Both enable you to reach the world at large, as well as nurture prospects and respond to customer service queries.
However, you’ll first have to create a business account on both before you can post branded messages and product updates. I’ve provided a step-by-step walkthrough below to help you get through this phase quickly and easily.
To create a business account on Facebook:
To build a Facebook Business Page, open the following URL in your web browser: facebook.com/pages/creation.
You’ll then be asked to choose one of the following Page categories:

Click ‘Get Started’ for business or brand.
Next, you’ll have to fill in the basic information of your brand or business:
- Page Name
- Category
- Address
Write your store’s name as the page name, and choose your business niche as the category. The address can be a random one, and you can hide it later.
Click ‘Continue’ once you’re done.
Next, you’ll be asked to upload a profile image. Put the logo you made on Day 7 in here (most ecommerce brands tend to do this).

The ideal dimensions for the profile image are 360 x 360 pixels, and the minimum size that Facebook accepts is 180 x 180 pixels.
Once you’ve added a profile photo, it’s time to upload a cover image.
The cover image is the first thing that catches people’s attention when they visit the Facebook page of a business. So it’s key to put up something that showcases your brand’s personality and uniqueness.
Canva has some great templates that you can use for your Facebook cover image.

Facebook displays covert art at 820 x 312 pixels on PCs, and 640 x 360 pixels on smartphones.
[highlight] You can also ‘skip’ the profile and cover image part during the page creation process and come back to upload their contents later. [/highlight]
And that’s mainly it. You now own a Facebook Business Page that you can use to promote your store.
By the way, you’ll be connecting your Instagram account to with the same Business page in order to be able to set up a business account on Instagram.
To create a business account on Instagram:
[highlight]I’ve used a friend’s personal Instagram account to demonstrate how to set up an Instagram business account, as my own personal account is already linked to a business profile.[/highlight]
Sign into your personal Instagram account and tap the circled profile image at the bottom right of the screen.

On the page that appears, tap the 3 vertical lines at the top right corner of the screen.

Next, tap the wheel icon for ‘Settings’ at the bottom right.

Scroll down and tap ‘Switch to business profile,’ and then swipe left to learn more about the new features Instagram has introduced for business profiles.

When you’re done reading, tap the blue ‘Continue’ button to move forward.

The next screen will ask you to pick a Facebook business page to connect to. Choose your store’s and tap ‘Next’.

You’ll now be asked to enter a phone number, address, and email for your business. You need to fill at least one of these fields to move onto the next step. I just put in my store’s email ID.

Once you’re done, the Instagram app will take you back to your profile, which should now be a business profile.
For consistency, the username of your Instagram business profile should match the name of your Facebook Business Page.
The other things you should pay attention to are your Instagram bio, profile image, and website link.
From my experience, people really look at your Instagram bio. It’s not like Facebook where audiences are unlikely to read the description of the page. Hence, it’s important to come up with a bio that fits with and relates to your branding efforts.
If you’re not sure about what to include in your bio, Oberlo has 200+ Instagram bio ideas you can copy and paste.
For the profile image, use the logo you had created on Day 7, but make sure to change its dimensions to 110 x 110 pixels.
Here’s the Instagram business profile of my sunglasses dropshipping store:
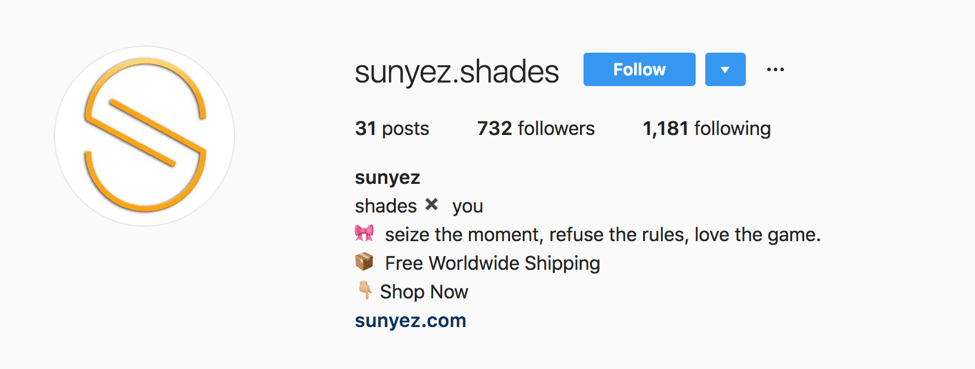
I used the logo I had created for it as the profile image and added a few emojis and lines. Additionally, I used the direct URL of the store as the website link, so that anyone who finds this profile on Instagram can go to the ecommerce site to make a purchase.
That’s all you need to do to set up business accounts on Facebook and Instagram. Post some content on each to make sure they don’t look empty. Also, start liking and commenting on the posts of micro-influencers that you had researched on Day 2.
Then, after a few days of posting content and updates, inform people about the giveaway that you had designed on Day 6.
Day 8 Recap
Today, you:
✓ Learned where to find your customer’s language
✓ Built Facebook and Instagram business accounts
Fantastic. See you tomorrow.
Day 9: Start building behind-the-scenes

1. Tweet today’s quote → 2. Get to work!

The time has come. Today we’re going to start building your store!
There are two main parts of a store that need to be addressed thoroughly before you can launch: the backend and the frontend.
The backend is the ‘internal workings’ of the store – the settings, apps, things like this. The frontend is the shoppable part that your customers see when they go to www.[yourstore].com.
Before we get to making your store beautiful for customers, we need to make sure everything in the backend will function smoothly to save you a million hours of stress down the road.
None of us want you to have a million hours of stress.
Today, we’re going to:
- Buy and connect a custom domain name so your customers don’t see ‘your-store.myshopify.com’
- Build out your 4 legal policy pages: privacy policy, refund policy, terms of service, shipping policy (with some help from Shopify’s templates for the first 3)
- Configure important settings like taxes, shipping, etc.
- Set up Google Analytics so you can track your performance and make improvements after you launch
Let’s go.
Buy a website domain
Having a store name like https://my-test-store.myshopify.com isn’t so reputable for shoppers. So we’re going to buy a proper .com domain and connect it to your account.
Go to www.GoDaddy.com and start typing in your ideas for a store name into the search bar.

GoDaddy will tell you if the domain is available or not. Basically, the name of the game here is to keep trying until you find a variation that’s available.
If you have an idea that you love, but it’s taken, you can try a few things.
For example, say you wanted www.LiveLaughLove.com, but it’s not available. You can try:
-
Use a different domain extension instead of .com, like:
- livelaughlove.co
- livelaughlove.live
- livelaughlove.store
- livelaughlove.net
- livelaughlove.online
- livelaughlove.biz
- Experiment with adding hyphens in between words, like live-laugh-love.com
- Add extra words, like livelaughloveshop.com
Once you find a good one that’s available, click ‘Add to cart.’

Then click the ‘Continue to cart’ button next to the search bar.
The next page will ask for add-ons. These aren’t important if you don’t have the budget, so you can say ‘no’ to all of them. Amanda went for it – but again, it’s not critical.
The next page will ask you to create an account or sign in. Create your account and add your payment method, like your credit card or PayPal account.
On the final payment page, make sure your details are right. If there’s a banner for a promo code, use it! Amanda got 30% off.
Click ‘Complete Purchase.’

Now that you have your domain, it’s time to connect it to Shopify.
GoDaddy will automatically take you to your Domain Manager page. Next to your domain, click the ‘Use my domain’ button.
On the next page, scroll down to ‘Connect to an existing site’ and click ‘Get Started.’

On the next page, find and click Shopify in the list of Online Stores destinations.

On the next page, click ‘Connect Domain.’
It will give you a few extra steps. Follow them.

When you complete these steps, click “Connect automatically’ inside Shopify.

Your browser window will get a popup window asking if you want to connect to the website and change your domain’s DNS records. Click ‘Connect.’

Yeah! You’re good to go. Give Shopify up to 24 hours to show this in the URL when you visit your store.
Now it’s time to start setting up the backend of your store. This is critical so that everything functions smoothly. If you mess up the backend, you’re gonna have some serious problems down the road.
But don’t worry – that’s why I’m here!
Create policy pages
Amanda Asks
“Legal stuff is scary. What things do I need to cover my bases?”
My answer: There are 4 key legal pages that you’ll need to make at a minimum:
- Privacy Policy
- Refund Policy
- Terms of Service
- Shipping Policy
[highlight]Important: I’m not a lawyer. I can’t give you official legal advice. But I’ll show you some tips and templates from Shopify that can help make legal compliance easier for you. In the end, it’s up to you to make sure you’re not violating any laws. If you’re selling to people in Europe, make sure you’re following GDPR guidelines.[/highlight]
To make these, follow the same steps as you did on Day 7 when you made the ‘About Us’ page.
(In the left sidebar of your Shopify dashboard, go to ‘Sales Channels’ ➜ ‘Online Store’ ➜ ‘Pages.’ On the top right, click ‘Add page.’)
Now let’s talk about each page.
Create a Privacy Policy page
Especially with the recent GDPR laws in Europe, it’s critical that you have a strong Privacy Policy in place to cover yourself legally.
Luckily, Shopify has a handy privacy policy generator tool that spits one out for you.
Just go to the Privacy Policy Generator page.
- Click ‘Get Started’
- Since you already have a Shopify account, check the box that says ‘I’ll skip the Shopify trial for now, just create my policy’
- Enter your company info and website URL and click ‘Send me my privacy policy’
- Done! Easy.

Then check your email for an email from Shopify. Go to the link to your policy and copy it.
Add a page like I showed you earlier. Write your page title (‘Privacy Policy’ will do) and paste in the privacy policy you got from the Shopify generator.
You’ll notice that there are several parts where the Shopify team put some text in brackets. These brackets are to help you customize your policy. Read each one and decide what to do based on your store.
If certain bracket items don’t apply to you, just delete them. Make sure none of those ugly brackets are left when you’re done.
Make sure you read every single word and have it reflect your business. This is just a template, it’s not set in stone.

Click ‘Save’ and your page is published.
On to the next one.
Create a Refund Policy page
Shopify has a refund policy generator page too. Click here to fill in your info and have a template page emailed to you – the same way you did before.
Again, read every single word and make sure it all applies to your store. Then publish the page the same way you did with the privacy page.
Create a Terms of Service page
Once again, Shopify saves the day with a generator. Click here to generate a template for your ‘Terms of Service’ (also called ‘Terms and Conditions’) page.
Read every single word, make edits where needed, and publish like the previous pages.
Create a Shipping Policy page
Since you’re dropshipping, it might take a little while for products to get to your customers. Sometimes, it can be as much as 60 days.
But don’t worry – this usually isn’t the case, and you can choose your suppliers wisely to try and help prevent this.
That said, having a shipping page is a good idea to help inform your customers of potential shipping times. It can also give you a leg to stand on in case any customers claim you didn’t tell them about the shipping times.
Your shipping page should include the following info:
- Shipping options: The types of options you provide. Include anything like standard shipping, international and domestic shipping, etc.
- Shipping cost: Discuss the costs of shipping as they relate to different methods. Note: free shipping is a great competitive advantage, and could be a way to help explain the longer shipping times. Worth considering.
- Shipping & handling times: How long does each shipping method take? How long can a customer expect between them placing their order and actually receiving it?
- Restrictions: Are there any restrictions for your shipping abilities? Like if you don’t ship to certain states, countries, P.O. boxes, etc.
And of course, create this page the same way you made the others.
Add these pages to your navigation
Just like any page you make on Shopify, you have to add these to your website’s header or footer or else customers can’t access them without the direct link.
Let’s add these 4 to the footer.
To do that, go to ‘Sales Channels’ ➜ ‘Online Store’ ➜ ‘Navigation.’
Click ‘Footer menu.’

Click ‘Add menu item.’
Then type the page’s name how you want it to appear in the footer.

Click ‘Link’ ➜ ‘Pages.’

Find and select the corresponding page. Then click ‘Add.’

Then repeat this until you’ve added all 4 pages.
Then click ‘Save menu’ at the bottom of the screen.
Configure settings
You’ll need to set up lots of little things to get the store running smoothly. Let’s run through the settings.
In the bottom left corner of the dashboard, click the ‘Settings’ button with the gear icon.

First, go to ‘General’ and fill out all your store details.
Set up taxes
Then, go to ‘Taxes.’ Select if you want to just calculate taxes into your prices, or if you want the customer to pay for taxes based on the location they’re making their purchase from. In the US, this would be based on their state/county/city. In other places, this might be based on their country.
Amanda chose to calculate them into her prices. This is usually my personal choice too.
Check the appropriate box and click ‘Save.’

Set up payments
I’m a fan of using Shopify Payments and PayPal Express (for US customers). They make it super simple for you to get paid, and they’re lightning fast to set up. Some of the other payment gateways can take weeks to set up completely.
So let’s do Shopify Payments first. Go back to settings and click ‘Payment providers.’
Click ‘Complete account setup’ to use Shopify Payments.

Fill in your personal details, including:
- Business details
- Personal details
- Product details (just a quick description – like ‘Women’s fashion accessories store’)
- Customer billing statement (how you want your company to be listed on their credit card transactions)
- Banking information – bank account and routing numbers
Double-check and make sure it’s all correct, then click ‘Complete account setup.’

On the next page, you’ll see the fees that Shopify Payments charges. Take note that for each online transaction, Shopify will take a 2.9% fee plus an additional 30 cents. If you’re changing currencies, it will cost an additional 1.5% of each transaction.

PayPal payments
PayPal is popular. That’s why I recommend adding the option for customers to pay through it.
To set it up, click the ‘Activate’ button in the PayPal section of the ‘Payment providers’ page.

If you have a regular PayPal account, you’ll need to upgrade to a business account. If you don’t have a PayPal account at all, create a business account.
PayPal will ask what type of business it is. If you’re not registered (and in the US), select ‘Individual/Sole Proprietorship.’

They’ll ask a few questions and for the URL. Give ‘em all the good stuff.
Click ‘Save’ and you should be good to go.
Set up checkout
Let’s set up the checkout process for customers.

Here are my recommendations for settings for new store owners:
- Customer accounts ➜ Accounts are disabled
-
Customer contact
- To check out ➜ Customers can only check out using email
-
Form options
- Full name ➜ Require first and last name
- Company name ➜ Hidden
- Address line 2 ➜ Optional
- Shipping address phone number ➜ Required
-
Order processing
-
While the customer is checking out
- Use the shipping address as the billing address by default
- Enable address autocompletion
- After an order has been paid ➜ Do not automatically fulfill any of the order’s line items (this is important for using Oberlo)
- After an order has been fulfilled and paid ➜ Automatically archive the order
-
While the customer is checking out
- Email marketing ➜ Show a sign-up option at checkout
-
Abandoned checkouts ➜ Automatically send abandoned checkout emails
- Send to ➜ Anyone who abandons checkout
- Send after ➜ 10 hours (recommended)
[highlight]Note: we’ll talk more about abandoned cart emails on Day 13.[/highlight]
Be sure to click ‘Save’ when you’re done.
Set up shipping
In Shopify, you’re required to enter an address for the ‘Shipping origin,’ and this should be your business address (which is probably your home address too, unless you decide to rent a mailbox).
But don’t worry, customers won’t see this once we change the settings.
First, delete the existing pre-set shipping zones.
Click ‘Edit’ next to the pre-existing zones.

Scroll down to the bottom and click ‘Delete zone’ and then ‘Delete shipping zone’ in the confirmation window that pops up.

Repeat for all of them (there are usually 2 – one for ‘Domestic’ and one for ‘Rest of world.’)
Once it’s clear, click ‘Add shipping zone.’

If you’re offering free shipping, just type that in. Customers won’t see this label.
You can add the countries you plan to ship to. Just add ‘Rest of world’ if you’re ok with shipping to other places.
Go to the ‘Add rate’ in the ‘Price based rates’ section.
Here, you can select ‘Free shipping rate’ if you plan to include shipping in your prices. If you want to charge customers for shipping, you can add a flat rate here instead. (In this case, change the name to something like ‘Flat rate $2 shipping’ so it accurately reflects your plan.)

Click done.

When everything’s set up, don’t forget to click ‘Save’ as always.
You don’t need to worry about any other settings below that on the ‘Shipping’ page.
And you’ve got the basic settings configured! Now to analytics.
Set up Google Analytics
Google Analytics is a must-have. It will give you comprehensive information about the people who come to your store and what they do when they’re there.
If they made a purchase, you can use this info to get more sales. If they didn’t make a purchase, you can help fix that.
Here’s how to sign up:
- Go to the Google Analytics website.
- Choose the Gmail account you want to sign up with and log into it.
- Click ‘Sign up’ on the next page.

-
Fill in your store details:
- Account and website name (these can be the same: the name of your store)
- Website URL that you just bought
- Industry category
- Your timezone

- Choose whatever data settings you want (these won’t impact your Analytics, so choose whatever you prefer). Then click ‘Get Tracking ID.’

- A popup will show you Google’s Terms of Service Agreement. Read through it, check the box next to ‘I also accept the Data Processing Terms as required by GDPR,’ and click ‘I Accept.’

- On the next page, it will show your Global Site Tag. This is a piece of code that needs to go on every page you want tracked (which is all of them). But Shopify makes this super easy – you only need to paste it in one place. Highlight and copy this entire code. Make sure you don’t miss anything.

- Now go to your Shopify dashboard. In the left sidebar under ‘Sales Channels,’ go to ‘Online Store’ and then ‘Preferences.’

- On that page, scroll down until you see the ‘Google Analytics’ section. Paste your whole Global Site Tag into this box.

- After you paste, check the box that says ‘Use Enhanced Ecommerce.’
- Then scroll to the bottom of the page and click ‘Save.’
- One last thing to do. You’ll want to enable ecommerce tracking inside Google Analytics so you can see how people are buying (or not buying) on your site. To do this, click the little gear at the bottom left of your Google Analytics account, which takes you to the Admin screen.
- On that screen, go to column 3 and click ‘Ecommerce Settings.’

- Toggle the switch under ‘Enable Ecommerce’ and ‘Enable Enhanced Ecommerce Reporting’ so that they say ‘On.’
- Then click ‘Save.’ And you’re done, woohoo!

Phew. Now your store’s backend is on point.
Day 9 Recap
Today, you:
✓ Secured and connected your custom domain
✓ Built out your key legal paves to save your behind legally
✓ Configured the important settings for a smooth-running store
✓ Installed a Google Analytics tracking code to see how you’re doing after launch
Now that this stuff is out of the way, we can build the exciting part… the frontend! See you tomorrow.
Day 10: Make it beautiful for everyone to see

1. Tweet today’s quote → 2. Get to work!

Yesterday, we set up the backend of your store so everything runs smoothly for you. Today, we’re going to work on the frontend – the part that everyone sees when they visit.
It’s critical to have a nice-looking, functional, easy-to-navigate store or else you simply won’t make many sales.
Luckily, Shopify makes it incredibly easy to build an awesome store in less than a day. And that’s exactly what we’ll do.
[highlight]Note: it’s really important that you’ve added and customized all your products and collections before you build out the frontend. Otherwise, you’ll just make extra work for yourself by having to do this again and make sure it all looks nice.[/highlight]
Today, we’re going to:
- Choose a theme for your store
- Use Shopify’s builder to customize the store with your own branding
- Organize the store to create a simple and streamlined shopping experience for your users
- Set up a basic sales funnel to entice and engage your customers
All righty.
Pick a Shopify theme
There are a bunch of Shopify themes to choose from. Some of them are made especially for certain industries, while others are made for certain kinds of stores – like themes that emphasize product photography or themes for stores with only a few products.
Shopify offers a handful of free themes and lots of paid ones. Paid themes cost around $140 to $180. Since we’re operating on a $500 budget, we’ll stick with a free theme for now.
Once your store picks up, you should definitely consider a paid theme that’s more geared toward getting conversions and purchases in your niche.
To browse through themes, go to ‘Sales Channels’ ➜ ‘Online Store’ ➜ ‘Themes’ in the left sidebar of your Shopify dashboard.

Scroll down to the ‘Explore free themes’ button.

Explore your options and choose the theme you like best.

Amanda Asks
"What kind of themes will help maximize my sales?"
My answer: I strongly recommend choosing a theme where at least one of your products is showcased ‘above the fold,’ which means that it shows up before the user even scrolls down. The top of your homepage is prime real estate… don’t waste it!
Your theme should also be really intuitive and easy to navigate. Bonus points for themes that include upselling techniques like a ‘You might also like…’ section that shows more products.
So Amanda went with the theme ‘Simple’ because it didn’t waste any time showcasing her products.
Just select your theme option and click ‘Add [Theme name].’ To make it live, you’ll need to click ‘Publish’ in the ‘Actions’ dropdown menu.

(Remember: if you decide to change your theme, you’ll always need to click ‘Publish’ in this section to make it live, or else your previous theme will stay put).
And if you click the ‘Customize’ button, you’ll be taken to a neat store builder that lets you put everything together without any coding experience.
Let’s jump into that.
Customize your theme
After you published your theme of choice, click the blue ‘Customize’ button to get started.

The cool thing is that you can see every change in a live preview. So you know exactly what changes whenever you click a button – no surprises, and you can play around until you find settings that you like best.
You can build out pretty much every page from this builder. Just click the dropdown menu that says ‘Home page’ and you can switch between pages.
You’ll see options for:
- Homepage
- Product pages
- Collection pages
- Collections list page
- Blog page and blog posts
- Cart page
- 404 error page
- Custom pages you’ve created, like policy pages, etc.

Add your branding elements
Let’s start by adding your branding elements. Go to ‘Theme settings’ in the top tab.
This is a critical area, because every change you make here will be site-wide. So once you add your brand color, for example, it will change everything across the site for that option.

Click ‘Colors’ and add to your brand colors. If you just want an accent, I recommend changing the ‘Links and primary button background’ to your primary brand color. Amanda changed it to her purple.

Next, go to ‘Typography’ (this is just a fancy word for font, by the way).
Skim through the options and select one or 2 you like the most. As a general rule of thumb, you’ll want to go with something clean and easy to read, and one that represents the ‘feel’ of your brand.
Amanda went with ‘Avenir Next’ for the header and body text – so just one font for the whole site. She kept the default sizes, but you can play around with those and see what you like most.
Next, go to ‘Checkout’ and add your logo file from your computer so that it displays on the page where your customers are checking out.

Scroll to the bottom and change the colors to your custom brand colors. Shopify will remember the colors you recently selected, so you can just click those quickly. I recommend changing the ‘Accents’ and ‘Buttons,’ but keeping the errors red so they’re more noticeable.

Homepage header
Now go back to the ‘Sections’ tab and click ‘Header.’ This is the top portion of your site, including your logo and banner.
Upload your logo and play with the size.
[highlight]Shopify’s photo library will save any photo you upload, for easy access later. So since you’ve already uploaded your logo, it will be waiting for you to select with just a click.[/highlight]
For the ‘Announcement bar’ section, you’ll want to always have something here to grab the user’s attention. If you’re having a grand opening sale, I recommend adding that here.
Click the ‘Show Announcement’ box, and unclick the ‘Homepage only’ box if you want the announcement to stay on every page.
Type in your announcement into the ‘Announcement text’ box. You can even select any specific page on your site for it to link to when someone clicks the announcement banner.
For example, if you’re having a sale on one product or collection, you can link that product or collection page from the header so the visitor can go straight to it. If you offer free shipping, that makes for a great banner announcement too.
[highlight]Adding this special offer to the top banner is an element of your ‘lead funnel’ – it’s another step toward getting them to buy. The lead funnel is a series of steps that turn a visitor into a customer.[/highlight]
And if you have a company slogan/tagline, you can fill that in too.

Be sure to periodically click the ‘Save’ button at the top right – just in case.
Also, you’ll see 3 little icons at the top of the page. You can use these to see a preview of the mobile version and a full-screen version. Play with those too. It’s really important for your site to look good on mobile, so make sure all your changes look nice there too.
Main menu
In most themes, the menu will be in the header. But in the ‘Simple’ theme, it’s in the sidebar.
It doesn’t really matter for my purposes of showing you how this works.
In the ‘Menu’ section, you can edit which pages visitors can click from your menu.
If you click the little ‘Edit menu’ link, you’ll be taken to the ‘Navigation’ page where you can mix-and-match the pages in your header menu the same way you did with the footer yesterday (with the policy pages).
I recommend keeping it very simple, with maybe just a few buttons: Home, Shop, and maybe Contact or About. Then under ‘Shop’, you can add a dropdown that has your main collection pages.
Of course, this is just a recommendation. You can put your collection pages in the main menu so they’re more accessible.

Homepage body
Now look at the sections underneath. You’ll see a bunch of different options for how you can organize the page’s content.
You can have a big ‘hero’ photo that takes up the whole top bar. You can go straight into your items. You can have a photo with text to one side of it to describe certain items or collections, with a button they can click to go to the appropriate page.
There’s a lot of fun to be had to design all this.
Take a look at the different ‘Add section’ options. You’ll see:
- Blog
- Blog posts: To feature image thumbnails and text snippets from your blog posts. Obviously, you don’t need this for this 21-day period.
- Collection
- Collection list: A section that lists your collections. You can choose the number of collections per row, etc.
- Featured collection: The products inside a collection highlighted in one section. Amanda chose to do this with all 4 of her collections on her homepage.
- Image
- Featured banner: A large photo that spans the width of the page. You can choose how tall it displays.
- Image with text: Half photo, half description. You can also add a button leading the visitor somewhere. In between her collections, Amanda featured a nice image and a little description of the collection displayed right above it.
- Slideshow: Several photos in a slideshow, that play through automatically as well as visitors clicking through themselves.
- Product
- Featured product: Just one product, highlighting its product details like price and description.
- Promotional
- Newsletter: A field for users to enter their email. I absolutely recommend having this on your homepage. Every page, really. Email lists are important.
- Store information
- Map: You don’t need this as you’re dropshipping.
- Text
- Rich text: Just a section of text. Good for if you want to talk about your brand without any images. I recommend using images where possible though.
- Video
- Video: Self-explanatory, eh?
- Advanced layout
- Custom HTML: Don’t even bother with this.

Explore your options and see what works best.
Here are some general recommendations:
- Put at least one product ‘above the fold’ so that visitors can see something right off the bat.
- I prefer displaying a featured collection right at the top, with more aesthetic, brand-building photos underneath.
- If you describe a product or collection, always put a button like ‘Shop now’ that leads them directly to that page.
- Write awesome descriptions. Tap into the brand-building that we discussed earlier and really entice your visitors.
- Use good photos. Nobody wants to buy items with crappy photos, because it makes the products themselves seem crappy too (shocker).
- Put a lot of products on the homepage. I like to have a super long homepage with basically all my store’s items featured on it. Nothing’s hidden that way.
Here’s a peek at what Amanda’s sections looked like when her homepage was done:

Product pages
Now let’s look at options for your product pages, as it’s really important for these to be on point in order to get sales.
In the top dropdown I showed you earlier, click ‘Product pages’ and then click ‘Product pages’ in the side menu as well.
On this page, you’ll be able to edit how all of your product pages display. You can select:
- A quantity selector for them to order more than one if they want
- Showing the product vendor (don’t select this box – it will just show your store’s name)
- Sharing options on social media
- Which side of the page your images and descriptions go on
- A tab that shows another page, like your shipping page for example
- Any zoom options so customers can look at the photos closer

Remaining pages
Using this same process that we’ve covered so far, keep tweaking and building the rest of your site. Go through every page, explore your options, and play around with the settings until you like the way it looks.
[highlight]Building the frontend can feel overwhelming, especially if it’s your first time with this kind of thing. Amanda was nervous about choosing the right options, but I encouraged her that she had to start with something before she could know what’s best. Plus, I’ll guide you through how to get some valuable feedback before we launch. So don’t overthink it![/highlight]
Day 10 Recap
Today, you:
✓ Chose your store’s theme – something clean, appealing, and easy to navigate
✓ Set up a basic lead funnel by adding an enticing offer to your banner
✓ Built out the frontend of your store for your customers to have a great shopping experience
Your store has finally come to life! Amazing.
See you back here tomorrow so we can fine tune and start preparing for your launch in a few days.
Day 11: Build your app empire – and get some opinions

1. Tweet today’s quote → 2. Get to work!

You know that old saying: ‘Apps make the world go ‘round.’
Okay, that’s not a real saying. But there are lots of awesome Shopify apps out there that can help take your store’s performance to the next level.
So today, I’m going to share a list of apps which I believe would help your business.
I’ll also guide you on how to get some feedback on your store.
Today, we’re going to:
- Install important apps, including ones for customer contact, GDPR compliance, email popups, and heatmaps
- Get honest feedback from entrepreneurs and everyday people to see what can be improved before you launch
Okay, let’s go.
Apps to install in Shopify
Apps are essentially a must-have for an ecommerce store. But they can quickly become expensive and noisy, especially if you don’t know what to install. Ideally, you want to have apps that make it easy for you to run a store.
Amanda Asks
“What apps would make it easy for me to run Evooli?”
My answer: There’s plenty of them. But I think you should at least have a contact app, an email popup app, a GDPR compliance app, and maybe a heatmap app. Once you can justify the costs, I also recommend an email marketing app.
Below is a quick breakdown of the ones I usually recommend to new store owners.
GDPR compliance app
Because of the GDPR (General Data Protection Regulation) which was introduced by the European Union to secure customers’/visitors’ data, there are now a number of things a store owner has to be vigilant about such as their privacy policies and cookie popups.
In this regard, an app like Easy GDPR + Cookie Bar can help protect your store from penalties and even data breaches.
It presents visitors with a ‘private data modify’ page and a ‘delete’ page, letting them modify and delete their personal data at will. Plus, it comes with a GDPR compatible cookie bar. It can be placed in various places, and is multilingual.

Click here to install Easy GDPR + Cookie Bar on your store and become GDPR complaint with a single click. It’s 100% free.
[highlight]Don’t take this as legal advice. Make sure to do proper research on how to make a website GDPR-complaint. Google should help. [/highlight]
Contact app
Want to give customers an easy and quick way to give you questions, comments, and even complaints? You better.
Easy Contact Form is a convenient app that creates a quick popup form for visitors to fill out when they have a question.
The app delivers an embeddable and responsive contact form that you can put on the ‘Contact Us’ page of your store.
Also, you get to customize the text, fields, background image and tab.

Click here to install Easy Contact Form in Shopify. It comes with a ‘forever free’ plan that places no limit on submissions. Paid plans start at $9.99 a month.
Email popup app
You should 100% have an app that collects visitors’ email addresses. Such leads are crucial for building lasting relationships and generating sales – now and in the long-run. (Plus, privacy laws like Europe’s GDPR require that users opt-in to receiving marketing from you.)
There are plenty of apps you can use for this, both free and paid. A good option is the Sumo app for Shopify. It allows you to create a call-to-action popup which you can use to collect email addresses of people who visit your website.
Additionally, you can configure this app to automatically send follow-up emails when people view your items but leave without buying anything.

Click here to add Sumo to your store. It’s free for up to 200 subscribers. Paid plans begin at $29 a month.
Heatmap app
Heatmaps are visuals that show you which areas of your store a visitor’s mouse (or finger) hovers over, and which buttons they’re clicking the most.
Lucky Orange is a great heatmap tool, but note that it’s not free. It starts at $10/month. However, there’s a 7-day free trial – so there’s no commitment to try it out.
Once installed, it’ll give you an insight into the most interesting and intriguing parts of your store, so you can double-down on what works and abandon what doesn’t.

Click here to install it on your store and create an account to start your free trial.
[highlight]Note: If you decide to use this app, make sure it’s noted in your privacy policy that this behavioral data is being collected and used for advertising/marketing purposes.[/highlight]
It’s unlikely that you’d need more apps than these 4 as you march onward. You’re good to go.
Getting feedback on your store
Taking another look at your store overall can give you a good insight into what your audience may or may not like. But sometimes it’s easy to oversee mistakes when you’re too close to your work. That’s where a second pair of eyes comes in handy.
Whenever I build a store for myself, I ask other entrepreneurs and friends to give me some honest feedback on it.
The reason I do this is to get both perspectives: thoughts of someone experienced and also of people who could answer as my customers would.
That said, I’m always super picky and careful about the people I approach for feedback.
That’s because I don’t want someone to criticize my work just for the sake of it. Very often, in fact, I’ve seen people desperately searching for ‘mistakes’ on a website because they want to give at least some input. It’s, therefore, best to not ask everyone about how your store looks.
To get valuable feedback on her store, I advised Amanda to take these steps:
Join Facebook groups related to ecommerce & dropshipping
I asked her to do this knowing many entrepreneurs join such groups to exchange ideas, share success stories, and provide guidance to beginners.
And the best part is that they’re super responsive. You could just say “I recently built this store. What do you guys think?” and you’d receive loads of feedback from highly experienced individuals.
Here’s an example of a store owner asking for feedback on his dropshipping store:

See the second comment? That’s the kind of transparent feedback you can expect to receive with this approach. Just remember: don’t take anything too personally by them being blunt. Take it as constructive so you can improve.
Some of the groups I recommend joining are:
- Dropship Business Masterminds
- eCom Dropshipping for Entrepreneurs
- Shopify Dropshipping For Entrepreneurs
Since your store is still protected by a password page, you can just include the password in your original post so they can sign in and see it.
Ask your friends who fit into the audience
This is easy. Just take out a few minutes to browse your Instagram or Facebook feed and you’d know which of your friends recently shopped online.
Once you’ve identified those friends, send them a message saying you just launched a new store and would love their honest feedback on it.
As an option, you could also ask them to compare it with the stores they buy from on a regular basis.
If all goes well, you should have some decent feedback to work with.
It could be that you forgot to add something important, like an email popup that gives an incentive to people who’re about to leave your site. Or your product page has jargon that’s difficult to comprehend.
Get rid of all the major and minor issues today, so you don’t look bad on launch day or after.
Day 11 Recap
Today, you:
✓ Installed essential apps for your store to make sure everything runs smoothly
✓ Asked for and started to received honest feedback on things you can improve
Perfect. See you tomorrow.
Day 12: Deep dive into the world of social media

1. Tweet today’s quote → 2. Get to work!

On Day 2, you got a crash course on how to start scouting social media for potential partners and customers. You also learned that social media is an incredibly valuable tool for doing ‘market research’ and ultimately getting closer to success.
On Day 8, you built your Facebook and Instagram accounts and started engaging with these people so they’re familiar with your name.
Now, it’s time to build out your pages and start approaching your micro-influencers.
Today, we’ll:
- Learn some tips and best practices for posting on social media (especially Instagram)
- Message a handful of micro-influencers to ask for ‘shoutouts’ for your store
Let’s do this.
Make your Instagram sexy
If you’re in the type of niche where Instagram is valuable, you’ve already noticed that looks are everything. That’s the whole point of Instagram, after all.
So before you start reaching out to people, you have to build that immediate sense of trust by having a nice-looking page.
If you’re in the fashion niche, this means posting some fashion-related photos. The best way to snatch up some good photos (that you won’t get in legal trouble for using) is to go to my favorite 2 websites: Burst by Shopify and Unsplash.
You can download whatever you see for free and use them however you want. It’s awesome.
There are loads of other websites too, just try Google searching for something like: ‘[items you want] free stock photo.’
Amanda went to Burst and typed ‘scarf woman’ because she wanted photos of women wearing scarves.

Plenty of results.
She repeated the process on a few sites and collected enough to start posting regularly. You don’t have to always post your own products – and you shouldn’t, actually.
Instead of always hard-selling, look for photos that visually represent your brand. For example:
- If you’re high-fashion, choose glamorous high-fashion photos
- If you sell luggage or travel accessories, post photos of beautiful travel destinations
- If you sell pet supplies, post photos of adorable pets
- If you sell home decor, post gorgeous interior design photos
You get the point.
Think about the kind of stuff that ‘goes viral’ and tap into that. Make your page something people can envision themselves into, so they want to look at and talk about it.
You should also use the page for brand announcements every once in a while, like posting about giveaways and contests, sales, etc.
You can even try some ‘behind the scenes’ kind of stuff so people can get to know your brand. Just don’t go crazy with self-promotion – that’s not what social media is here for.

Once your page is lookin’ nice, you’re ready to start reaching out.
Reach out to your micro-influencer list
Whip out that mini influencer database we made on Day 2. The time has come to pitch them on a collaboration.
Since we’re operating on a low budget, we’re going to try the ‘free item in exchange for a shoutout’ route. This one is pretty reliable.
But you should set your expectations – surely you’ll send some free items out, because a micro-influencer (and every other person in the universe) loves free stuff. But that doesn’t necessarily mean that you’ll get sales from a shoutout.
So if your budget is tight, be careful about shooting out free items as fast as those little t-shirt guns shoot out band shirts at concerts.
Just a warning note.
Amanda Asks
“What should I look for in a good micro-influencer?”
My answer: It’s a combination of scouting through their profiles and understanding your niche audience.
Look at these things when you’re scouting their profiles:
- Do their posts, comments, hashtags, etc. fit with the ideal audience you have in mind?
- Look at their past 5 posts. How many likes and comments do they have in relation to their total followers? If someone has 5,000 followers, but only 50 likes and 7 comments on their posts on average… that’s a no-go.
- Read the comments. Do they actually add value? Do they look like they’re from genuinely interested and engaged people, or are they spammy, generic, or weird? Paid likes and comments are very much a thing… don’t be fooled by them.
[highlight]I actually look through their followers’ profiles too. This is also great research, and I add many of these people to my separate list for my direct messaging strategy. Apart from that, you can tell if they’re actually real, engaged people, and you can get more and more insights into your target audience. It’s a big bag of wins.[/highlight]
With these new insights, comb back through the big list you made on Day 2 and re-prioritize the most promising people. Then it’s time for some good old-fashioned chatting.
Send a good message
A good Instagram message shows that there’s a real person behind the account. Introduce yourself by name, be friendly and straightforward, and use emojis to express emotion (if it fits with your audience’s communication style – you can see this in their own posts).
Keep in mind that it will take 10-20 days for an influencer to receive your product. So if you want to get some attention now, you can ask if they’re willing to promote it before they get it.
[highlight]Pro tip: Since an Instagram story is short-lived, many influencers will be willing to do this without even receiving the item yet. Try asking if they’ll give you a shoutout there.[/highlight]
Here’s an example of an initial message Amanda sent:

Amanda knew that she wanted to give these influencers a shot regardless, so she offered them a free scarf first. After they agreed, she asked for their address and scarf of choice so she could send it. (She also offered to send them a discount code to check out themselves, in case they didn’t want to share their address. Only one influencer chose this option, the rest happily gave their address or P.O. box.)
When everything was squared away, she then asked if they’d be willing to give her a story shoutout now while they wait for the scarf.

Here’s an example of a story shoutout she got:

She had about a 70% success rate getting story shoutouts with this approach. Most of them gladly tagged her in a story along with a photo or video of the Evooli website, but a few of them didn’t want to promote something they didn’t have yet. Understandable.
But unfortunately, she didn’t get any sales from these story shoutouts. Womp womp. (She did get some traffic though, so there was a benefit in the end.)
Try different message variations and approaches to see what works best for your audience. And as always, don’t expect a miracle.
This can also be a great opportunity to get ideas about how to work with and co-create with influencers. Ask them if they have any suggestions for how to work together. Be open to trying new things!
Address the criticisms from yesterday
Yesterday, you reached out to some people who you thought could give you some feedback on your store.
If they replied, set aside some time to really examine their suggestions and see if you should apply them.
Keep in mind that whether advice is really ‘good’ or not will depend heavily on who you asked – so don’t feel like you have to change every single thing someone mentioned. However, you definitely shouldn’t ignore anyone either.
It’s a balancing act and a constant state of growth.
I can’t stress enough: there’s no single right answer, and it’s all about testing until you find what works.
Day 12 Recap
Today, you:
✓ Learned how to make a stellar Instagram profile that generates interest in your brand
✓ Reached out to your top micro-influencers asking for collabs and shoutouts
✓ Hopefully got a couple of mentions!
✓ Started to address the criticisms you asked for yesterday
Doesn’t it feel good to get out there and interact with people? When you spread positivity and kindness, you’ll inevitably get it back.
Let’s keep the good vibes going through tomorrow.
Day 13: Get excited (and finalized) for your launch tomorrow

1. Tweet today’s quote → 2. Get to work!

It’s almost here. Are you ready for your launch? Hopefully, you’re feeling confident and prepared – minus a few finishing touches, of course. And we’ll get to those today.
You might be getting stressed about little details here and there that don’t quite feel right just yet. I always say that I try my best not to ‘fall in love with the details,’ because then you find yourself falling down all kinds of rabbit holes and wasting all kinds of time.
We’re going to get it done today, then worry about falling in love with the details later.
Deal? Deal.
Today, we’re going to:
- Finish implementing all the criticisms you started receiving a couple days ago
- Set up the email notifying your giveaway winner(s) using a template we’ll give you
- Set up the email announcing your store launch tomorrow using another template we’ll give you
- Activate and customize your abandoned cart emails – a critical way to save lost sales from people who didn’t finish checking out
- Learn how to create discount codes, if you’ll be using them
- Run through our handy ‘Launch Day Checklist’ to make sure everything is ready
Here we go.
Finish implementing criticisms
Hopefully, you’ve gotten feedback from everyone you asked. And hopefully, you can wrap those up today.
I’d like to remind you once again that the name of the game here is finished, not perfect. You’re aiming for a functional site. You have time after your launch to optimize and make things better, but you’ll never know what you can optimize until you see how you’re performing.
Set up your emails: contest winner & launch announcement
You spent all that time getting contacts through your giveaway. You gotta make the most of it.
Right after you go live tomorrow, you’ll want to send out an email letting people know about it. You can also use this as an opportunity to announce that a winner has been chosen, and that they didn’t win. Then offer them a ‘consolation prize’ in the form of your opening day launch sale.
You could also try making a special sale or discount for only the people who entered, just to give them that feeling of exclusivity.
Let’s go over how to get those contacts, choose the winner through KingSumo, and create two types of email:
- To send to your winner(s) announcing that they won (and including your store launch)
- Your launch announcement email that goes to everyone else
Download the entrants’ email addresses
Log into your KingSumo dashboard.
If you want, KingSumo will randomly choose the winners for you. Just click the ‘Ready to Award’ button under ‘Status’ and it will generate winners and show you their emails.
Copy and paste these so you can email them.
Now, download the others into a CSV spreadsheet. You’ll see that the number of ‘Contestants’, or people who entered your giveaway, is a green clickable link. Click that link.

Click the ‘Export CSV’ button.

[highlight]I’d like to make a note here that Amanda had quite a lot of entrants. She’s a professional marketer, after all. If your list isn’t quite as big, don’t be discouraged. (And if it’s bigger, awesome!) Regardless of your results, just keep on plugging away with these 21 days of advice and your list will grow. Promise.[/highlight]
Set up your winner notification email in Gmail
If you don’t have a store email, you can make an easy, free one in Gmail.
That’s how we can send your emails tomorrow (and however long, until you sign up for one through your domain down the road).
First, write up an email to send individually to each of your winners if you have more than one.
Here’s a quick template. Replace the bracket items with your own details.
| Subject line | CONGRATS! You won our [Zoeva makeup set] giveaway! |
| Email body |
Hi there,
This is [Amanda] from [Evooli]. I’m so happy to announce that you won our [Zoeva] giveaway! If you could please just respond to this email and tell me your name and address, I can have it shipped right over to you. Also, can we give you a shoutout on our Instagram and Facebook pages? If so, please let me know your username so I can tag you in a post. Important note: Please respond in 48 hours, or else I’ll unfortunately have to choose another winner. Thanks so much, looking forward to hearing from you! [Amanda] P.S. – Our store just went live today, woohoo! Check it out. We’ve got a grand opening sale – [buy one blanket scarf, get one free]. |
Easy. It’s a good idea to give them a 48-hour window so you can move onto the next if they don’t respond. Ultimately, it will be nice for you to announce the winners on social media. People love that.
Save this as a draft so you can send it out when the store goes live.
Set up your launch announcement email
Amanda Asks
“How can I get people’s attention with my launch email?”
My answer: Since you just had your giveaway, and people are still anticipating the results, you’ll want to start by telling them they didn’t win. Then once you have their attention, you can offer a ‘consolation prize’ like a custom discount or mentioning your grand opening sale.
Here’s a template idea with a couple different short-and-sweet subject lines.
| Subject line |
Sorry to tell you this…
OR We’re so excited. Celebrate with us! |
| Email body |
Hi there,
This is [Amanda] from [Evooli]. You’re getting this email because you signed up for our [Zoeva makeup set + 3 scarves] giveaway. Thanks so much. Unfortunately, you’re also getting this email because you didn’t win. 😭 But don’t worry! I can make it up to you. To celebrate our GRAND OPENING – and as a special thank you – we’re offering a special deal: [buy one blanket scarf, get one free]! Plus – shipping is always free. You can check it out here: [site link] If you have any questions, you can reply directly to this email and I’ll get back to you ASAP. Hope to see you around, [Amanda] |
It’s 100% necessary that you don’t put anyone’s email address in the regular ‘To’ field of the email. If you do this, everyone will see everyone else’s email, and that’s a massive privacy violation.
Instead, you should put your company’s own email address in the ‘To’ field, and put everyone else’s email address as a ‘Bcc’ (Bcc means ‘blind carbon copy,’ so it hides the addresses of anyone sent through it).
This way, everyone can stay anonymous.
[highlight]Pro tip: From your CSV file (in Excel), you can just copy and paste your entire list into the Bcc section in one go – no need to go back and forth for every person. Super fast. Just don’t forget to pull out the email addresses of your giveaway winners. You don’t want to double email them (especially when one email says they lost the giveaway… talk about mixed signals).[/highlight]

[highlight]Note: Gmail’s max is 500 recipients per email, and 500 emails sent per day.[/highlight]
Just like the other one, save this as a draft so you can click ‘Send’ tomorrow, stress-free.
Create discount codes
It’s really easy to create discount codes in Shopify. In the sidebar, go to the ‘Discounts’ section.
There are 2 types:
- Codes: a customer must enter the code in the box at checkout, or they must click the discount’s link to begin their shopping session and it will be applied to their cart
- Automatic: if the customer’s shopping cart meets the conditions, the discount will automatically apply without having to enter a code or use a link

Let’s go over how Amanda made her ‘buy one, get one free’ launch day promotion for blanket scarves. She created a discount code.
Fill in the code that you want. Make it something easy if you want customers to type it in manually.
Then select the type. Amanda chose ‘Buy X Get Y,’ but other options include a percentage off, a dollar amount off, and free shipping if you’re a store that charges shipping normally.

Select the conditions. Amanda chose:
- Customer buys: 1 item from the collection ‘Blanket scarf’
- Customer gets: 1 item from the collection ‘Blanket scarf’
- At a discounted value: Free
- Max number of uses per order: 1

And then you can set a start and end date, but Amanda opted to do this manually when she’s ready for the offer to be over. So she left this part blank.
You can also limit this to specific products, or make it a percentage offer instead of free. For example, ‘Buy any blanket scarf, get any ponytail beanie set for 50% off.’
You can get really creative with it. Experiment over time and see what your customers get the most excited about.
Customize abandoned cart emails
Abandoned cart emails are so important. In fact, studies show that these simple emails can win back up to one-third of the customers who put items in their cart but don’t check out.
The best part is: Shopify makes these super simple to set up and ship out.
You actually already set them up on Day 10, but today we’re going to customize them.
In your Shopify dashboard, go the bottom left corner. Click ‘Settings’ ➜ ‘Notifications.’
Under the top ‘Customers notifications’ section, click the ‘Customize’ button so we can add your branding.

You’ll see the default branding that Shopify has in place.

It’s a little bland, eh?
Add your logo and select your brand’s primary color for the buttons and link accents.
Amanda’s looked like this when she was done:

Click save, and now all of your automated transactional emails will have this look.
Now, I’ll show you how to edit the text of your abandoned cart email.
Go back to the ‘Notifications’ screen and click ‘Abandoned checkout’ (under the first section ‘Orders’).

Click the ‘Preview’ button to see what your email looks like now.

You can edit the body of the email if you like, but I recommend just changing the subject line to something catchier.
Amanda changed hers to ‘Forgetting something, babe?’ to fit with Evooli’s friendly branding.
Over time, you can keep track of how these are performing and make changes accordingly.
Okay, let’s get to the final checklist!
Launch day checklist
Make sure you’ve got all of these covered before you hit that glorious ‘Disable password’ button tomorrow.
| Orders & payment |
|
| Store front-end |
|
| Marketing |
|
Day 13 Recap
Today, you:
✓ Finished making store edits based on the trusty feedback you got from others
✓ Customized your automated notifications, including abandoned cart emails
✓ Created discount codes for your opening day promotion
✓ Went through every item of the pre-launch checklist to make sure you won’t encounter any maniacal hair-pulling tomorrow
Look how far you’ve made it! You’ve done an awesome job up to this point.
Be proud of everything you’ve accomplished and get pumped for tomorrow. But not too pumped… or else you won’t be able to sleep.
Day 14: The time has come! Launch your masterpiece!

1. Tweet today’s quote → 2. Get to work!

YOU MADE IT. 🙌
Today is the day that you click a button and send 2 weeks worth of hard work out into internet land.
I remember the feeling of launching my first store. To be honest, it was probably 50% excitement and 50% stress. (Amanda weighed in at 49% excitement and 51% stress.)
I was overthinking things a lot, and worried that other people would blame me if I failed. But the truth is: that didn’t matter in the end. Because I learned that people remember your success and they forget your failure. Even if they do remember your failure… it doesn’t last long.
So hopefully you’re hanging in there and you’re remembering why you’re here: to make life better for you.
This is what you’ll need to remind yourself of every day. A successful business is only as tough and resilient as its captain (…that’s you).
Okay, enough with the emotional pep talk.
Today, we’re going to:
- Make your store live
- Blast out your launch-day promotions on email and social media
Let’s launch this store!
Make your store live
It’s kind of funny how much work goes into building a store versus how easy it is to make it go live. It’s just a few clicks.
Go to ‘Sales Channels’ ➜ ‘Online Store’ ➜ ‘Themes’ in the left sidebar.
The screen will have a ‘Disable password’ button. Click it.

On the next screen, uncheck the ‘Enable password’ box and click ‘Save.’

You should see a notice that says your store is live. Click ‘View store’ to check it out!

Yessssss. Take a minute and do a little dance.
Now it’s time to get the word out.
Launch day promotions
Perhaps you’ve heard the phrase ‘spray and pray,’ where you promote something as much as humanly possible, in as many places you can think of, and hope that it works out.
That’s sort of what we’re going for here. (Except without the spam factor, of course.)
We want your site to get in front of as many eyeballs as you can manage. Especially today, but pretty much every other day after this until you’ve reached – and hopefully exceeded – your goals.
So that’s what we’ll do.
Send out launch day emails
Fortunately, those are already prepared and saved as drafts in your Gmail account from yesterday. Click send and they’ll be on their merry way.
Don’t forget to send the separate email to your giveaway winner(s).
Keep an eye on your email throughout the day in case you get responses from your winners, as well as in the event that anyone really does take you up on the offer to reply directly for questions.
Post on your business & personal social media
Obviously, you want to promote the launch through your company’s social media pages.
Here’s what Amanda’s Facebook post looked like.

As for her personal Facebook, Amanda was actually more nervous than excited to tell her friends about her launch. It felt really vulnerable to her the same way my first store felt vulnerable to me – it starts to make you question your own value in case you were to fail.
But ultimately, Amanda realized that this was an irrational fear. In her personal network, she’d only ever been met by love and support.
And this was no exception.
When she posted the launch on her facebook, she got a whole lot of encouragement and congratulations… and some lovably sarcastic jokes. Naturally.

But you know what else happened?
Amanda got 2 sales from this post!
While this was a huge boost in her morale, she wasn’t done yet. She wanted what she called a ‘real’ sale, one that didn’t have the kind of built-in trust from knowing someone personally.
(While I completely disagree with her – I definitely think this counts as a ‘real’ sale – I understand why she felt that way.)
So she kept on plugging to get the word out as much as possible.
To do this, go back to the lists and databases you’ve been compiling throughout these past 2 weeks. Reach out to admins and ask if it’s okay for you to post. Offer them ‘exclusive’ discounts, maybe with a special discount code to encourage them that it’s more special.
There are a lot of things you can do to promote your store. The busier you keep yourself, and the more posts and announcements you make, the greater your chances of getting some sales.
Day 14 Recap
Today, you:
✓ LAUNCHED YOUR STORE! Go tell the world.
✓ Sent out a launch announcement email to your giveaway entrants (and a victory email to the winners)
✓ Promoted your store in as many places as possible without getting yourself flagged or banned
Awesome. See you tomorrow, when we’re back on the grind to do it all again.
Day 15: Promote, promote, promote

1. Tweet today’s quote → 2. Get to work!

Today is your first full day as an ecommerce store owner. How do you feel?
I’ll go ahead and assume you feel an immense amount of relief that it’s launched. Even better, the world didn’t explode. Phew.
But don’t let that sense of relief keep you idle.
It’s the end of your store-building journey, but the beginning of a whole new, never-ending journey of maintaining, promoting, and killing it with your new business.
I like to think that generating sales and loyal customers for your brand is actually quite simple – it just takes a hell of a lot of work.
So now it’s time to keep the momentum you built yesterday and continue to scream about your store from the rooftops.
Today, we’re going to:
- Keep promoting your store as much as you can using the resources you’ve built up so far – we’ll also learn about Instagram direct messages today
- Plan out our Facebook and Instagram posts for the week ahead, and plug them into the content calendar template we’ll give you
Let’s. Do. This.
[highlight]HEY YOU! Congrats. Show the world how far you’ve come! If you haven’t already, download your Calendar now, add your name with a marker, mark “Launched Your Store” on Day 14 as done, snap a picture and post it on Instagram, hashtag: #Oberlo21.[/highlight]
Send some Instagram direct messages
This is an amazing tool that I use quite a lot – and it’s generated me thousands of dollars in sales. My technique is to ask them for feedback on my store, then send them a special discount coupon as a ‘thank you.’
The main goal is creating a positive relationship and building some trust.
But before you go messaging people, there’s a formula you need to know.
This strategy will only work if you have the following things down strong:
- You have to know your audience and how to find them on Instagram
- Your store has to be solid so that they trust you to buy
- Your Instagram page has to be on point
- Your messages have to really be good
If you’re missing any of these, it’s not going to work for you.
Let’s break down how to find people and how to message them.
Find the right audience to message
By now, you’ve got plenty of experience scouting Instagram. This is just a matter of drilling down into the deep corners and getting creative.
For starters, I don’t recommend messaging any ‘micro-influencers’ using this technique. Focus on more ‘normal’ people who don’t have huge followings and don’t seem like they have ambitions to become big influencers.
I already mentioned looking for people based on hashtag searches.
When you first type in a hashtag to search, you’ll see ‘Top posts’ at the top of the page. These are posts from popular accounts. You’ll see that they’ll have thousands of likes.

These are not the right people for this tactic.
Scroll down until you find the ‘Most recent’ category. These are your best shot.

Just like usual, you’ll need to go through each profile one by one to see if they’re actually a good fit for your brand.
Tips for writing good messages
Amanda Asks
“How can I make sure they actually see my messages?”
My answer: Once I pick someone, my technique is to send them the message, then leave a comment on one of their posts telling them that I sent a message. I do this because they often don’t see messages from people they’re not friends with.
To leave a comment on a post, show them you’re a human and you appreciate their uniqueness by commenting on something specific. If they have a passion – say art or animals – comment on that.
Give them some validation and compliments. Who doesn’t like to be validated and complimented? Just be nice.
Amanda used the hashtag tactic we just discussed. She also messaged people who liked her Instagram posts, because they were already somewhat familiar with her brand.
Here’s an example of a message that Amanda sent to someone who recently liked one of her posts. She saw that this person frequently posted amazing makeup looks she created:

Then she sent her a direct message that looked like this:

When you start out, try a few different types of messages. Switch up your introduction line, the types of things you say, what you ask them for, and how you ask them. Also, switch up your discount amounts to see what works best.
Remember: Don’t offer them more than you can afford!
After Amanda got some feedback, she sent her discount code as a thank you.

See? A little kindness goes a long way. I always say that all you have to do is give.
[highlight]As you can see, this is a very hands-on technique and it takes a lot of work. I recommend messaging at least 10 people per day (complete with 10 comments per day to let them know you sent a message). Set aside 2 hours each day from now on to send comments and messages and answer the ones who respond. Your response rate might be as low as 1 in 10 – but don’t get discouraged! Just keep plugging.[/highlight]
Write social media posts for the week
There’s a lot on your to-do list. And it won’t get shorter anytime soon.
That’s why it’s a really, really smart idea to plan out all of your social media posts in advance.
Here are some tips:
- Keep scouting to make sure your photos are all eye-catching and visually appealing
- Have a dedicated image folder on your computer (or phone) so that you can easily find them all and have a record of past photos
- If you want to save some time, you can just have very similar posts between Instagram and Facebook – just use less hashtags on Facebook than you do on Instagram
- Use a ‘content calendar’ spreadsheet to write up everything in one place
We made a social media calendar for you to download and use. Find it on the 6th tab of our templates spreadsheet. The tab is titled ‘D15: Social Media Calendar.’

You should post once a day at the very least, and make sure to use lots of relevant hashtags on Instagram. For optimal results, you can post several times a day. This will get you more followers and more engagement faster.
Ideas for posts:
- Pretty much anything niche-relevant and visually appealing that you can find on free stock photo websites
- News, current events, or popular ‘gossip’ in your industry
- How-tos, tutorials, tips, and ‘life hacks’ that your audience might find relevant
- Polls and questions to get some engagement from other users
- Announcements for your store’s news and events, like new product lines, sales, etc. (as I mentioned before – don’t get too salesy here)
As you’re scouting for ideas, you’ll likely see more than just a week’s worth. Write every idea down so you have more juice for next week’s schedule!
Day 15 Recap
Today, you:
✓ Continued promoting your store like we’ve been discussing since Day 2
✓ Learned about proper etiquette for sending Instagram direct messages to get feedback and one-on-one sales
✓ Created a social media calendar for the next week so you don’t have to get distracted scouring the web for post ideas every day
Excellent. See you tomorrow.
Day 16: The Holy Grail of data – Facebook Ads
 1. Tweet today’s quote → 2. Get to work!

Now, once you’ve launched a store and gotten the word out, it’s time to knock on your potential customers’ door.
Unless you’re a well-known personality, traffic and buyers won’t come to you on their own, so it’s up to you to find ways to reach them.
There are multiple ways to get people’s attention, but perhaps the most effective option is to use Facebook Ads.
However, a Facebook ad won’t do anything on its own – it needs an audience to work.
Today, we’re going to:
- Choose an audience to target with Facebook Ads
- Install essential Facebook Ad tools
Let’s go.
How to choose the right audience
One of the main reasons why I advise aspiring entrepreneurs to use Facebook Ads is interest-based targeting.
Essentially, if you know what your potential customers are interested in, your ads are likely to be able to show up in their news feeds.
Amanda Asks
“How can I make sure the right people are seeing my ads?”
My answer: Facebook’s ‘Audience Insights’ tool is a great way to figure this out.
Let’s take a look.
Facebook Audience Insights
It’s a tool that lets you analyze a broad interest, as well as find a relevant audience.
To take advantage of it, open your Facebook Ads Manager and click on ‘Audience Insights’ as your first step.

Put in a broad interest of your niche, for example, ‘fashion accessories’ in the Interests section and see the results.

Facebook will show you an estimated number of individuals related to the interest you just entered. Scroll down to see the age, gender, relationship status, and education level of the people interested in the niche.

It’s apparent that women are more interested in fashion accessories than men.
Next, click on the ‘Page Likes’ tab to get ideas for narrower targeting.
Because Facebook allows you to target audiences who ‘like’ specific pages, the research you do here can serve as a foundation for your ads targeting.

Look through the listed pages and check which of them are relevant for you to target.
For example, Amanda could target young females who are interested in Refinery29, The Mint Julep Boutique, and Bath & Body Works.
You could also directly put the name of your product in the interest section and see the Page Likes tab to find relevant ideas. Here’s what Amanda saw when she put ‘scarf’ as an interest.

I explained this with the help of a broader category because Facebook may not generate enough data for every product out there.
Jot down relevant pages to list as ‘interests’ in the Audience section of the Facebook Ads setup window.
Additionally, you can get ideas from the ‘Suggestions’ feature present in the same window.
Suggestions for additional interests
You can find the ‘Suggestions’ feature under the Audiences section when creating a Facebook ad. Click it after putting in some interests to get more ideas.
Here’s what Facebook showed as suggestions for Amanda’s product:
In this image alone, there are 9 new interests that a fashion entrepreneur like Amanda could add to their list.
Age, gender & location
Besides interests, you can also target an audience based on their age, gender, and the region/country/city/town they live in.
When you’re just getting started, the trend says to target the big 4: Australia, Canada, the United Kingdom and the United States. But based on my personal experience, there’s nothing set in stone about this one.
For example, one of the stores I built got orders from European countries.
So you’re better off testing different regions instead of making assumptions on where your customers will actually be.
[highlight]Note: Shipping viability is crucial. Make sure you choose locations where your supplier is capable of shipping. It is going to be a waste of time and effort to target people in Germany if your supplier doesn’t ship to Europe. Hence, double-check if your supplier is okay with shipping to locations you’re planning to reach with Facebook Ads. [/highlight]
For the gender, I advised her to choose both male and female for her initial Facebook Ads test run. That’s because she was launching her store near the holiday season, a time when a lot of men buy gifts for their sisters, cousins, spouses, etc.
I also advised her to choose an audience between 18-65+ (the default setting for most Facebook advertisers).
Here’s what her first audience looked like:

Overall, Facebook Ads make it easy for dropshipping entrepreneurs to reach relevant audiences, so they’re the ideal route to take for getting that first sale.
Facebook Ad tools to consider
Creating a Facebook ad can be a bit tedious.
Besides choosing an audience, you have to come up with an intriguing design, find a way to compare the performance of one ad creative with another, and more.
Fortunately, there are tools you can use to relieve some of these burdens.
Canva
I’m a big fan of Canva.
It’s a simple ‘drag-and-drop’ tool that any entrepreneur can use to design Facebook Ads.
There are plenty of free stock images and illustrations in Canvas’ library that you can use on your design.
Alternatively, you can upload your own image by dragging and dropping it into Canva.
They’ve even care of the dimensions that images need to follow for standard Facebook Ads. So you won’t have to resize or crop anything.
Plus, you can use Canva’s text tools to put a text overlay over your image and achieve amazing typography.
Here’s an example (I created one using Amanda’s product):

In a nutshell, you don’t need to hire a professional designer to create attention-grabbing Facebook Ads.
Just use Canva if you have limited design skills or are pressed for time.
Photoshop
You’ve probably heard of this tool.
Photoshop allows users to create graphics for Facebook Ads, enhance or tweak product photography, and make banner advertisements for sales and discounts – just to name a few of its capabilities.
However, it can take a while to get used to its functions, which is why I recommend Canva for beginner dropshippers.
If you’re familiar with Photoshop as Amanda is, you can use that too.
Someone with basic design skills should stick with simpler tools, especially if Photoshop isn’t already installed on their computer.
If you’re curious, Photoshop costs $10 a month via Adobe’s Creative Cloud subscription, whereas a boxed copy typically costs more than $500 (equal to Amanda’s whole budget for her dropshipping venture).
Facebook Ad Compass
Facebook ad reports can appear a bit dry in terms of aesthetics, so I you can use Facebook Ad Compass.
Created by AdEspresso, Facebook Ad Compass presents you with beautiful ad reports that highlight key engagement metrics like reach, clicks, and CPC.
You can simply use your Facebook account to access Compass.
Choose one of your twenty recent ad campaigns and enter your email. You’ll then receive an email reply with a link to a beautiful report.
Here’s an example:

In the event that you aren’t satisfied with your ads’ performance, you could simply use another free tool from AdEspresso to work toward improving your next campaign.
The Facebook Ads Gallery from AdEspresso offers access to over 600,000 Facebook ad examples.

There’s no need to login to see the good and not-so-good out there. This may give you a fresh perspective for your next round of ads.
That’s it for the tools.
In the next chapter, I’ll take you through the steps Amanda took to launch her first Facebook Ads campaign.
Day 16 Recap
Today, you:
✓ Dove into audience research using the awesome tools Facebook has available
✓ Chose an audience that you’ll use for targeting your first round of ads tomorrow
✓ Installed a few Facebook ad tools to enhance the experience
Great. See you tomorrow.
Day 17: Set up round 1 of Facebook Ads

1. Tweet today’s quote → 2. Get to work!

Now that you’re familiar with your audience’s interests and potential targeting ideas, it’s time to make your first ads.
There’s one very important thing to keep in mind here:
[highlight]In your first several rounds of ads, you’re essentially buying data on your potential customers. Do not expect to make a boatload of sales immediately. You have to be patient and give Facebook’s pixel time to ‘warm up’ and understand the right audience for your store. This is likely to take at least a couple of weeks and a couple hundred dollars – if not more. It also helps to have the mindset that your first ads may not be successful and that you’re learning with each campaign rather than wasting money on Facebook. [/highlight]
Today, we’re going to:
- Learn the basics of Facebook Ads strategy, and why you can’t expect immediate results
- Install the Facebook pixel on your website
- Run your first round of ads using Facebook’s split testing feature
Now that you have a bit of ‘expectation management,’ let’s get started.
An overview of Facebook Ads strategy
Ideally, you’ll learn to create an effective Facebook ads formula and learn how to really do well with the platform.
But I’m not going to lie – that will take time and money.
Since our 21 days together will end in less than a week, I’m going to show you how to set up and get started. Hopefully, you’ll be able to build on this knowledge and keep educating yourself after the 21 days is over.
[highlight]Oberlo made an amazing ebook on Facebook advertising – check it out and keep learning![/highlight]
Amanda Asks
“How do I avoid burning money on ads?”
My answer: It’s a whole lot of testing to find what works. But there are some notes to keep in mind about your Facebook Ads strategy:
- You’ll likely need to run more than 10 ads over the course of at least 2 weeks before the Pixel is ‘warmed up.’
- This can be done in ‘rounds’ where 2 or 3 ads run at a time, each ad with a budget of $5–$10 a day. (So anywhere from $10-30 per day total.)
- The purpose of this initial approach is to ‘buy data’ to get insights into your ideal customers, then use that data to tweak your next ads. It likely won’t result in a bunch of sales.
- For every ‘round’ of ads, we’ll change only one element between each variation, like the ad copy, the visual, or the call-to-action (CTA). This is called A/B testing or split testing. By changing only one element, we know exactly what influenced each ad’s performance – if you change everything, you won’t know which elements led to the different results.
- The first rounds of ads will be for the ‘View Content’ conversion goal, then later ‘Add to Cart,’ then finally ‘Purchase.’ Don’t worry, we’ll go through this.
Okay! Let’s go.
Install your Facebook pixel
The key to all the magic that will happen is your Facebook pixel. Facebook defines the pixel as an ‘analytics tool’ that helps measure how effective your advertising is by understanding the actions and behaviors of people who visit your website.
You can think of the pixel as a ‘smart’ tool that progressively learns about the people who are more likely to buy, and then shows your ads to people who fit those characteristics.
Let’s install it.
In the top right corner of the Facebook menu, click the down arrow and go to ‘Create Ads.’

Click ‘Ads Manager’ at the top left and select ‘Pixels.’

Click the ‘Create a Pixel’ button.

Name your pixel. I recommend naming it after your store. Then click ‘Create.’

Next, you’ll be asked how you want to install it. If you’re logged into Shopify in the same browser, it will know (creepy Facebook). Select ‘Set Up Using Shopify (online).’

It will give you your pixel ID, which is a numeric code.
Copy that code.
Now, we’ll paste it into Shopify – just like we did for our Google Analytics tag. Don’t close out of Facebook yet.
In another browser tab, go to your Shopify dashboard. Go to the left sidebar under ‘Sales Channels’ ➜ ‘Preferences.’
Right underneath the Google Analytics section, you’ll see ‘Facebook Pixel.’ Paste in the code and click ‘Save’ at the bottom of the screen.

Now go back to Facebook.
It will ask you to ‘Send test traffic’ to make sure the pixel is working. Type in your store’s URL, click ‘Send test traffic,’ and wait for the little red dot that says ‘No activity yet’ to change to ‘Active.’ This can take a few minutes.

[highlight]Important: Disable any ad blockers you have, because they’ll prevent the pixel from becoming active. Amanda learned this the hard way after staring at this screen for 20 minutes wondering what she did wrong.[/highlight]
Once the red dot turns into a green dot and says ‘Active,’ click ‘Continue.’

Aaaaaand you’re ready to make your first ads.
How to design your first ads
Like I mentioned, it’s extremely unlikely for your first several ads to be real ‘winners’ – this goes for even the biggest Facebook Ads experts.
But there are some general guidelines for creating ads that have better chances of performing well:
- Use really good visuals (also called ‘creative’). If your products don’t come with good photos or videos, find a free (or even paid) stock photo. Trust me, it’s worth the $12-ish investment.
- Don’t add too much text on your creative itself. Facebook recommends against this strategy, and typically, users don’t respond well to a lot of text on visuals.
- Experiment with different types of creative – a single photo, a ‘carousel’ that lets users swipe through multiple photos, and a video can all be effective.
- Write clear, compelling copy. You only have a few sentences. Clearly communicate your product’s value and speak your customer’s language 100% of the time.
- Focus on one product or offer for a campaign. The more specific you get, the easier it will be to build value and create a lead funnel that gets them to click and eventually buy. Plus, if you focus on more items or offers in a single campaign, it will confuse the results and defeat the purpose of our split testing in the first place.
- Every URL should link to a specific product’s page – not a collection page, and absolutely not your home page. Amanda made this mistake by linking to her blanket scarf collection page in her first round of ads. I believe it cost her a few sales because visitors didn’t immediately see the item in her photo.
For Amanda’s first round, she chose to focus all ads on her ‘buy one, get one free’ sale on blanket scarves. She ran 3 ads, using the exact same text (also called ‘copy’) and only changed her 3 photos.
Here are the 3 ads she ran:

- A ‘split screen’ with a woman wearing 2 different blanket scarves, with text saying “Buy one. Get one.” Her logic was that this one clearly communicates the offer.
- A very clean, more ‘high fashion’ style image of an unsmiling woman wearing a blanket scarf with a plain white background.
- A close-up photo of a woman smiling warmly, wearing a blanket scarf on what looks like a city street. Note the twinkling lights in the background that match the holiday season.
Which ad do you think performed the best?
Amanda thought that #1 would win, but she was dead wrong. The winner was #3 by a landslide, then #2… #1 actually performed the worst!
And this is why we do these tests. You can’t operate on assumptions – you have to keep an open mind, try new things, and let the data guide your decisions.
Building your first round
Like I mentioned earlier, your first ‘round’ of ads should include 2 or 3 ads running at the same time, with only one element that’s different between them.
Let’s go through Amanda’s process for building her first round of 3 ads.
In your Facebook, go back to the ‘Manage Ads’ section.
Go to the top left menu and click ‘Ads Manager.’

In the ‘Campaigns’ tab, click ‘Create.’

Click ‘Select Guided Creation’ so we can make full ads.
Under ‘Marketing objective,’ click ‘Conversions.’

Name your campaign something specific so that you have an easy reference point later, when you have a bunch of campaigns, ad sets, and ads and want to easily tell them apart. Amanda named hers ‘VC – BOGO Blanket Scarf’ since this campaign will be set to ‘View Content’ and she plans to test only the BOGO offer.
I recommend naming yours ‘View Content – [whatever you want to focus on].’
- ‘View Content’ means that Facebook will try to show your ad to the types of users who are most likely to click the link to visit your website (view your website content). This is based on their past behavior interacting with other Facebook Ads.
- Once you have some strong data here, you should retarget the customers who viewed your content. This time, you’d use the ‘Add to Cart’ conversion to target the users who are most likely to add your product to their shopping cart on your site.
- Then later, you should target the ‘Purchase’ conversion. This is where the magic happens.
Next, click on the ‘Create Split Test’ option and click ‘Continue.’

On the next page, go to ‘Website’ and click ‘View Content’ from the dropdown menu.
(Don’t worry about the ‘events received’ in this screenshot – Amanda had some previous ad activity. Yours won’t show this.)

Then, in the ‘Variable’ section, select ‘Creative’ in the dropdown.

Next up is the audience targeting.
Choose:
- Location(s) you want to target – choose several if you’re unsure
- Age group – leave this pretty broad so the data can tell you (for example, Amanda predicted that her main audience would be 18-35, but she extended to 45 just to be certain)
- Gender – leave ‘all’ if you’re unsure
[highlight]Take note of the right side, where it shows you the audience size with each new addition you make. Ideally, this should be between 200,000 and 500,000 for your first ads. So keep adding interests until you’re around that number.Take note of the right side, where it shows you the audience size with each new addition you make. Ideally, this should be between 200,000 and 500,000 for your first ads. So keep adding interests until you’re around that number.[/highlight]

Next up is audience interests using the research we did yesterday… and pretty much this whole time.
Type in about 10-20 of the interests you looked up yesterday – consider all the things you’ve seen doing internet research on your niche and products so far. Make educated guesses, but it doesn’t hurt to add some ‘extras’ and let Facebook do its thing.
Under ‘Placements,’ select ‘Edit placements’ and uncheck all the boxes except ‘Feeds’ under Facebook and Instagram.

In the ‘Delivery optimization’ section, select:
- Optimization: Conversions
- Conversion window: 7 days after clicking
- Bid strategy: Lowest cost, then set a bid cap at $5 per day
Then choose the total budget you want to spend per day, or across the lifetime of the campaign (basically the total spend).
Amanda chose to spend $21 per day, split evenly. So $7 per ad for 3 ads. (Facebook recommends that you spend more money… but when you don’t have it, you don’t have it.)

Click ‘Continue.’
On the next page, you can start designing your ads.
Name the first ad. Name them based on the characteristics that are different from the others. Amanda named hers ‘Ad A – Woman in City’ because she knew what this meant.
Choose your creative format. This one is a single image.

Then upload the first photo.

Fill in the details of your ad in the next section. Note that it’s a live preview, so you can see how it’ll look after every change. And you can look at how it will show for all your placements too. So in this case, you can see how others will see it on mobile, desktop, and Instagram.
Add:
- Text: the main text of the post. You’ll link the button to a URL on your site, but you should also paste a shortened version of the same link inside the body. You can use bit.ly for this.

Then add:
- Website URL: the page you want to point to – this landing page should directly mirror your offer, or you’ll get poor results
- Headline: what they’ll see below your photo, next to the call to action button
- Call to action: choose what the clickable button will say
- News Feed link description: additional text – this only shows on desktop, not mobile

Then click ‘Continue to Ad B’ at the bottom. Fill in a name for the second one and scroll down again.
You’ll see that Facebook duplicated the settings from Ad A, so you just have to change the one element you’re testing.
When you’re done, scroll to the bottom and click ‘Test Another Ad’ if you want to do 3, or ‘Confirm’ if 2 is enough.

Boom.
I strongly recommend that you just leave these alone for at least 3 days. It takes a few days for Facebook to ‘stabilize,’ so the results for the first couple of days can be misleading.
We’ll check back on Day 21 and discuss options for your next moves once you have some results.
Continued education
I wish we had the time, but I couldn’t possibly cover all there is to know about Facebook Ads. That’s why I strongly recommend that you keep learning more as you go.
Day 17 Recap
Today, you:
✓ Installed your Facebook pixel on your website
✓ Got familiar with the general split testing strategy you’ll be using from now on
✓ Learned some ‘best practices’ and traits of winning Facebook Ads
✓ Set up your first round of split testing ads based on yesterday’s research
Score. See you tomorrow when we look at Google Analytics to see how your store is performing so far.
Day 18: A dropshipper is nothing without their analytics

1. Tweet today’s quote → 2. Get to work!

Ah, analytics. There’s no better way to see how your store is performing. After all, it’s cold hard data that shows you how visitors (and hopefully customers) are interacting with your store.
Shopify has some great analytics tools, like how the ‘Home’ screen of your dashboard shows you things like your sales, sessions, top product breakdowns, top pages, and more.
On top of that, we installed Google Analytics, which gives you some pretty amazing details.
[highlight]Google Analytics is incredibly in-depth. I couldn’t possibly cover all the features – that’s another week in itself. I’ll go over the key points to know, but I strongly encourage you to poke around on your own and explore all the awesome things you can find. Making the most of this tool will be a learning process that won’t happen overnight.[/highlight]
Today, we’re going to:
- Learn the basics of Google Analytics and the data that it can offer
- Look at the Home, Audience, Acquisition, Behavior, and Conversions tabs
- Explore how we can apply these insights to your efforts
Let’s go.
Home
On the ‘Home’ dashboard, you’ll find an overview of the selected timeframe that shows information including:
- How many visitors you had
- Total revenue you’ve earned from sales
- Conversion rate, or the number of people who did an action you set
- Number of user sessions, which includes people who visited more than once
- The time of day that the most users were on your site
[highlight]The time of day feature is pretty neat… you can keep track of when certain marketing efforts ‘went live’ – like an email sent or an influencer’s shoutout post published – and see what time of day the most people came to your site afterward. This can help you optimize the best time of day to launch certain efforts and campaigns.[/highlight]

Scrolling ‘below the fold,’ you can see:
- The major sources of traffic to your website, like social media platforms and other websites
- The geographic location of your users by country, to get a better idea of which countries you should be targeting in your advertising
- The top website pages that your users have visited
- The top devices, so you can optimize for mobile if most people are shopping that way
Audience
Just like all the tabs, when you go to ‘Overview,’ you’ll see a summary of all the options in that category. To drill down and get more details for certain topics, click the different options in the sub-menus below each category.
When you go to the ‘Audience’ tab and select ‘Overview,’ you’ll see:
- Users: how many users you had on each day
- New users: how many people were new users (versus returning)
- Sessions: how many total sessions, including new and returning visitors
- # of sessions per user: the average number of sessions each user had
- Pageviews: how many times anyone clicked any page
- Pages/session: the average number of pages that each person went to during one session
- Avg session duration: the average amount of time that each user spent on your website in a single session
- Bounce rate: percentage of people who only visited only one page during their session before they left the site
It’s worth noting that Amanda’s 72% bounce rate is pretty high. Bounce rates could be for a number of reasons, but she had some issues that caused broken links and 404 errors – this definitely contributed.

When you go ‘below the fold,’ you’ll be able to look at the number/percentage of users based on:
- Demographics: the language, country, or city they visited your site with/from
- System: the desktop browser, mobile operating system, or internet service provider they visited from
- Mobile: the operating system, service provider, and screen resolution that mobile users used when viewing your site
Amanda saw that most of her visits came from the US and UK.
[highlight]Note: She shared her website on her Facebook, so she was able to deduce that the visits from countries like Indonesia, India, Turkey, and Vietnam were likely from her friends who live in those areas. If you have outliers like this, keep them in mind as you read your analytics so they don’t interfere with your marketing plan.[/highlight]

This data can be incredibly helpful depending on your niche. For example, if you’re selling mobile phone accessories, it could be massively helpful to learn that most of your website’s visitors have iPhones.
Even better if you see the exact type of iPhone, which you can find if you go to ‘Audience’ ➜ ‘Mobile’ ➜ ‘Devices.’

Acquisition
This tab shows you your website’s traffic sources, or the websites they were on before they clicked your website’s link.
The top channels are:
- Social: social media like Facebook, Instagram, etc.
- Direct: when people went directly to your site
- Organic search: when they typed a search into Google or Bing (or some other search engine), and your website showed up as one of the search results that they clicked
- Referral: when users came to your site through other websites that weren’t social media platforms
- Other: these aren’t specified

You can drill down into these options to compare different types of campaigns and how they fit into the bigger picture.
For example, if you’ve been giving away lots of free products to get Instagram shoutouts, but barely getting any activity in comparison to other, cheaper methods, you know that it might be time to ditch the shoutouts technique and focus on the more fruitful ones.
Behavior
The behavior tab shows you what people did on your site, like:
- The pages they viewed the most
- Average time spent on those pages
- How many people bounced, or left your site, after visiting one specific page
- How many people left your website from a specific page (‘exit’)

You can see which pages perform better than others, and try to analyze why that is. If there’s a page that’s very often the last page that visitors click before they leave your website, you can try to see if there’s something about that page that’s turning users off.
Conversions
This tab is magic. It can get pretty complex though, so I’ll just show you the basics for now.
Go to ‘Conversions’ ➜ ‘Ecommerce’ ➜ ‘Overview.’
Here, you’ll find a breakdown of transactions and revenue that’s similar to your Shopify dashboard: total revenue, conversion rate, number of sales, average order value, etc.
Amanda Asks
“How can I learn more about the people
who are abandoning their carts?”
My answer: If you go to ‘Conversions’ ➜ ‘Ecommerce’ ➜ ‘Shopping Behavior,’ you can see a breakdown of the checkout funnel, including where people are dropping off.
It looks at all sessions, then shows you how many of those involved viewing product pages. Then out of those, how many people added an item to their cart. Then how many proceeded to the checkout page. Then how many actually completed the purchase.

You can look at how many people are dropping off at different stages of the purchase funnel. Certain clues will give you big insights.
For example, if you have a huge number of people abandoning at checkout, it could be some sort of technical issue or inconvenience with the checkout process.
The important thing is to approach all this with curiosity and critical thinking – there are loads of things you can learn if you dig into all this beautiful data.
Day 18 Recap
Today, you:
✓ Learned how to navigate the dashboard of Google Analytics
✓ Got a crash course to all the awesome capabilities of the Audience, Acquisition, Behavior, and Conversions datasets
✓ Got some tips on how you can apply this data to your own performance
Excellent. See you tomorrow.
Day 19: All hail the power of newsletters

1. Tweet today’s quote → 2. Get to work!

You know you need to remind people about your new store, but you can’t afford to put more time and resources into Facebook ads, and manually sending individual DMs on Instagram can get stressful (not to mention, it puts you at risk of being labelled as ‘irritating’).
Fortunately, there’s a cost-effective alternative available, and it gives you the ability to reach people in a place they visit daily – their inbox.
If you haven’t guessed by now, I’m talking about email newsletters.
While channels like Instagram and Facebook are great for distributing content and reminding people of your existence, they’re also noisy and your message may not reach everyone when you post an update.
A newsletter, in comparison, stands a better chance of being seen and read as it goes out in a person’s email – 58% of people first check emails at the start of their day, and 77% of them prefer this medium for permission-based promotional messages.
Today, we’re going to:
- Create an email newsletter in Gmail
- Go through some newsletter content templates designed to help you get that first sale
Let’s jump in.
Creating email newsletters in Gmail
With Gmail leading your email marketing efforts from the front, it makes good sense to know how to set up a newsletter in this email client. Most entrepreneurs, however, are simply clueless about where to begin. And I don’t blame them; Gmail isn’t popular for creating email newsletters.
That said, I don’t recommend investing in a high-end email marketing tool just to create newsletters, especially if your subscriber count is between 100-200. It’s better to just stick to Gmail and find ways to make it work.
Amanda Asks
“Are there any tools to help with sending newsletters in Gmail?”
My answer: Flashissue is a good one. Let’ quickly go through the steps involved in creating a newsletter with this tool.
- Open flashissue.com in your web browser. When the site loads, click on ‘Sign Up for Free’ to get started.
- Sign in using your Gmail account. If you have multiple Gmail accounts, Flashissue will give you an option to select the one you want to use for sending newsletters.

- You’ll then see the following dashboard-like screen in your web browser.

- Click on the ‘New Email’ button at the top of the screen and then click ‘Themed’ to see a gallery of pre-configured newsletter templates. Scroll through them and choose the one you like.

- When the template loads, what you’ll see is a pre-configured newsletter with content already in it.

- Now if you hover over the various parts of the newsletter, you’ll see that different ‘blocks of content’ are highlighted. These give you the ability to edit the content in the newsletter.

- Click on any block and you’ll be able to change its content in a mini-editor. You’d also be able to insert images inside the blocks. And there’s also an option to add a link to the image.

- Moreover, Flashissue gives an option to add more blocks of content to a newsletter. These can be added in the form of text, image, button, sidebar, and more.

- The final design option you have is the ability to change the background color of your entire newsletter.

- Once you’re finished with the design, you can just go ahead and click ‘Send’ to send your email.
- If you want to save the newsletter you just designed and edited as a template for future use, you can just click on the ‘Design’ button, click ‘Save As (New Template)’, name it, and go to ‘My Templates’ to access it whenever you desire.

- Additionally, you can source content from your store using the Flashissue Google Chrome extension. It will make that content available in a dialog box inside the Flashissue editor.

- You can then add it to your newsletter by dragging it from the dialog box on the right and dropping it into the body of the newsletter.
That’s it for the steps. Now you can send newsletters from Gmail directly to give subscribers an extra nudge.
Another solid reason for using Flashissue is that it allows you to create an email list.
Populating the email list is extremely easy. You can:
- Add people from your Gmail contacts (I advise doing this)

- Upload a .CSV file (using Excel). It’s the one I recommended you to use on Day 13.
After creating an email list, you can just go back to the Flashissue editor, click on the field titled <Select Mailing List…>, and click ‘Send’ to finish off the process.
Newsletter content templates to encourage action among your subscribers
When you’re running an ecommerce store, it can be challenging to come up with new newsletter content ideas week after week. After all, the responsibility of creating a fresh newsletter every now and then on top of maintaining your website is a lot.
The good news is you can always use a newsletter content template to get things moving forward. Here’s a few to improve your chances of getting that first sale.
Template 1
| Subject line | 6 Varieties of (Product name) [Plus, Discounts] |
| Newsletter body |
Hello beautiful,
Have you seen our (product name) yet? (insert influencer name) just did and it rocked her world.
We have six varieties with beautiful patterns. Alternatively, you may find inspiration among some of (insert store name)’s favorite picks below. Have a great day, (personal name) (images of products that have good selling potential) |
[highlight]You could ask the micro-influencers you’ve built a relationship with if it’s okay for you to use the image where they’ve demonstrated the look and feel of your product. Most of them will be happy to comply, since you’ve already sent them a free sample or discount code.[/highlight]
Template 2
| Subject line | Get 50% off on our top 5 (product name) (Today only) |
| Newsletter body |
Hey (subscriber name),
You qualify for a 50% discount on (product name). The offer is valid till clocks tick midnight (time zone). (images of top 5 products (based on selling potential)) Shop now (call-to-action button) |
I hope you now feel more confident in writing newsletter content for your new store. All it requires is a bit of thinking and using what you already have in a smart and effective manner.
Day 19 Recap
Today, you:
✓ Set up a newsletter in Gmail
✓ Read newsletter templates that you can tweak and use for your store’s promotion
Time for bed. See you tomorrow.
Day 20: Take a good, hard look at what you’ve got so far
1. Tweet today’s quote → 2. Get to work!

Can you believe we’re almost done? If you’re not quite elated by your performance so far – don’t be stressed. This is all part of the process.
I had to remind Amanda of this on more than one occasion.
Another part of the process is digging into what you’ve got so far. You may have noticed that I’m big on performance and results data. I think it’s pretty self-explanatory why that’s the case.
So today, we’re going to – you guessed it – look at your data to see how you’re doing.
Of course, your store hasn’t been open too terribly long. So at this stage, I don’t think you need to be making any drastic changes. But every little tidbit of information you can get will equip you to make better decisions as time goes by.
I truly believe that all you need in order to succeed is to spend time doing the work, and let the data tell you where to go next.
Today, we’re going to:
- Have a look at your store using the analytics tools we’ve discussed so far
- Get an idea of the types of signs that tell you when you should change things up
Here we go.
How are your products performing?
Apart from what people are buying (if any yet), you’ll want to see what people are looking at. So let’s direct our attention to activity on your site.
Look at Shopify’s dashboard, if you haven’t looked at it in-depth yet. Click on the ‘View dashboard’ button on the top right corner of the home screen.

Edit the date range to whatever you want to look at (preferably launch day to now), and scroll through the results.
As I mentioned, the results here are like a ‘lighter’ version of what Google Analytics can offer. I would say that if Google Analytics feels overwhelming, you can look at the Shopify dashboard first, then use Google Analytics to dig a bit deeper into certain insights.
Promoted product activity
We’re going to start by looking at the one specific product your Facebook Ad pointed to.
As you recall, we went to the ‘Behavior’ tab to look at the activity that each page received. Let’s go back there.

Go to ‘Behavior’ ➜ ‘Site Content’ ➜ ‘All Pages.’
As you can see, Amanda’s top-performing page was her homepage (this is because she shared it on her Facebook).
The second top-performer was the blanket scarf collection page she was pointing to in her Facebook Ads.
[highlight]Remember: Amanda messed up here. Do not lead your Facebook Ads to a collection page – lead them to a product page instead to increase sales[/highlight]
But for the purpose of this exercise, we’ll look at her collection page anyway.
When she clicked on this page, she saw:
- 164 total pageviews, counting whenever a user visited the page more than once in a session
- 102 unique pageviews, which reflects the number of visits where the user only visited this page once
- 35 seconds average time on the page
- 65.75% bounce rate, meaning that 65.75% of these visitors only visited this one page, then left
- 37.8% exit rate, meaning that this was the last page of the site viewed by 37.8% of all visitors (which means that they could have visited other pages in their session too – but they looked at this one, then left right after)

These numbers could use some improvement. While 35 seconds could possibly be long enough to make a purchase decision (since it’s not a high-consideration kind of item), she only had her friends’ 2 purchases up to this point.
The bounce rate is a bit high. But as I mentioned earlier, it could definitely be the result of Facebook visitors not seeing the scarf from her photo, so they didn’t care to sift through the inventory until they found it.
As for the exit rate, it doesn’t seem particularly unusual given the other stats.
Looking at ‘Behavior Flow’
There’s a silver lining for Amanda – even though she possibly lost some sales by linking to her blanket scarf collection page, she now has more data about which blanket scarves people clicked when they were presented with all the options.
Amanda Asks
“Dangit. Can I at least see which items people are
looking at, to have an idea of what I should promote?”
My answer: The Google Analytics ‘Behavior Flow’ tool is awesome. It can look a bit intimidating, but it can show you the journey of your users’ visits.
Here’s how she looked at the blanket scarves people clicked once they were on the blanket scarf collection page.
Go to ‘Behavior’ ➜ ‘Behavior Flow.’

Told you it’s intimidating. But stick with me.
She looked under the ‘Starting pages’ column and found the URL that described her collection.

Then she clicked it and selected ‘Highlight traffic through here.’

Looking at this highlighted flow, she looked at the ‘(25 more pages)’ group.

To do this, she clicked it and selected ‘Group details.’ Then it showed her all the pages that people clicked from that collection page.

She could see the most popular items, including the scarves she labeled black, blue grey, and colorful.
This is also a way to see which items are getting no love at all, like her yellow one. Apparently no one is into yellow.
It’s still too early to make any definitive judgment calls about taking any products out of Amanda’s store (and perhaps yours too).
But knowing what to look for is important as more time passes. I would say that in about a month, you should do this exercise again, and look at all the products in your store.
Especially for the products you’re running ads for – if they still haven’t picked up steam in a month, you should consider focusing on something else. And use your data and research to determine what that might be.
Day 20 Recap
Today, you:
✓ Looked closely at how your store is performing so far
✓ Learned how to better identify what’s working and what isn’t
✓ Got some ideas about things you might want to do differently moving forward
Tomorrow. Is. The. Last. Day.
I can’t believe it. See you then.
Day 21: Do a happy dance and enjoy your first sale!

1. Tweet today’s quote → 2. Get to work!

Have you gotten a sale yet?! If you did, woohoo!
If you didn’t, there’s still more time to apply everything you’ve learned. Who knows, maybe you’ll get your first sale by the end of the day.
In fact, that’s exactly what happened to Amanda. She was pretty bummed that she didn’t get any sales the whole day.
But just in the nick of time, on the evening of day 21 – someone she had direct messaged on Instagram made a purchase!
Seriously, I can’t make this stuff up. Well… I can. But I’m not.
Today, we’re going to:
- Evaluate the performance of your first round of Facebook Ads
- Run your second round of ads, working off the data from the first
- Keep plugging away at the promotional strategies we’ve discussed throughout these few weeks
- Celebrate your first sale, or at least all the incredible hard work you’ve put in toward making it soon
This is our last ‘let’s go,’ guys. I’m getting sentimental.
Look at how your first round performed
The strategy now is to look at our top-performing ad from round one, then build off of that.
I already ruined the surprise by telling you which ad performed best for Amanda. But here are the performance stats:

(As you can see, Facebook duplicates the Ad Set so that they all have the same name, but you recall that the image of the smiling woman trumped the other 2.)
Looking at the results, you can see that the winning ad only cost her $1.79 per content view, while the worst ad cost $7.55 per content view. Ouch.
Amanda Asks
“How can I tell if my ads performed well?”
My answer: On the surface, you might think that spending $90 to get 28 people to look at your site isn’t so great.
But little did she know, this was actually a pretty decent run.
In fact, after taking a look at the top-performing ad, I had a really good feeling about its potential once she changed a couple things and did some more testing.
So that’s what she set out to do.
Before we discuss some ideas for how to build off round 1, let’s go over how you can dig into your results to get ideas for round 2.
Drill down into performance data
Drill down into performance data
On your ads dashboard, I want to direct your attention to the little dropdown menu that says ‘Breakdown.’ Use this. Use it often.

It lets you break down your results into helpful little bites. For example, you can see your results based on:
- Time: which days got the most clicks. You can use these results to find out when your target audience is most active on Facebook, so you can make sure ads are displaying to them when they’re most likely to engage.

-
Delivery: stats regarding the people who saw your ad (but didn’t necessarily click)
- Age and gender
- Country/region they were in
- Which platform they saw your ad from (in our case, either Facebook or Instagram)
- Which type of device they used to view your ad (desktop, iPhone, Android, etc.)
- The time of day they saw, even down to the hour

-
Action: how they interacted with your ad, including:
- The device they used when they performed the conversion
- How they interacted (likes, comments, etc)
- If it was a video, whether it played automatically or if they clicked ‘play’
- Whether the sound was on or off when the video played
- If you ran a carousel, engagement on each of the photos

Keep in mind that you can apply multiple breakdowns at once to really dig in there. Just make sure to hit ‘Clear all breakdowns’ if you want to start fresh.
Run Facebook Ads round 2
Now that you’ve looked at a bunch of specifics, you can make changes to lean toward those results.
For example, here are some changes Amanda decided to make based on her results:
- The vast majority of her clicks came from the US, so she nixed the international targeting
- She saw a higher proportion of clicks coming from certain states, so she knew to keep those in mind
- The data confirmed her original guess of 18-35 year olds, so narrowed it down from 18-45
- She saw that all of her clicks came from mobile, so she could target those users more in the future – this also meant that her store needed to be 100% on point for mobile shoppers
As I mentioned before, she linked to her blanket scarves collection page instead of the product page for the specific scarf in her ad. So I told her to only link to that specific scarf from now on.
Apart from that, I gave her a few more tips:
- Since the ‘winning photo’ of the smiling woman performed so well, her next campaign should focus on that graphic only – with slight changes to the copy. I also suggested that she put a text overlay on the image to the left of her, since her eyes were looking left. This would direct people’s attention to the offer when they follow her eyes.
- It looked to me like her ad copy was performing pretty well, so I told her to keep it intact for the most part, but just experiment with making slight changes.
- Since she had less than 50 ‘events’ (people who Viewed Content), I recommended to run another View Content campaign until she hit that number. This is because Facebook needs the View Content data to perform well on the next conversion goals (Add to Cart and Purchase conversions).
- For the next campaign, she should try a different kind of offer to get more diverse results. She decided to change her ‘buy one, get one free’ offer to 50% off on blanket scarves.
Keep on learning about Facebook Ads
As I mentioned before, I couldn’t possibly cover everything there is to know about Facebook Ads. If you haven’t taken a look yet, check out this free Facebook advertising ebook from Oberlo.
In particular, you might glean some helpful insights from Chapter 5 about Facebook advertising optimization, as that’s essentially the stage you’re in now.
The important thing to keep in mind is that there’s no single right way to do it – it’s all about tweaking, experimenting, and even having a little fun while you’re at it.
Day 21 Recap
Today, you:
✓ Explored how your first round of ads performed
✓ Created a new campaign that built off the data and success from round 1
✓ Hopefully celebrated your first sale!
And that’s a wrap, my friend.
It’s been an absolute honor that you’ve followed me along these 21 days, and that you’ve stuck it through until the very end.
I can’t stress enough what an amazing achievement this is! Give yourself a pat on the back… throw yourself a party… have a beer (if that’s what you’re into).
Take a few minutes to put aside your to-do list and any lingering stress you might have. Celebrate yourself and all that you’ve accomplished.
It was quite a roller coaster, huh?
And it will continue to be – for as long as you’re an entrepreneur. If there’s only one thing I can promise you, it’s that.
Are you ready to take everything you’ve learned and multiply it by 100 to reach – and exceed – the goals you set for yourself?
It all comes down to you in the end.
You got this.
P.S. If you found this guide helpful, make sure to share it with other aspiring ecommerce entrepreneurs. Share it on Twitter, Facebook, and post a celebrating image on Instagram: remember the hashtag #oberlo21.